Fold Over Cushion
Fold Over Cushion
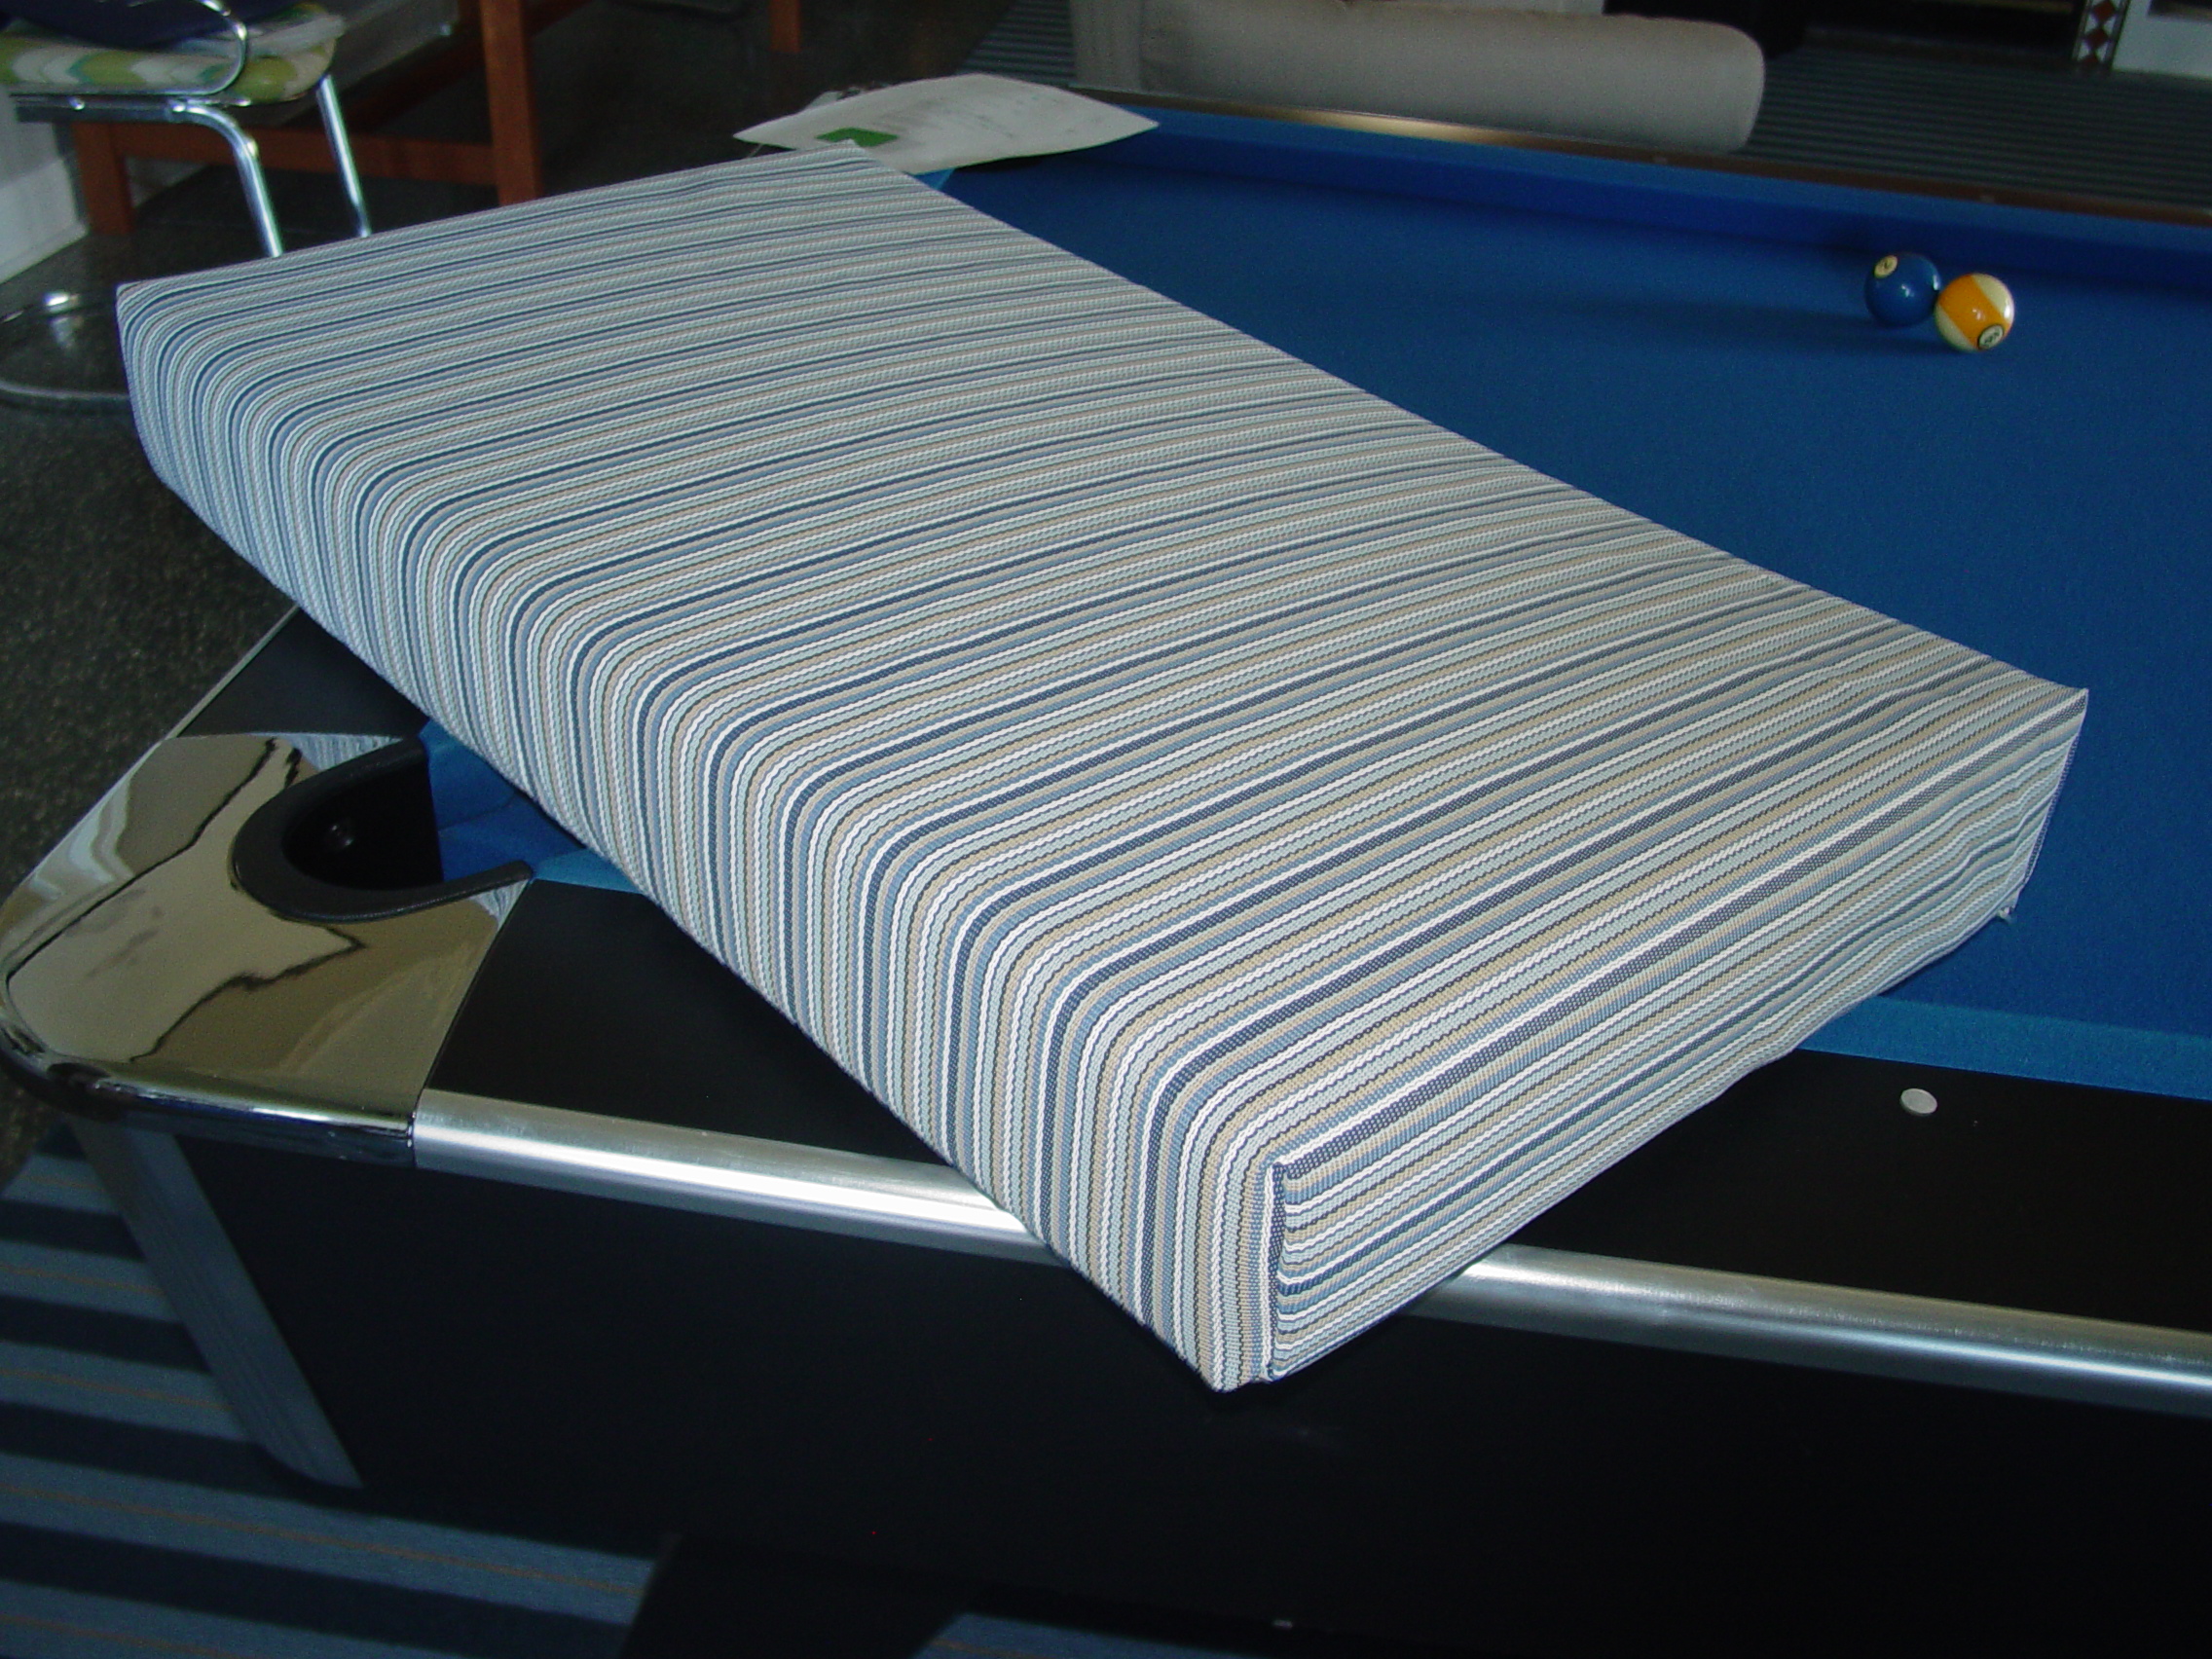
The fold over cushion is just a piece of fabric draped over a foam or fiber filler and secured along the bottom. It is a quick and easy way to build a cushion. Even so, the results are spectacular. In some respects it offers distinct esthetic advantages over the "box" cushion alternative. Any pattern will always be aligned acurately from the top plate into the "facing" (as distinct from "boxing") on the sides. And edge seaming on top of the cushion is replaced by absolutely accurate fold lines (there is no need to worry about straight seams there).
Note that there are two ways to build these cushions. One the one hand they can be independent constructions with a fabric bottom plate. But they can also be permanently attached to a wood or plastic "platform". In either case, construction procedures are exactly the same. The later type, however, can make use of a wide edge allowance to make stapling the cover in place easier (the app adds a 3 inch -- 7.62 cm -- edge allowance instead of the .375 inch -- .953 cm -- seam allowance for fabric backed cushions).
Almost any fabric can be used for a fold over cushion. Of course we all have preferences. I like GeoBella and Sunbrella outdoor fabrics for their stain resistance and durability. But other choices are perfectly acceptable. One important limitation if these instructions are followed to the letter -- the bottom plate (if fabric) has a zipper installed with a simple slit. This means that the fabric used must be one that will not ravel. At Sailrite we almost always use "Cushion Underlining Fabric" here. It breaths and it tends to stick to whatever surface it is on (cushions do not slide) and it is inexpensive. If a raveling fabric is selected for this plate, it will require some kind of sealing hem or binding on the zipper slit edges. Check out the box cushion app instructions for help with this procedure.
I want to display the "7 steps" page from the video here since it succinctly captures the work to be done if a fabric bottom is employed. The platform cushion is made in nearly the same way but without step 3. And the steps 6 and 7 are replaced by stapling the cover to the backing board over the foam.
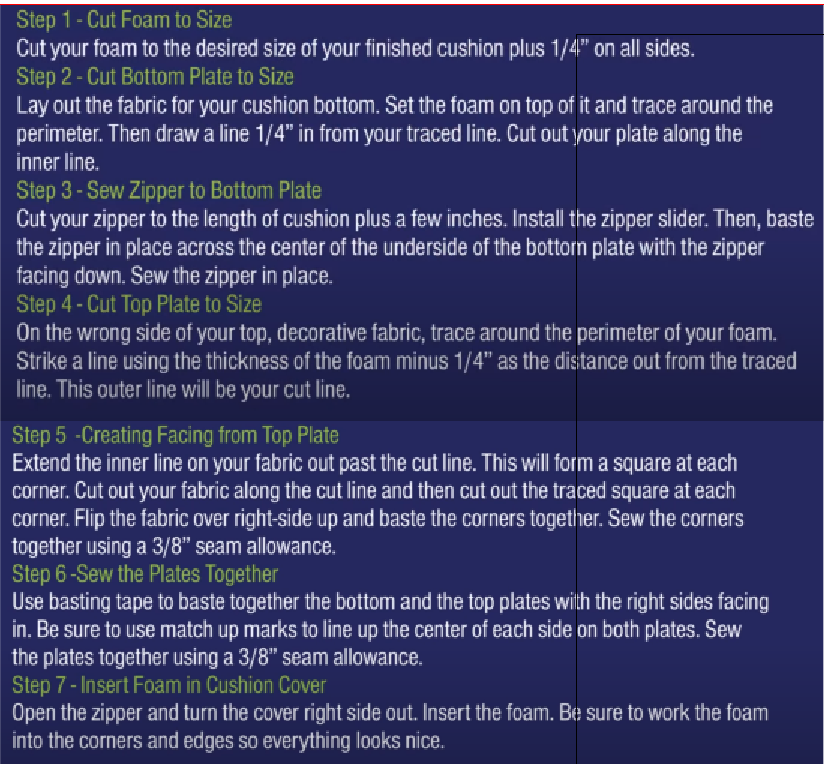
Seven Steps in Building a Fold Over Cushion with a Fabric Bottom
Our customers' biggest concern is often "What measurements do I need and how do I use them to create a proper fit." Let me respond to that question first. The key dimensions for any cushion are determined by where it will be used -- how wide and long and deep is the place to be occupied by the cushion. Given these measurements, we use a simple rule of thumb to cut the foam. It will be cut 1/4 inch (.64 cm) big on each side: 1/2 inch extra width and 1/2 inch extra length. Obviously this rule of thumb dimension might benefit from enlargement in the case of softer foam or in case of relatively large cushions. And if you are making doll house furniture cushions it is certainly too much. But for normal cushion sizes of foam with relatively normal density and firmness, the rule of thumb works! In some of the Apple cushion apps I develop algarithms allowing for variations in foam and size -- although the resulting cushions are fine, they are just not notably better than those resulting from use of the rule of thumb.
If you are making a cover for an old piece of foam, measure that foam and subract 1/4 inch on each of the four sides. These measurements will define the finished size of the cushion.
Now what about the size of the cushion cover, the plates on top and bottom and the facing along the sides? How should they be sized and how should we allow for seam allowance? The video uses the foam as a master pattern. And that can be useful, it provides a kind of "connect the dot" method that simplifies things. And, of course, the Fold Over Cushion App provides complete dimensions that connect dots behind the scenes. Here I want to "explain" these dimensions.
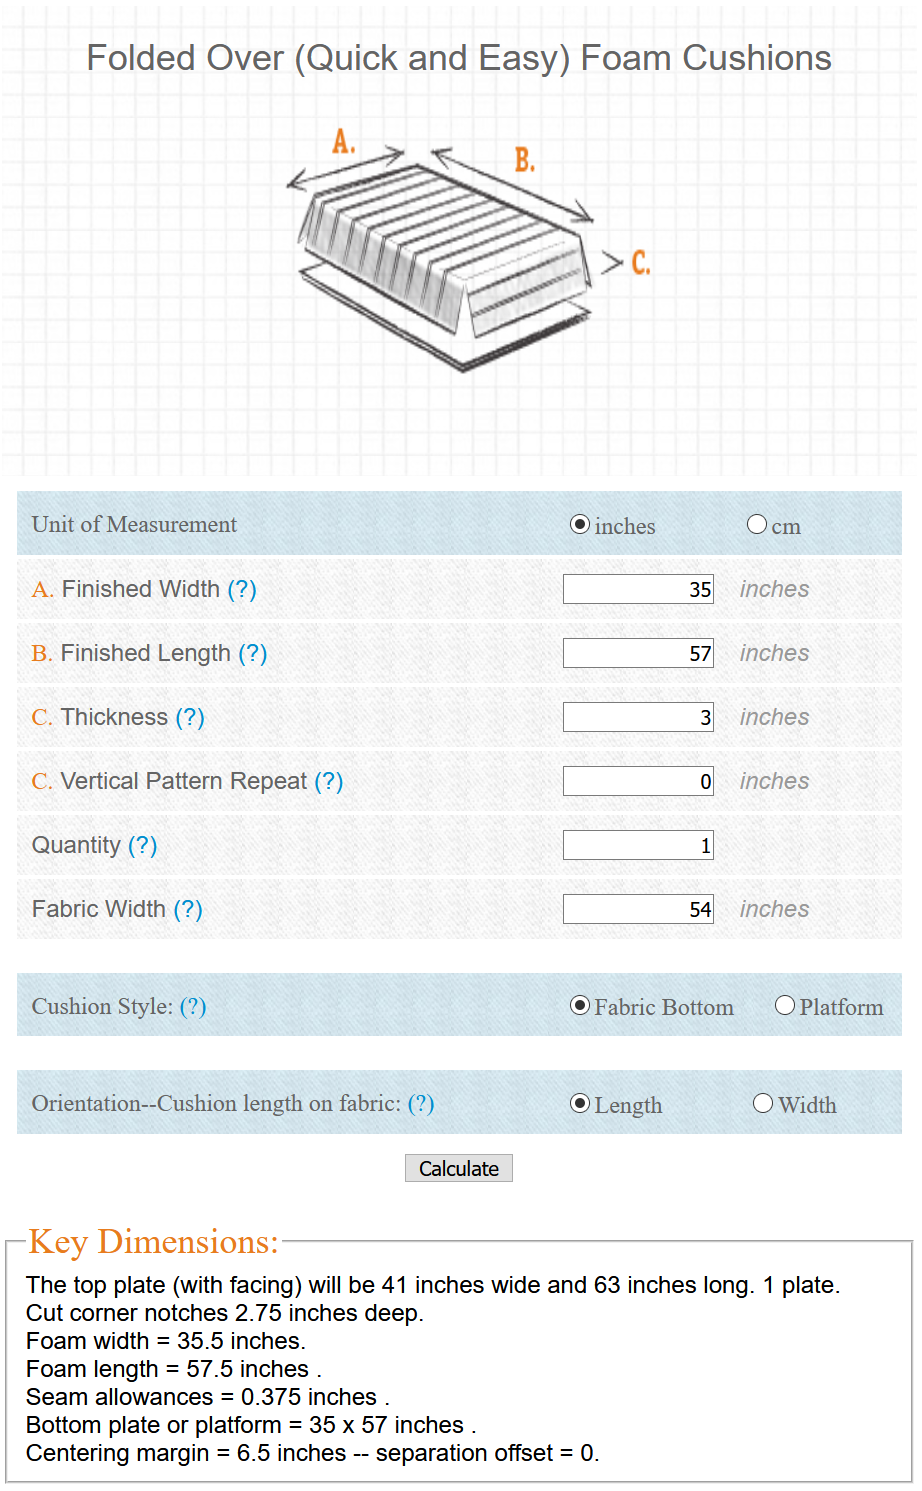
The Fold Over Calculator with Sample Data
Under "Key Dimensions" the top plate in our sample above is 41 inches by 63 inches. Both numbers are derived from the finished width, lengh, and thickness input figures (35, 57 and 3 respectively). The cut dimensions are the finished dimension plus two times the 1/4 inch plus two times the tickness of the foam less 1/4 inch. Thus, in our example, 35 + (.25 * 2) + ((3 - .25) * 2) = 41 and 57 + (.25 * 2) + ((3 - .25) * 2) = 63.
The cushion cover will be cut from a single piece of fabric that we call the "blank". If the blank is wider or longer than one fabric width, there will be two or more panels indicated on the rendition with a dashed black line or lines. If two or more panels are required to make up the blank, they should be sewn together with 3/8 inch (.95 cm) seam allowace. We like to use a semi-flatfelled seam to provide a finished top surface.
To make this seam first apply 1/4 inch basting tape (Sailrite part #129) to the top surface of one panel edge. Keep the tape right along the edge of the fabric. Peel the paper backing away from the tape, revealing the adhesive underneath. Then place the next panel on top of this first one -- the "top" surfaces of the fabric should be face to face.
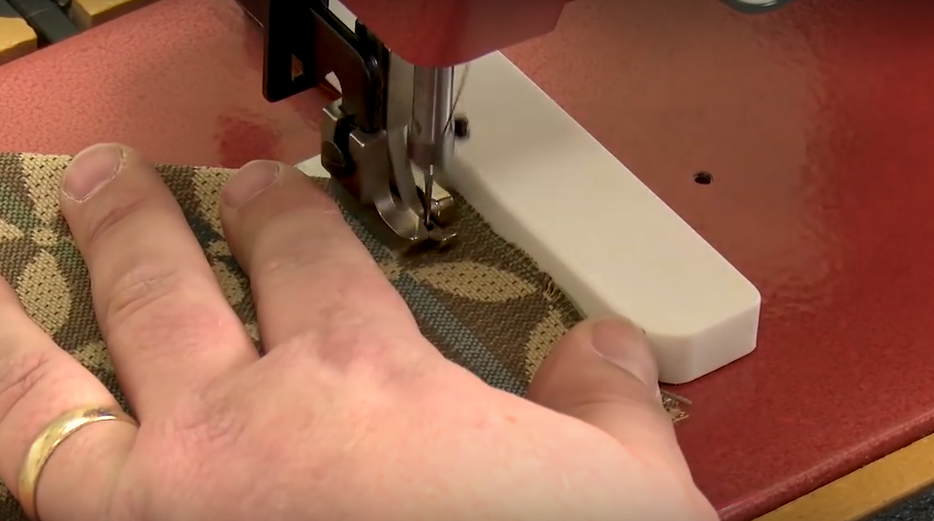
A Magnetic Sewing Guide for the 3/8 inch Stitch Spacing is Helpful
Then run the matched panels through a sewing machine with a straight stitch inside the two edges exactly the width of the edge allowance. A magnetic sewing guide will help keep this stitch straight and accurate, but a strip of masking tape on the machine can also work in this capacity.
When the two panels are opened (as though they were butterfly wings) the seam allowance will be underneath. Fold the basted seam allowance over on one side or the other and press it in place with a warm iron (set the iron temperature appropriately for the fabric). Finish the seam with a row of stright stitches about 1/8 inch from the fold to hold the allowance in place. Click here for more detail.
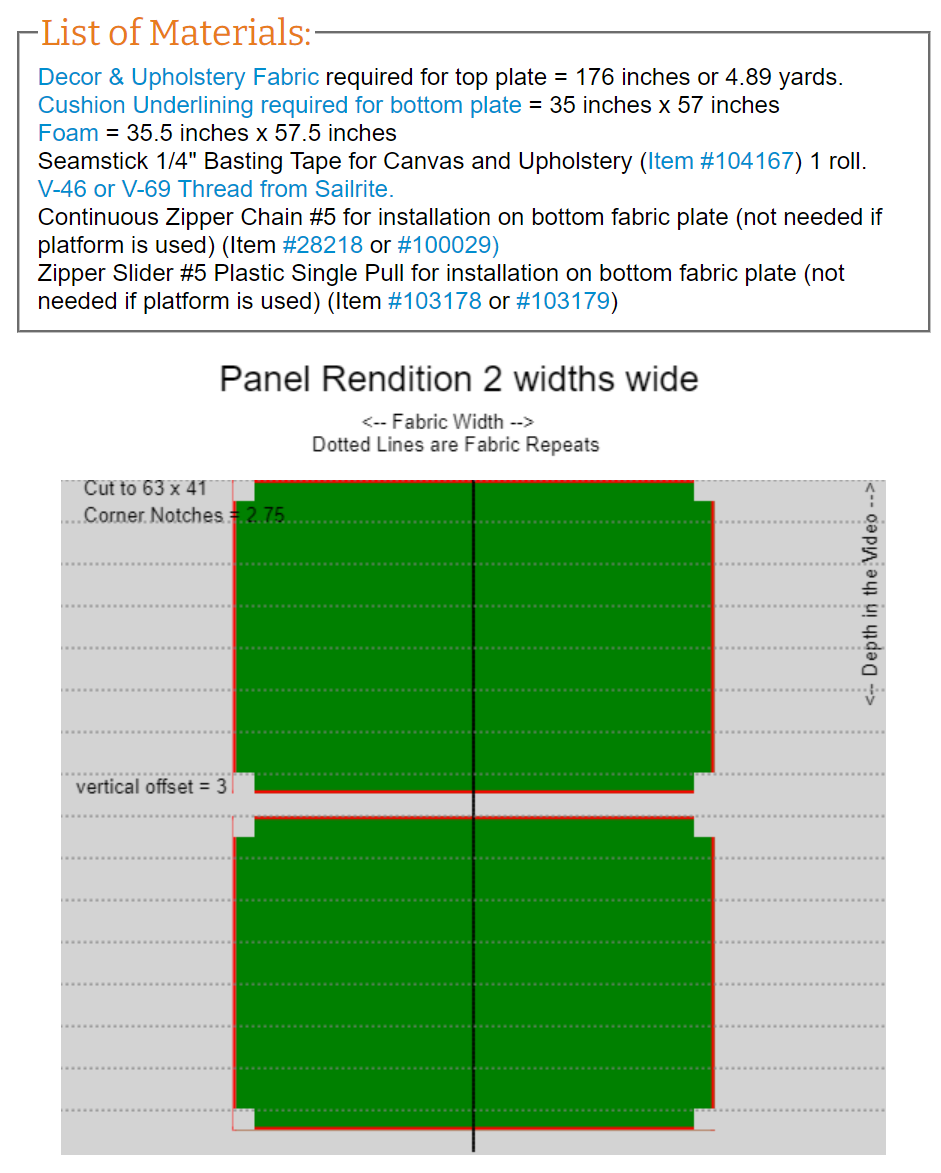
Two Cushions with the Above Dimensions and 5.5 inch Vertical Pattern Repeats
If the chosen fabric has a pattern it is a good idea to keep that pattern in the same place vertically and horizontally from cushion to cushion. The fold over cushion app matches horizontal pattern repeats by centering panels on the fabric blank (whether it is one fabric width or several). To match the vertical repeats on succesive cushions cut from the same blank, displace the cut panels vertically by the remainder of the panel length divided by the vertical pattern repeat. If you enter the vertical pattern repeat in the appropriate input field, the app will automatically calculate the additional fabric that should be ordered. Indeed, the app will indicate the pattern repeat on the rendition with dashed grey lines and vertical offsets will be printed in the key dimensions box along with the centering margins and any separation offsets if two or more panels can be cut side-by-side across the with of the fabric.
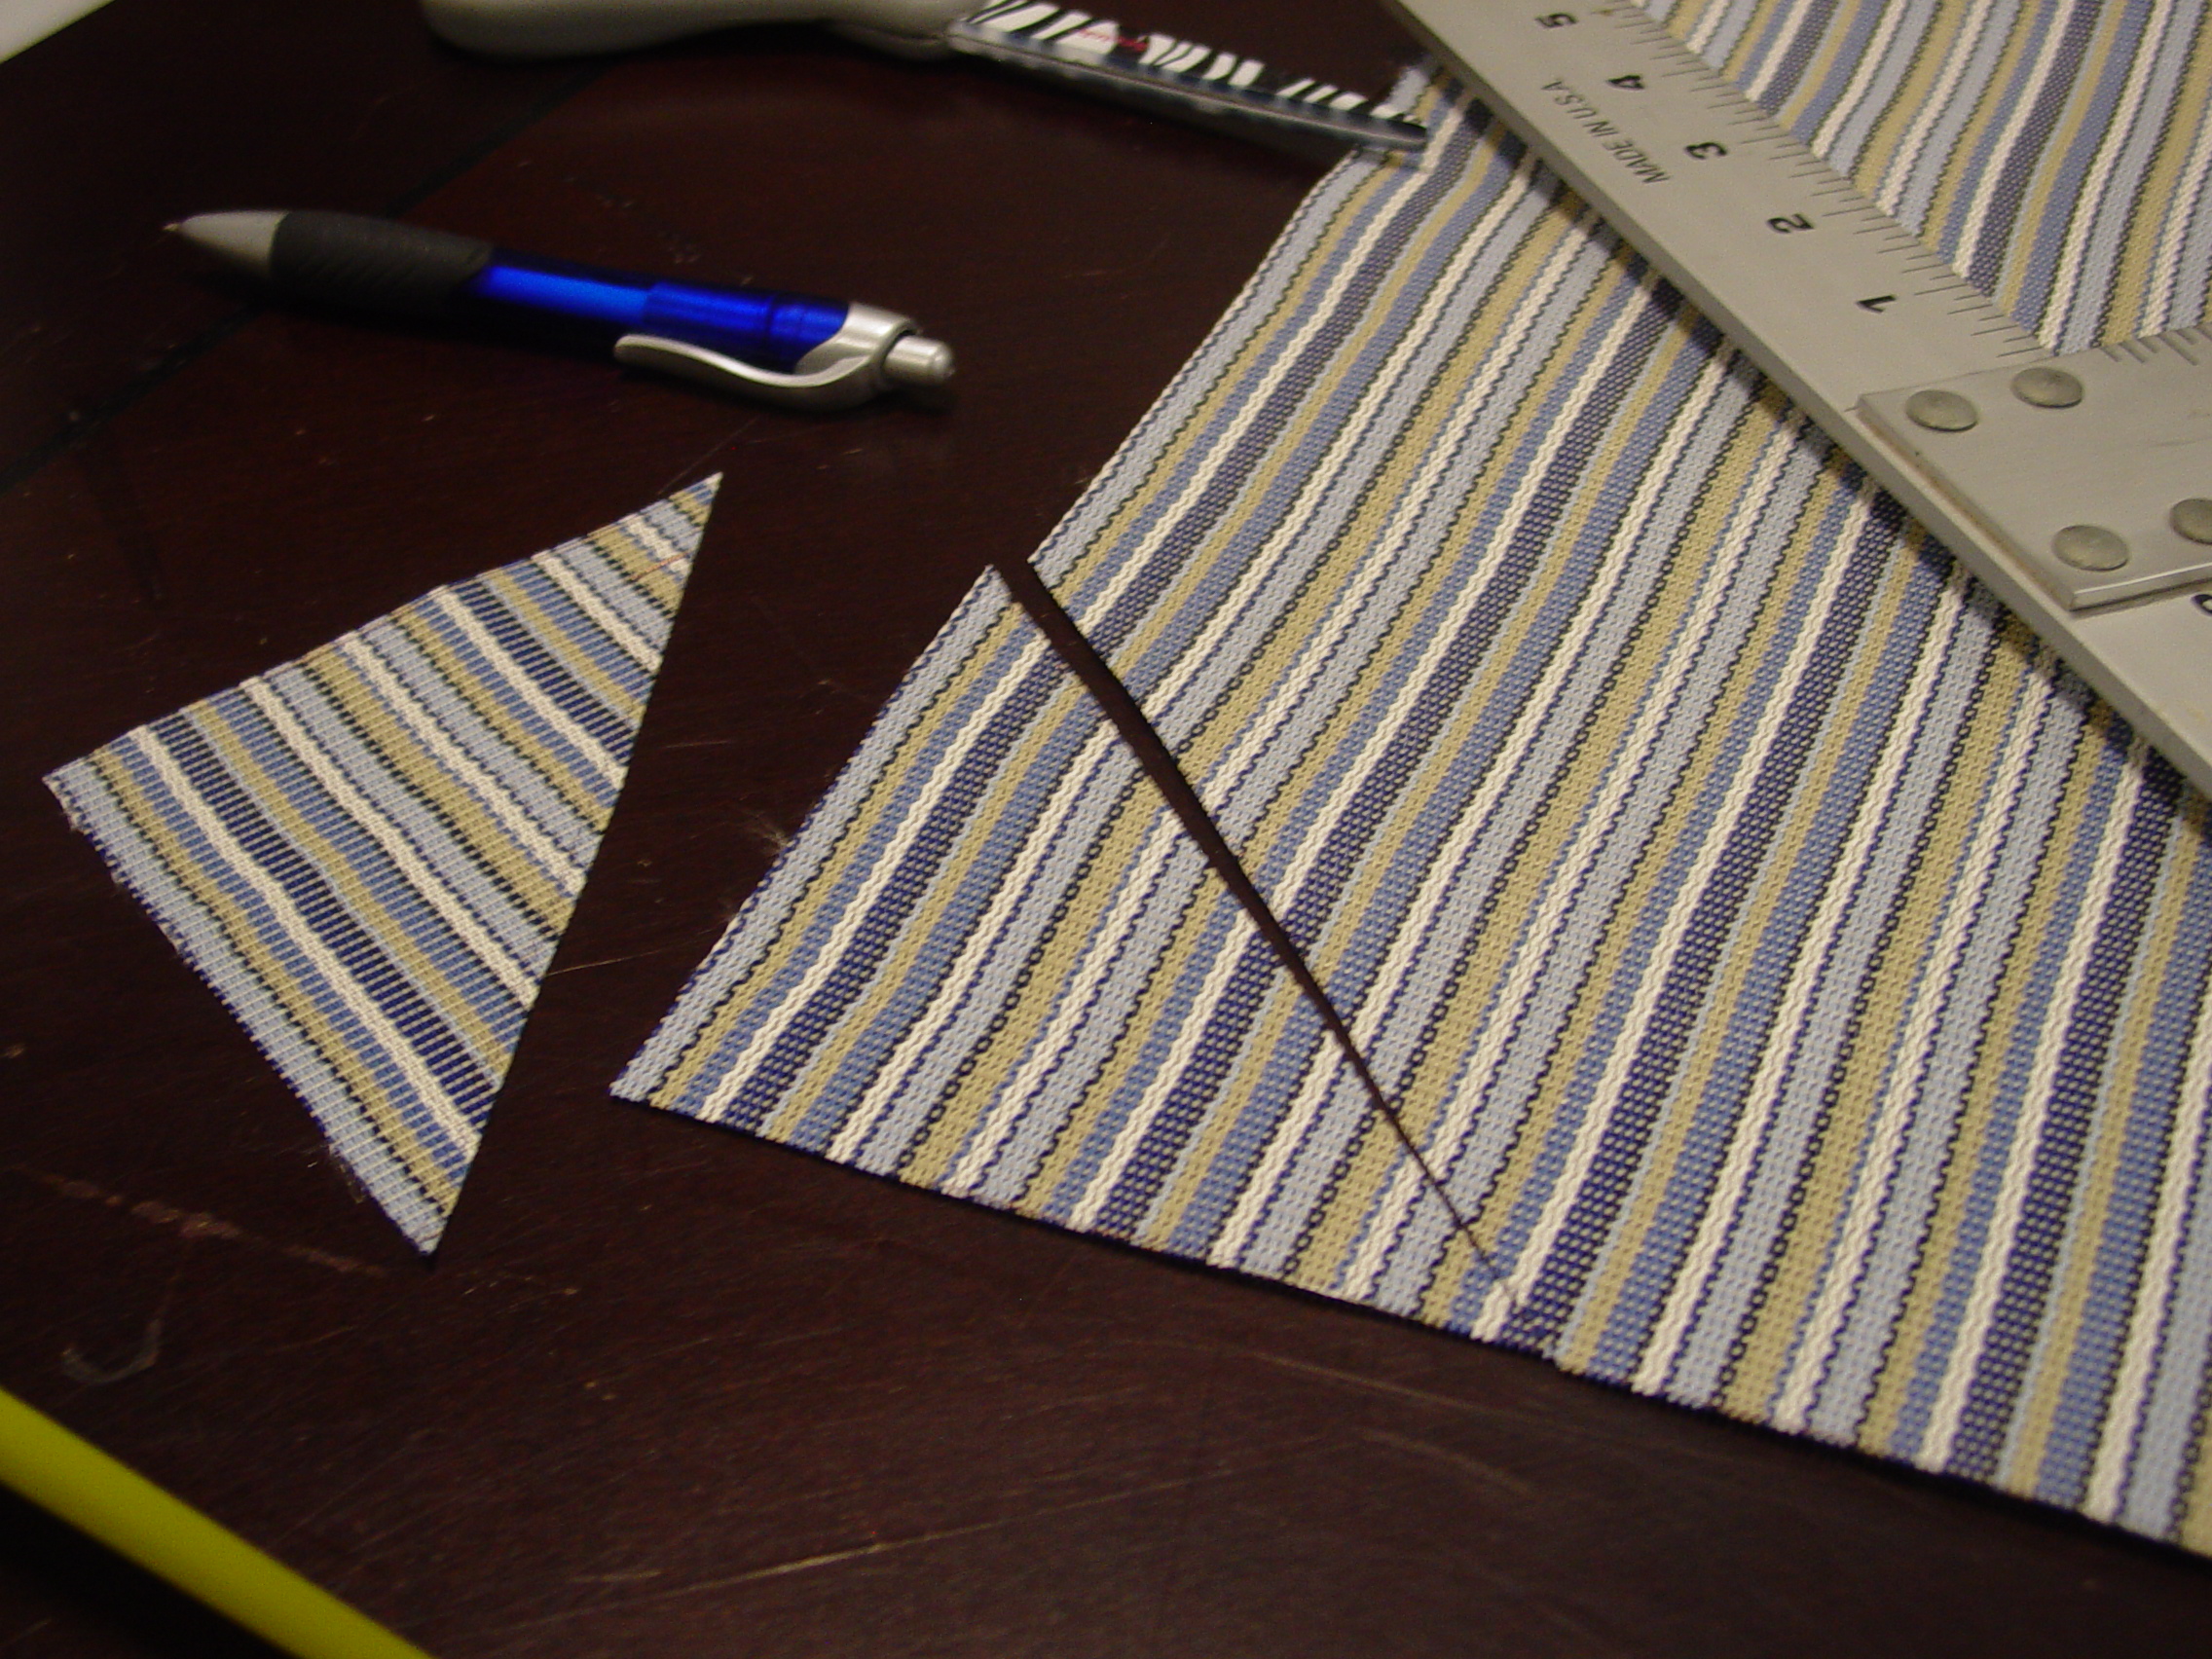
An Alternative to Cutting Squares at the Corners
Cut the cushion cover from the blank using the dimensions indicated on the rendition. First cut the shape as a simple rectangle then cut the corners. These corners are shown as squares and they can be cut away that way, but we prefer to simply cut a diagonal from one inside corner of each square to the other. If the corners are cut on a diagonal as suggested here, it will be a little easier to keep everything lined up when the folds described next are made.
Fold each corner to the top side of the fabric to match up the ends of the corner squares (creating a corner dart if the cuts above were made on the diagonals). If there are squares cut into each corner of the top plate and facing panel, l/4 inch basting tape (Sailrite part #129) applied to the fabric's top surface on one edge of the square can be used to secure the square corners. If corner darts are created this basting will probably not be necessary in order to keep things lined up.
Sew these corner folds in place with a row of straight stitches starting 3/8 inch (.95 cm) inside the point of the fold and perpendicular to the cover edges. Do be careful to keep the row of stitches straight and at right angles to the matched edges. It is even worth going to the trouble to mark the seam lines on the fabric with a carpenter's square. It is not necessary to sew all the way to the cover edges -- stop about the width of the red band at each corner. This unsewn fabric will be folded over the backing plate or it will be sewn to the fabric backing panel. Were it sewn now it would only have to be cut appart later. Be careful to reverse at the end and the beginning of each stitch to lock everything in place.
Note that the cover is sewn inverted. All seam allowances including the large darts formed if your corner cuts were diagonals will be on the inside of the cover when it is turned right side out. Those darts can be cut away to reduce the bulk of excess fabric inside the cover.
The calculator rendition will display a red borders along edges of the rendition plate to indicate seam allowance or platform overlap. If the cushion will have a fabric backing, these red areas will be as 3/8 inch (.95 cm) wide. If there is a platform, they wil be 1 inch (2.45 cm) wide.
Slider Pull Tab Down
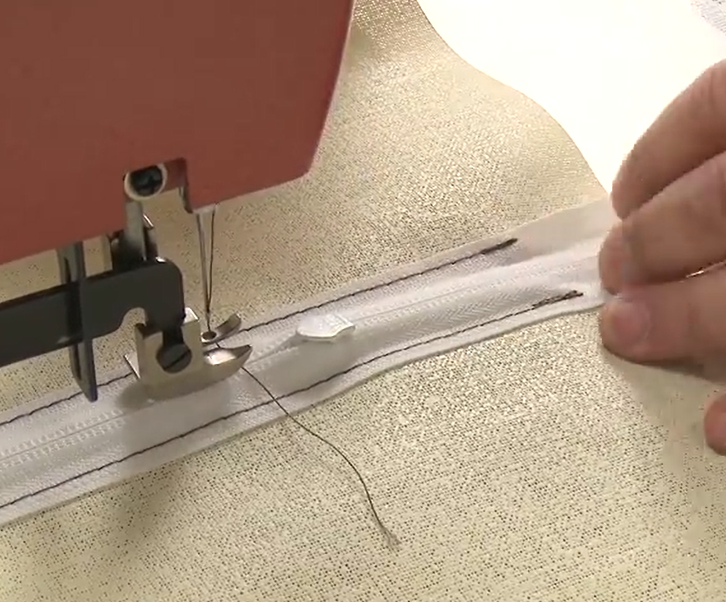
If this cushion has a platform, skip to "Completing a Platform Cushion" below. Otherwise, we assume here that a material unlikely to ravel is used for the bottom plate (we normally use "cushion underlining material" Sailrite part #s774, 768, 772 and 103934). This greatly simplifies the installation of a zipper. Start with a closed zipper without a slider and roughtly the length of the cushion. Run 1/4 inch basting tape along the outer edges. Peal the paper backing off the tape and baste the zipper in place lengthwise down the center of the bottom plate on what will be the inside surface. Run two rows of straight stitches along each tape side -- the stitches should be just inside the basting tape to ensure that the tape will not gum up the slider.
Work the zipper slider on from either end. Be careful to install it so the pull tab is up against the fabric of the backing plate. Then sew across each end of the zipper to lock the slider in place. If the machine balks at sewing over zipper teeth, simply whip round the zipper teeth at both ends by hand with needle and thread.
Slit the bottom plate from one closing stitch to another right down the center of the zipper tape. The slit can be started with a utility knife and then finished with a pair of shears.

Matching Center Marks
Find the center of all the edges to be sewn and place marks on the face up side in the edge allowance. Start the final assembly by placing the bottom plate face up on the floor or on a table. Run 1/4 inch basting tape all round its edges. Peal the paper backing off one side at a time and smooth the appropriate facing edge (with the top plate face down) in place starting from the center marks and working to the ends. Each side can be sewn after basting or the sewing can be put off until all the basting is done. Each stitch line should be just the edge allowance inside the two basted panels. As before, a magnetic sewing guide can be very useful here.
Platform Cushions are finished with the foam in place over the top of the backing board. Turn the top plate with its sewn facing right side out. Carefully push each corner out to the seam line. Then pull the cover down over the foam with the board underneath and staple it in place on the back of the board. We like to start in the center on each side and work gradually to the corners. That is it! The platform cushion is complete.
© 2016 - Sailrite Enterprises