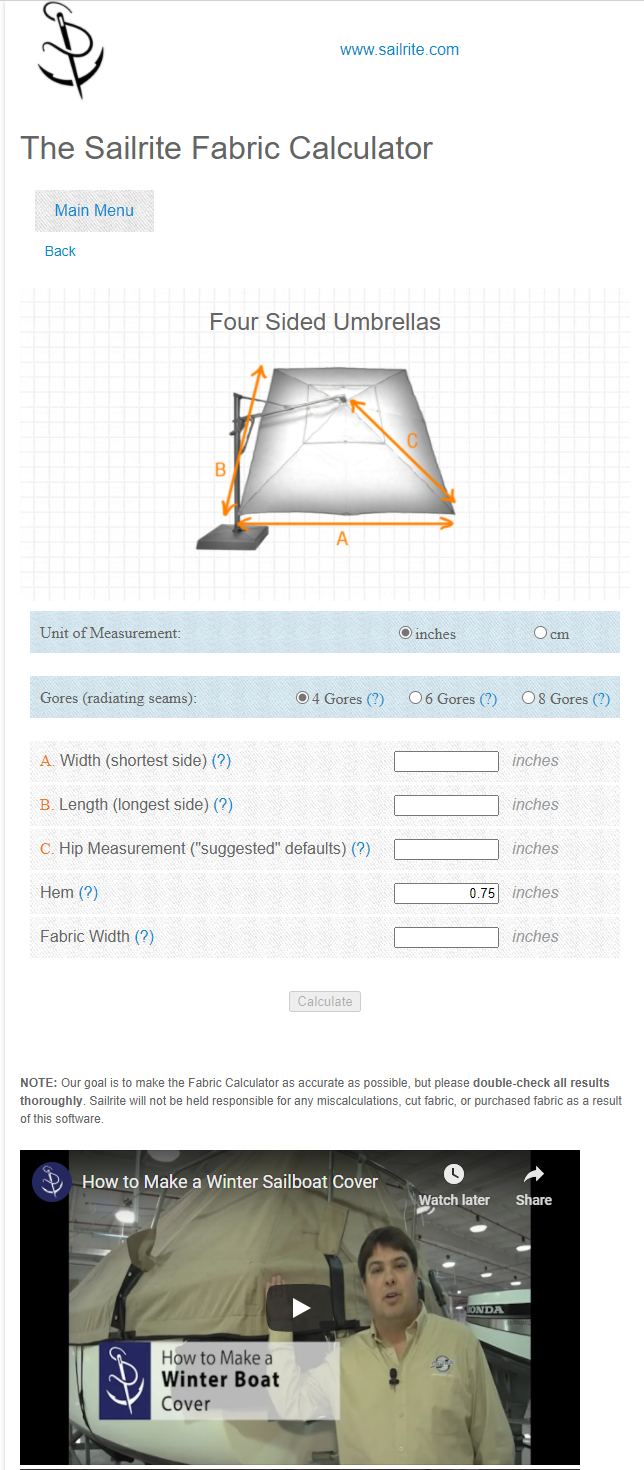
The Opening Screen
This calculator is intended to facilitate the planning required to create a replacement cover for a large four sided sun umbrella. Of course, one alternative to the use of this calculator is to copy the original cover. And, indeed, that cover is likely to provide some useful information. Alas, it is also likely to be worn, streatched, torn, dirty, and rather stiff as a consequence of months and years in the sun. Using this calculator one can accuratlely fit any frame and also determine with great accuracy the quantity of materials required. But before proceeding too quickly, it is a good idea to review a few matters regarding its use. These matters will all be taken up in the video that can be viewed by clicking on the link below the calculator. Even so, it can be helpful to provide a sussinct review here that can be quickly pulled up for review.
There are a couple of ground rules underlying the mathematics of the app that should be set forth at the outset. It is assumed that each umbrella will be made up of a primary set of panels that run all round the perimeter of the umbrella and that there will be a second set of panels that make up a "fly" that covers an opening in the center of the umbrella. It is intended that each of these panel assemblies will not exceed the width of the fabric selected. If your umbrella is too large for the fabric width the umbrella will give a warning and indicate how wide the fabric must be. A wider fabric can be chosen or two or more strips of the current fabric can be sewn together side by side to yield an assembly of nearly twice the original fabric width.
If the umbrella is so small that one fabric width nearly or fully exceeds umbrella width, the app will use only a portion of the fabric width such that a fly opening equal to 15% of the umbrella width is created. This will result in some additional fabric waste, but a fly opening is really neccessary on hot summer days -- it lets the umbrella "breath".
The Opening Screen
There are just three fields that require input: "A. Width", "B. Length", and "Fabric Width". These measurements should be easily understood and obtained. Note that all measurements must be entered as decimal numbers. DO NOT ENTER "100 1/8" or "100 inches" or even 100". Valid entries are "100.5" or "100.75".
There are also two optional fields that default to "normal" values. The hip measurement field is automatically filled with a number that will result in an umbrella with a "peak" (vertical height from the umbrella base to its top when fully raised) equal to 5% of the umbrella's total perimeter. Overriding this number with a larger one will result in a steeper cone shape while a lower number will yield a "flatter" umbrella. Depending upon the frame used, the peak will vary. To accommodate any given frame just carefully measure the "hip" along a frame member from a corner to the center (projected if necessary) -- entering this dimension accurately will ensure the appropriate peak. The hem field is also filled with a default. The hem width may be modified as desired if there are special needs along the edges of the cover.
There are also radio buttons to enable switching from imperial to metric input and output. The default is imperial "inches" but if centimeters are selected the program will remember that choice and default to it when the program is loaded next time. The most recent choice is always the default.
The three radio buttons labeled "Gores (radiating seams)" make it possible to select the number of seams in the fabric making up the umbrella cover. Some prefer to provide a seam over each rib in their frame to provide some chafe protection -- if so, these buttons will be useful. In fact they do not affect the shape of the umbrella at all. The "4 Gore" choice will provide a cover with the minimum number of seams and, thus, the least construction time. The "8 Gore" choice requires the least fabric, but the most seaming labor.
Note that there are question marks following most labels. Click on these to pull up short descriptions of their intended use.
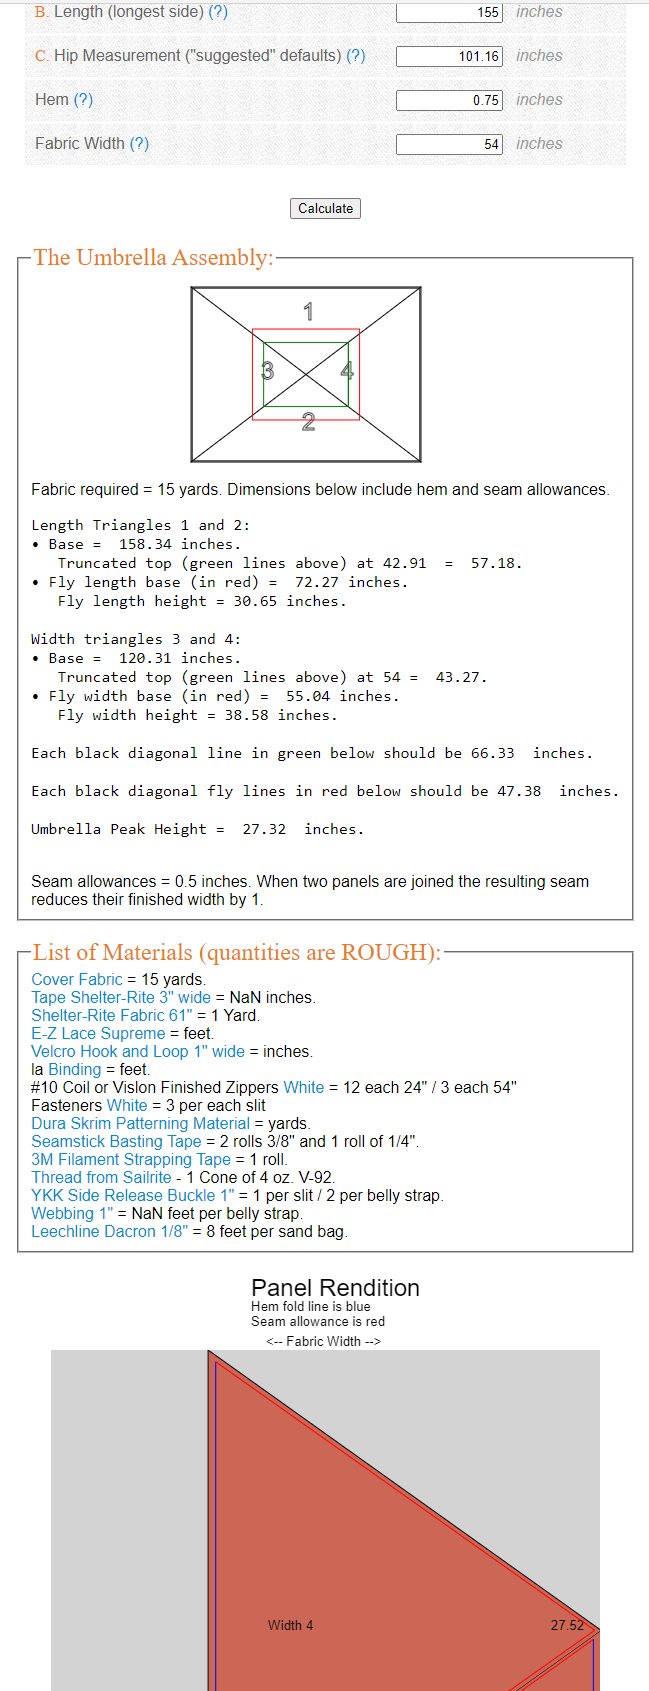
When the "Calculate" Button is Pressed
When the calculate button is pressed there will be a wealth of information displayed that can be viewed by scrolling downward. The "Umbrella Assembly" box features a view of the finished umbrella from the top. The requested number of seams radiate out from the center. The top of the outer panels are indicated in green and the overlapping fly panels in red. This diagram is not to scale.
Under the diagram are accurate figures that define first the total fabric yardage required, then the measurements of all the triangles involved. These measurements can seem confusing (Eric calls this the "JiberJabber" box). But they can be useful in checking on the panels that are cut from the linear dimensions in the "Panel Rendition" that serve as the primary cutting guide. Each numbered triangle is defined with a primary base and truncated height or, in the case of the fly triangles simply a base and height. The fly panels are intended to overlap the primary ones by six inches.
Below the triangle dimensions are the lengths of all the diagonal lines. If the assembly is to fit together, the lines in all the primary panels must be of equal length as must those in all of the fly panels. These lengths can be especially helpful when cutting out the panels displayed in the "Panel Rendition" -- before all cuts measure to be sure the cuts are based on accurate measurements.
The "Peak Height" has already been discussed. This can be used to ensure that the umbrella will fit its frame. A measurement from the upper corner of the frame at its center down to the level of the ribs at their outer ends should match this measurement. It it does not, check your hip input measurement carefully.
The list of materials can be especially helpful if it is used properly. Clicking on the blue highlighted portion of the item description will take you directly to an appropriate page of the Sailrite website where a shopping cart can be filled with selections. When an item has been added to the cart, return to the app and select the next item. The return can be effected by simply clicking on the Umbrella App Tab or the Sailrite Tab can be closed. Each selection will be added to your particular cart in either case so, when the list of items is complete, the order can be placed.

The Panel Rendition
The "Panel Rendition" is a scale presentation of the roll of fabric that will be cut to make panels required in assembling the umbrella. The fly panels are in red while the primary panels are in green. Hem fold lines are in blue. Seam allowances are shown with red lines near the appropriate edges.
Transfer the defining points to your fabric roll as follows. First make sure that the top of the fabric roll is square. A carpenter's square can be helpful here. Then measure down both sides of the fabric as indicated. Note that a number with an arrow before it is used to indicate how far the accompanying measurement is located to the right of the fabric edge, e.g., <--15.35.
Now join these points with lines using chalk or a pen or a pencil (these lines will not show). All diagonals should be measured to be sure that they equal the lengths described above (near the bottom of the "Umbrella Assembly Box"). Then cut. The resulting triangles (some truncated) should match the dimensions given in the Umbrella Assembly Box.
To assemble the panels we like to use the "semi flat felled seam". This seam has the advantage of simple construction which promotes accuracy. It also features one row of stitches that is hidden from exposure to the sun. To create it just lay adjacent panels top side to top side. The relevant edges should match nicely. Baste them together with double sided tape (Seamstick) or pin them carefully. Run a row of straight stitches just 1/2 inch (1.225 cm) inside those edges. Then unfold the two panels and secure the seam allowance to one side or the other with a second row of straight stitches.
© 2016 - Sailrite Enterprises