Chapter 1 -- What are Roman Shades?
Roman shades are merely panels of fabric hung over walls or windows in such a way as to permit them to be easily folded up out of the way exposing whatever they cover. (Roman shades can also be folded down —but we do not consider the mechanism to allow downward folding shades here.) They are popular for two reasons. First they can be wonderfully decorative. Second, at least when used to cover windows, they can provide privacy and shelter from harsh sunlight on an “as needed” basis.
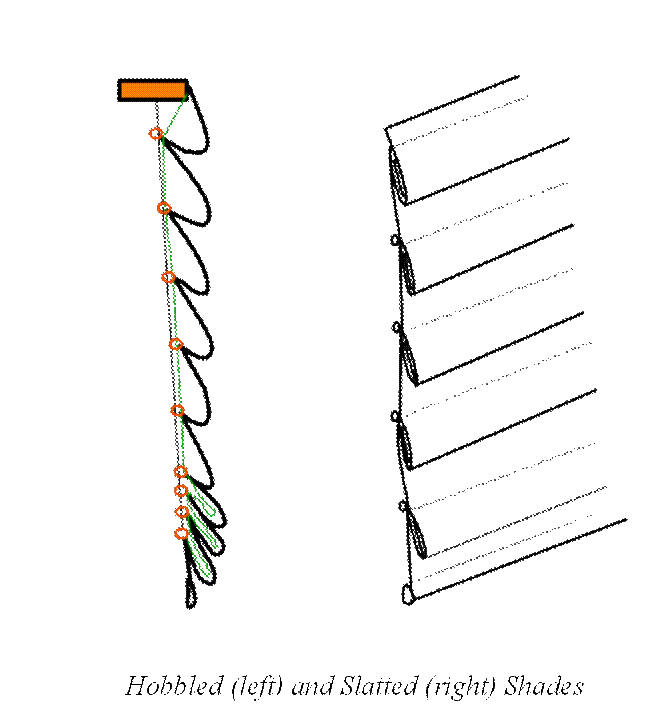
A Hobbled Roman Shade
This little digital manual has a simple purpose. It is intended to make it easy for anyone to measure and create uniquely appropriate roman shades. We will be setting forth very precise rules that guide the work. The Roman Shade Fabric Calculator) fits right in here. It provides a blueprint for each and every shade. First, it applies the rules that will be set forth in what follows. That simplifies some rather complex calculations. Just as important, it takes pattern repeats, both vertical and horizontal, into account so patterns can be placed accurately in the center of shades and uniformly across a series of shades.
In addition to setting forth these rules, this manual offers detailed assembly instructions with many illustrations. Please note the following caveat: what follows is not the only way that roman shades can be made (just as the measurement rules used in creating the Calculator are not uniquely “right”). So feel free to modify the procedures that follow if the result will better suit particular needs. On the other hand, everything that follows has been carefully tested and should yield excellent results.
|
We start with a basic roman shade primer (Chapter 1). Nothing fancy but everything needed for a solid foundation. It is here that we clear away much of the confusion surrounding the varieties of roman shade styles and the sometimes misleading terms that have been applied to them. Finally some sense can be made of all the myriad (often redundant or tautological) terms that are so loosely used: classic, flat, ribbed, relaxed, relaxed with wings, soft fold, false, faux, hobbled, tucked, stitch tucked, cloud, pouff , Austrian, shirred, balloon, balloon royal, teardrop, looped, pleated, ruffled, segmented.
There follows the four chapters that form the heart of this manual. Each one focuses on the construction of actual shades of a particular style. In Chapters 2, 3, 4, and 5 will be found roadmaps specific to given shade types with a definite length and width. We start with a flat shade and move on to an example of each additional essential style: hobbled, slatted, and tucked. As this work was completed at Sailrite, videos were created. And links to these videos are provided where appropriate.
Finally, the last three chapters lay out what we like to call a “general theory of roman shade fabrication”. Every shade is, to a certain extent, unique. It may generally be enough to just build attractive and useful shades, but there will be need eventually for a broader understanding. That is the purpose of Chapter 6. Here we seek to convey all the information required to design and build any roman shade. That information is in the form of “measurements and rules”: what to measure and how to use the measurements. The rules developed are applied automatically by the Calculator to the extent possible, but Chapter 7 makes their application clear and explains options and alternatives
The last Chapter 8 exhaustively reviews the materials and the tools that can be helpful in building roman shades in all their diversity.
Chapter 2 -- Roman Shade Basics
Shade Mechanics — The Universals
Let us begin with an overview of the anatomy of a simple roman shade system. There will be more complex fabric assemblies described later (some made up of two layers of fabric — a facing and a lining or backing layer and some utilizing more complicated rib and lift line systems), but the principles of the roman shade system remain the same.
A Simple Inside Mounted, Unlined "Flat" Roman Shade
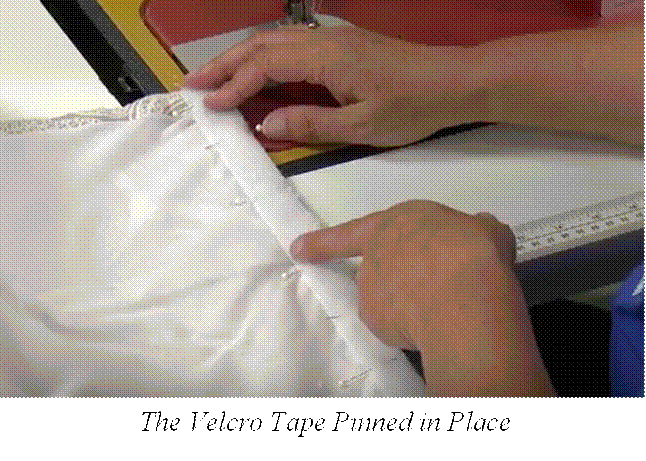
There will always be a headboard. This board is attached to the wall or window frame at the top of the shade. Along its front edge a strip of Velcro tape is stapled or tacked. A matching Velcro tape sewn to the top of the fabric construction secures the shade in place.
Each shade will be divided into several “segments”. The depth of the segments determine how the shade will fold. Segments will often have ribs secured at their lower edge that, when drawn up by cords from above, sandwich that segment and the one above it together creating a fold in the shade. Each pair of segments as it is folded from the bottom up, tucks under the segments that are folded above. It should be noted here that ribs are optional. There may be none or they can be used on alternate segments as illustrated above or they can be placed at every segment line. Using ribs or slats encourages more uniformity as the folds are created but and gives the shade a somewhat more formal “tailored” appearance but they can make small shades look “forced” (in our opinion).
Outside View of the Shade above
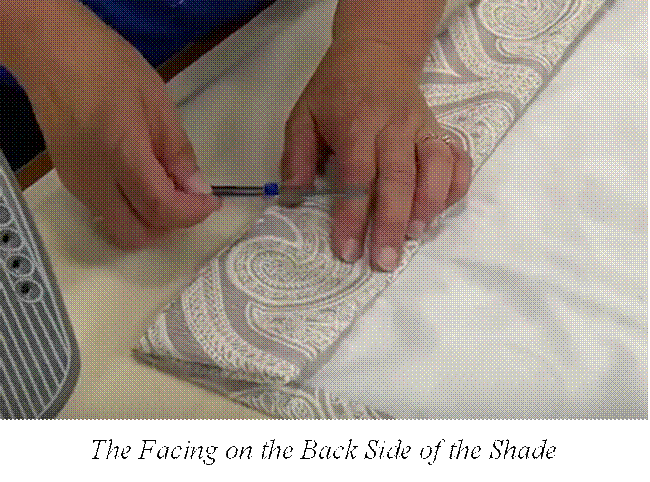
Cords are tied into rings on the back of the shade at the top of the bottom-most segment, or “bottom curtain”. These cords are run through rings on segments above (segment pairs in the case of flat and tucked shades) up to the headboard where they are put through fairleads or eyes and led to one or the other side and made adjustable with a “cord lock”
There will be several cords depending on the width of the shade. These are usually combined a foot or so below the cord lock into a single cord with a "condenser" -- that makes it easy to raise the shade with consistency from side to side (an attractive alternative is to braid the cord lines together into a single strand).
There will be several cords depending on the width of the shade. These are usually combined a foot or so below the cord lock into a single cord with a “condenser”— that makes it easy to raise the shade with consistency from side to side (an attractive alternative is to braid the cord lines together into a single strand).
There is a weight batten (often a metal rod) in a sleeve at the bottom of the shade. There will also be hems or other finishing techniques employed along the sides of the shade and along its top. Fabric for all of these finished edges must be provided for.
The discussion thus far has centered on a very simple roman shade. This style is generally referred to as “classic” or “flat” or “plain”. There are many variations on this design. A Pintrest post by Keenan Kreations that follows is itself not by any means complete, but it does suggest the breadth of that variety.
Our purpose here is to provide a foundation that will make it possible to build any roman shade without actually going into specific detail on every possible variation. To accomplish that we will carefully consider the construction of just four “styles” of roman shade: flat, hobbled, slatted, and tucked. The contention is that, knowing how to build these four, all the rest are possible with minor modification that is self evident. Moreover, we will focus entirely on the materials and construction techniques that we consider “normal”. There are alternatives to almost everything we say and do, but we will ignore them here. The goal is the creation of beautiful shades as quickly and inexpensively as possible. The alternatives can be applied as desired on a case by case basis.
Four Shade Styles — The Particulars
Let’s review the four styles of roman shade that we will consider:Classic or Flat or Plain Roman Shades
This type is by far and away the most common. We have already noted that ribs are optional. The simple shade that we have described above with ribs on alternate segments could be designated a “soft fold” design If ribs were totally absent and if the shade were to be drawn up with two lift cords from the edges, it might be described as “relaxed” or “swaged”. If the two lift cords were spaced in somewhat from the sides,“relaxed with wings” or “balloon royal” might be used in reference. If the segment folds were permanently sewn in place preventing easy adjustment, the shade would be considered “faux” or “false”. If vertical folds were set into the face of the shade, it might be described as “ruffled”, “pleated” or “relaxed with box pleats”. These terms are all widely used. They are helpful but hardly precise. It is important to note that all the above shade varieties share the basic characteristics of the simple classic roman shade with minor modifications.
Hobbled Roman Shades
When the segments in a roman shade are secured so that they do not fully unfold, they are said to be "hobbled". If the restraints are moderate in depth, say less than 50% of segment depth, then they are sometimes designated "looped" shades. More extreme hobbles will create fuller shades that some call "teardrop". Each of these can be considered members of the same "style" because they share construction techniques. And all members of this style feature segments that are asymmetrical -- the bottom portion of each fold does not mirror the top. So we treat each width from rib to rib as one segment unlike the the classic shade above where the folds take place over segment pairs (where one folds forward and one backward neatly over one another). Thus, the calculator will show just under half as many segments in a hobbled shade as in a flat shade. And each of those segments will be deeper. We work with segment "pairs" in a flat shade and with segments "and add-on" in a hobbled shade. Note that this distinction is quite arbitrary -- it makes very little difference in the final appearance of the shades. That is, the number of the folds will be the same. But the extent of the fold will differ and the detailed instructions that follow below will be more straight forward in each case as a result of this distinction.
Slatted Roman Shades
Some would say that slatted shades also share these characteristics and should be treated together with the hobbled shades. There is some significant variation, however. Horizontal pockets are sewn in place at the top of each segment so that narrow “slats” can be inserted in the resulting sleeves. Here, again, just as with the hobbled shade described above, each segment is asymmetrical. Unlike hobbled shades, however, the folds are more sharply defined. The result has been described as yielding "a sleek, contemporary look." (p. 47 of Windows With Style) The resulting shades are sometimes considered “banded” although this term can also refer to shades with contrasting vertical stripes of colored fabric on their edges.
Tucked Roman Shades
It is not unusual to encounter shades where segment folds, either all folds or alternate folds, are sharply creased with relatively narrow (usually 3/8 inch (9.5 mm)) horizontal pleats or “tucks” sewn in place at each fold. If all folds are tucked, alternate tucks will face the back then the front of the shade. When alternate folds are tucked, they will all face forward or they will all face back.The cords that raise these shades will be secured only on the back. So, like the flat shade, each fold is treated in what follows as consisting of a segment pair. Such shades fold neatly just like an accordion. They yield an extremely finished or tailored look. Ribs are not uncommon, but they may be absent, especially in narrow shades, to further a smooth look.
Summary
These "styles" are just variations on a theme. That is, they all share the essential structure that we discussed at the beginning of this chapter. Even so, there is enough difference to justify independent "build" chapters for each style. There will be some duplication but the likelihood of confusion will be reduced. And, in each case, we will be able to present alternative materials and techniques that lend themselves to the disparate styles.
So let’s build a roman shade! Pick a style and skip to the appropriate chapter below. Your dimensions will vary from ours, but the procedures will all apply. These four shades are all narrower than the panel width which keeps the sewing to a minimum. Feel free to build a wider shade, but read over the final two chapters first in preparation.
Chapter 3 -- Building a Flat Roman Shade
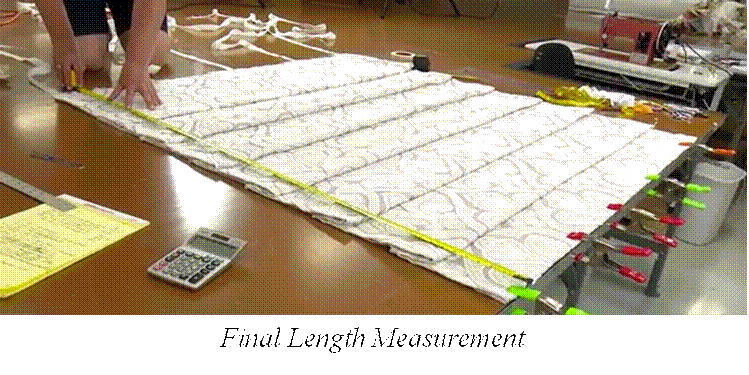
This shade will not be lined. It will make use of simple cord “lift lines” with rings. There will be ribs on alternate segments. The edges will be finished with a double folded hem. We will build a shade to fit inside the frame of a window. That frame measures 46 inches (1168.4 mm) in width and 45.5 inches (1155.7 mm) in height.
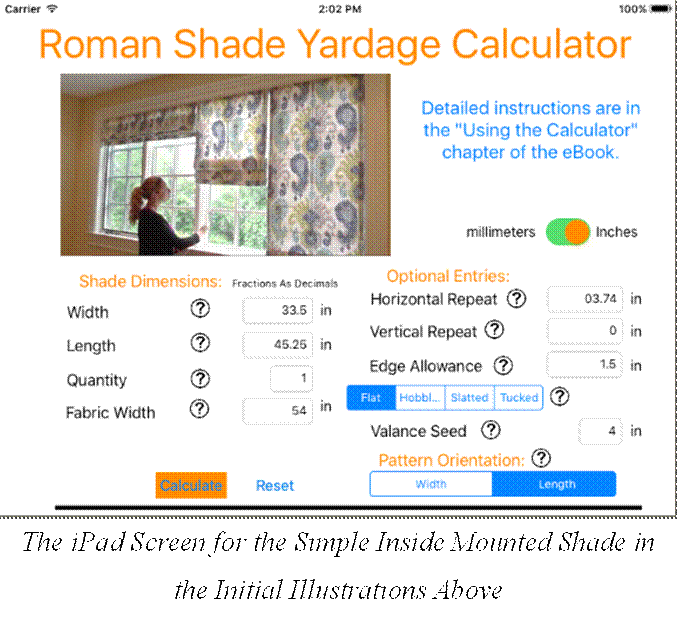
The first order of business in a project like this is to make good use of the fabric calculator. Hit the second tab below to pull up the calculator and enter width (45.5 inches in our example — there will be quarter inch clearance on each side) and height (45.5 inches in our example) and fabric width (54 inches here). We will use Sunbrella Reflex Flame Upholstery Fabric (Sailrite part number 145094-0002) so the horizontal pattern repeat is 5.6 inches and the vertical repeat is 10.15 inches.
• Note that the edge allowance defaults to 1.5 inches (38.1 mm).
• The flat style is selected unless it is changed.
• The segment depth seed defaults to 4 inches (101 mm) given the length and the style of this shade (the default seed is linked to these two inputs). It is termed a “seed” since it does not control but only guides the actual segment depth (even though in this case there is a direct match that will seldom be the case).
• And, finally, the pattern orientation defaults to “length” when there is a horizontal repeat.
Hit “calculate”. The screen below scrolls into view. Continue scrolling upward on the device to reveal the entire shade rendition.
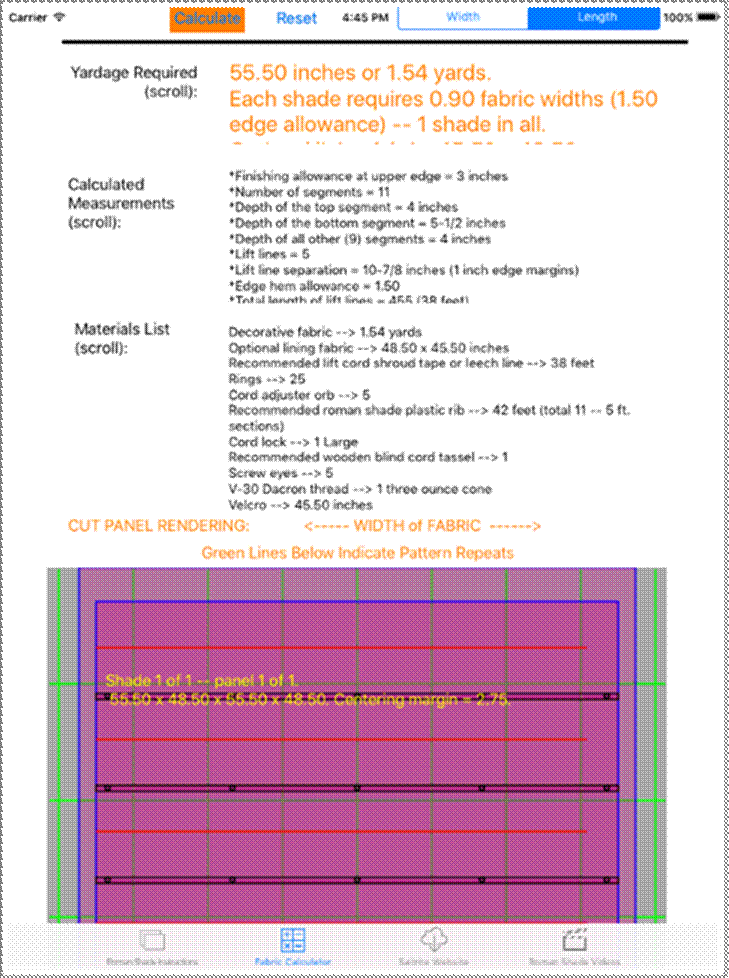
Several things should be noted. First, rings are indicated only on alternate segments. Folds will be created between ring lines. Since folds in a flat shade are formed by symmetrical segment pairs, these pairs are separated with a red line indicating that the fold will center there. The default segment depth seed is automatically reduced when flat shades are selected to make this “segment pair fold” work.
Second, the shade is centered over the horizontal pattern. The “centering margin” is 2.5 inches. If the fabric does not have a finished selvedge edge (some fabrics include extra fabric beyond the nominal published width), trim or mark it to establish that width before taking the centering margin measurement.
Third, the length and width dimensions in yellow on the rendering include edge allowance as well as head and foot allowance. These add-ons are indicated with a lighter shade of purple.
Fourth, ribs are shown on alternate segments and listed as recommended in the list of materials. In fact ribs can be entirely absent, only on segments with rings (as here), or on every segment. Rib usage is a personal decision. Our choice is to employ them only on the upper edges of alternate segments — the ones with rings.
Fifth, lining fabric is included in the list of materials but it Fifth, lining fabric is included in the list of materials but it is optional. We will not be using a lining with this shade.
STEP BY STEP FOR FLAT SHADES:
Flat: 1 — Create the Shade Panels
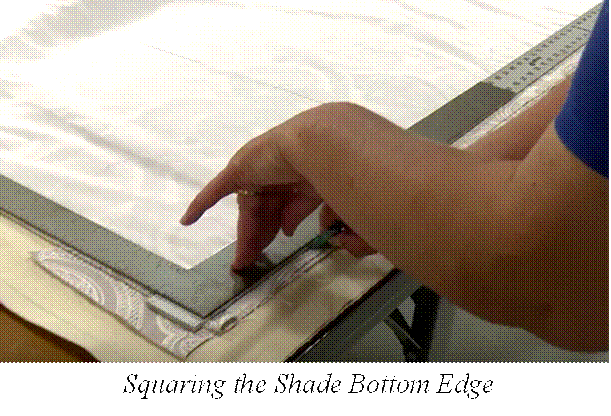
Cut the single 55.5 by 48.5 inch panel (1409.7 by 1231.9 mm) that will make this shade.Flat: 2 — Cut the Facing Strip
From this cut panel remove a strip of fabric along the bottom. Cut this “facing strip” that will be used to trim and finish the bottom edge of the shade. All shades with segment depth seeds greater than 5 like this one will have a facing strip 6.5 inches (165.1 mm) wide and, of course, 48.5 inches (1231.9 mm) long (the width of our cut panel). Shades with segment depth seeds less than or equal to 5 inches (127 mm) will have narrow facing strips just 2.5 inches wide.
This strip of fabric is light purple in the calculator rendition. Make sure that this cut is made perpendicular to the two edges and perfectly straight. Set this strip aside for now.
Flat: 3 — Finish the Shade Edges
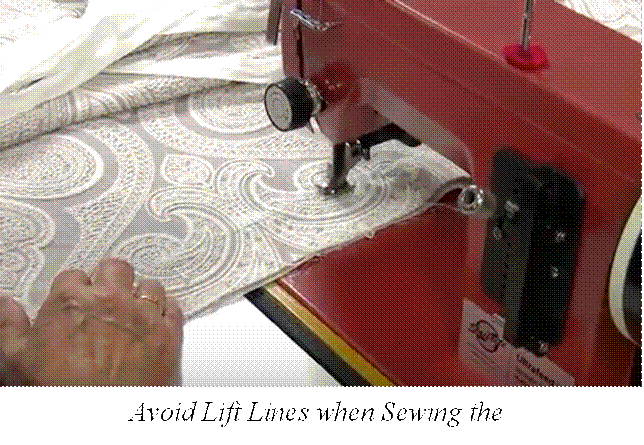
Press a double fold of fabric along both edges of the shade panel. Make the first fold 3/4 inch (19.05 mm) deep and do the second right on top of the first. Hold it all in place by running a straight stitch along the inside edges of the combined folds (about 1/8 inch or 3 mm from those inside edges). This stitch will be visible so use matching thread color and keep it straight! Some prefer to avoid these stitches entirely — simply pressing the hem flat with an iron or securing it with double-sided “Seamstick” tape.
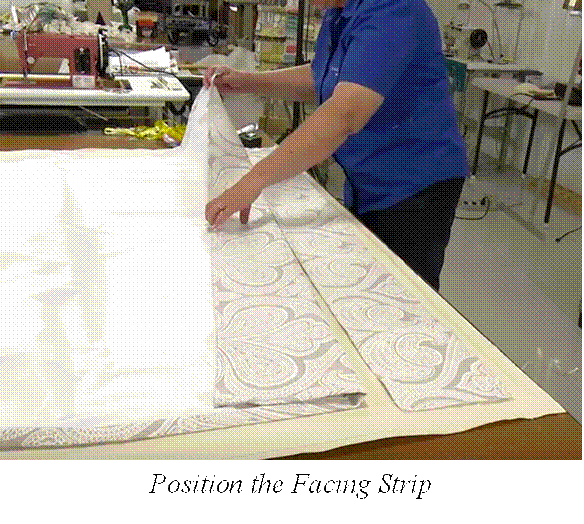
Flat: 4 — Install the Facing on the Bottom Edge
With the fabric in the shade panel right side up, place the facing strip that was cut in step 2 above face down centered on its bottom edge. Baste and sew with a straight stitch across the width of the shade 1/2 inch (12.7 mm) above the aligned bottom edges. Fold the two edge allowance flaps at the ends of the facing strip over onto the back (top side) of that strip so that they match the width of the shade that was hemmed in step 3 above. Then fold the facing strip down and over onto the back side of the shade. Press the exposed bottom seam edge so that it is rolled slightly to the back. Turn the assembly so the shade panel is right side down. Fold the loose edge at the top of the facing strip under until it is just 4 inches (101.6 mm) wide. (This width will be just one inch when the narrow facing strips that result from segment depth seeds of 5 inches (127 mm) or less are applied.)
Press this fold in place with an iron and then run two straight stitches across the width of the shade at the top of the facing strip. These stitches should be 1 inch (25.4 mm) apart. The weight rod will be inserted between these stitches — the lower seam creating that rod pocket will thus be 3 inches above the bottom of the shade. This flap of cloth keeps the weight rod from hitting any hardware that might exist within the window frame. We employ this technique as a matter of course even though it is not always necessary. Note that one stitch along the fold line creates the rod pocket when the narrow facing strip resulting from the segment depth seed less than 5 inches (or 127 mm) is used.
Flat: 5 — Glue Ribs in Place
With the shade panel still face down, measure up from the bottom 6 inches (152.4 mm) and glue a plastic rib in place there with 5 or 6 dabs of hot glue (any glue gun will work). All the ribs should be cut 1/2 inch (12.7 mm) shorter than the width of the shade or 45 inches here. Proceed all the way up the rest of the shade spacing ribs on 8 inch centers (204 mm or twice the main segment depth — a “segment pair”).
Flat: 6 — Sew Rings in Place
Sew 5 rings along the bottom of each rib as indicated in the calculator rendition. Use a thread similar in color to the shade fabric and keep the length of the stitch on the face of the shade to a minimum in order to reduce its exposure. Measure in from the edge 1 inch (26 mm) to place the first ring. Then space the rest at 10-7/8 inch (276 mm) intervals across the shade. The final ring should be 1 inch (26 mm) from the opposite edge. Repeat this for all 5 ribs.
Flat: 7 — Install Lift Lines
Insert 5 lengths of the 38 feet of leech line recommended by the calculator (any small braided cord will do), each roughly 8 feet (200 mm) long through the bottom rings. Secure them by sliding plastic orbs over their ends. These orbs are spring loaded to lock onto the cord while providing some measure of adjustability. Then thread each cord up through the rings above.
Flat: 8 — Headboard Installation
Prepare a headboard 45.5 inches long. The headboard can be wrapped like a present with scrap cloth stapled in place if desired. Put screw eyes in the bottom of the headboard that match the placement of the rings on the ribs. Install a small cord lock just 1 inch or so (25.4 mm) inside the right (or left) screw eye. Staple Velcro tape (hook or loop) on the front of the headboard. Sew the mating Velcro tape to the top of the shade after squaring and trimming it to the 45.5 inch length. Mount the headboard inside the window frame. Thread all lift lines through appropriate screw eyes and on to the cord lock. Reduce the number of cord ends by using a condenser and a tassel if desired.
Flat: 9 — Insert a Weight Rod
Cut a brass weight bar with a hack saw so that
it is 1.5 inches (38.1 mm) shorter than the shade width. Insert it between the two
stitch lines in the facing strip at the bottom of the shade. Close the ends of the
pocket with needle and thread by hand.
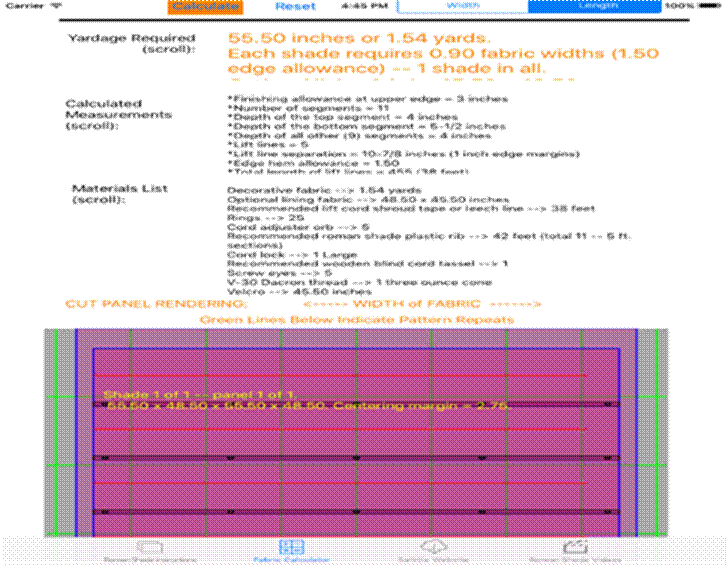
Chapter 3 -- Building a Hobbled Roman Shade
This shade will be lined. It will make use of shroud cord “lift lines” and the shroud will be used to create the hobbles. There will be ribs on each segment in casings sewn right into the shade itself. The edges will be finished with a double folded hem. We will build a shade to fit inside the frame of a window. That frame measures 46 inches (1168.4 mm) in width and 45.5 inches (1155.7 mm) in height.
The first order of business in a project like this is to make good use of the fabric calculator. Hit the second tab below to pull up the calculator and enter width (45.5 inches — allow for 1/4 inch clearance on both sides) and height (45.5 inches) and fabric width (54 inches). We will use P/Kaufmann Adelaide Platinum indoor fabric (pt # 106598). The horizontal pattern repeat is 27 inches and the vertical repeat is 27 inches. Note that the edge allowance defaults to 1.5 inches (38.1 mm).

The hobbled style makes visible an input box with a default value of 50%. This input controls the depth of the hobble folds. The default creates hobbles equal to half of each segment’s depth.
• The segment depth seed defaults to 7 inches (178 mm) given the length and the style of this shade (the default seed is linked to these two inputs). It is termed a “seed” since it does not control but only guides the actual segment depths (which are actually 6.5 inches here —165 mm for the 5 in the center, 3-5/8 inches at the top, and 9-3/8 inches at the bottom segment). The top and bottom segments are adjusted to keep the overlapping layers of the shade uniform or nearly so.
• And, finally, the pattern orientation defaults to “length” when there is a horizontal repeat (the length of the shade will run down the fabric roll’s length).
Hit “calculate”. The screen below scrolls into view. If this screen is scrolled up the entire shade rendition will be viewable.
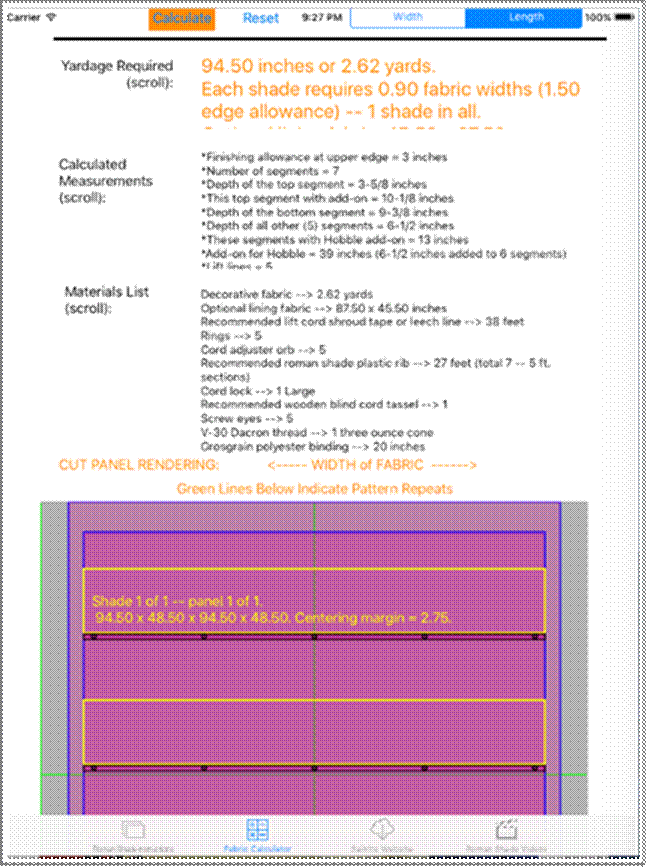
Several things should be noted. First, only 5 rings are included in the material list even though their placement on each rib is indicated on the rendition. The five rings will be used on the bottom batten. All the other rings designate attachment points for the shroud encasing the lift cord.
Second, the shade is centered over the horizontal pattern. The “centering margin” is 2.5 inches. If the fabric does not have a finished selvedge edge (some fabrics include extra fabric beyond the nominal published width), trim or mark it to establish that width before taking the centering measurement.
Third, the length and width dimensions in yellow on the rendering include edge allowance as well as head and foot allowance. These add-ons are indicated with a lighter shade of purple.
Fourth, ribs are shown on each segment and listed as recommended in the list of materials. In fact ribs can be eliminated if a softer look is desired. Rib usage is a personal decision. Our choice is to employ them.
Fifth, lining fabric is included in the list of materials but it is optional. We will be using a lining with this shade.
STEP BY STEP FOR HOBBLED SHADES:
Hobbled: 1 — Create the Shade Panels
Cut the single 94.25 by 49 inch panel (2399.7 by 1231.9 mm) that will make this shade. Also cut a single piece of lining 87.25 by 46 inches (2221.9 by 1155.7 mm).
Hobbled: 2 — Cut the Facing Strip
From this cut panel remove a strip of fabric along the bottom. Cut this “facing strip” that will be used to trim and finish the bottom edge of the shade. All shades with segment depth seeds greater than 5 like this one will have a facing strip 6.5 inches (165.1 mm) wide and, of course, 48.5 inches (1231.9 mm) long (the width of our cut panel). Shades with segment depth seeds less than or equal to 5 inches (127 mm) will have narrow facing strips just 2.5 inches wide.
This strip of fabric is light purple in the calculator rendition. Make sure that this cut is made perpendicular to the two edges and perfectly straight. Set this strip aside for now.
Hobbled: 3 — Secure the Lining
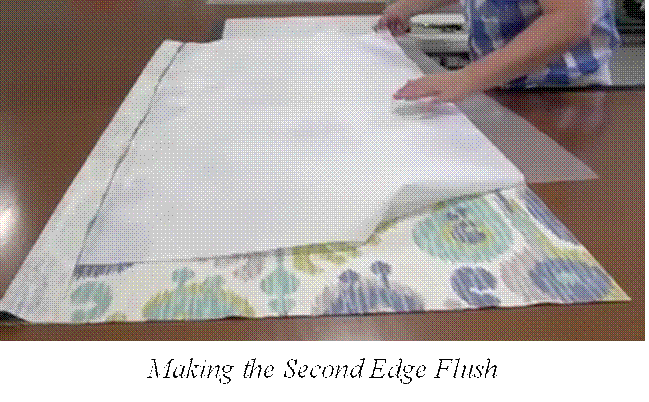
With the decorative fabric face up, spread the lining (right side down) over it. Sew the lining in place first along one edge with the two layers and the bottom flush. Then smooth the fabric layers together over to the other edge until they are flush and sew. Be careful not to skew the lining as it is attached. Both stitches should be accurately placed 3/4 inch (19.05 mm) inside the edges.
Hobbled: 4 — Finish the Edges
With the decorative fabric still down, fold each seam allowance back against the decorative fabric (so the lining is flat) and and iron just that seam allowance. Then pick threads, if any from both sides of the fabric (if threads or other debris are left on the inside of the shade before it is turned right side out they will be forever seen in the light).

Turn the shade assembly right side out. Press a double fold of the decorative fabric (the lining will not be folded) along both edges of the shade panel. Make the fold 3/4 inch (19.05 mm) deep over the flattened liner. Rather than risking the visibility of a sew line to hold this hem in place, we like to simply press it with a properly adjusted iron. The stitching at each rib location is generally enough to keep this hem fold flat.
Hobbled: 5 — Finish the Facing
With the fabric right side up, place the facing strip face down centered on the bottom of the shade panel. Baste and sew with a straight stitch across the width of the shade 1/2 inch (12.7 mm) above the aligned bottom edges. This stitch must be straight and 90 degrees to both edges.
Unfold this sewn facing and smooth the two attached panels flat. Fold and press the two edge allowance flaps at the ends of the facing strip over onto the top of the assembly so that they match the width of the shade. Now fold the facing strip up over onto the back side of the shade. Press the exposed seam edge on the bottom of the shade so that it is rolled slightly to the back. Turn the assembly so the shade panel is right side down. Fold the top edge of the facing strip under until the strip itself is just 4 inches (101.6 mm) wide. (This width will be just one inch when the narrow facing strips that result from segment depth seeds of 5 inches (127 mm) or less are applied.)
Press this fold in place with an iron and then run two straight stitches across the width of the shade at the top of the facing strip. One of these stitches should be just inside the fold of fabric and the other 1 inch (25.4 mm) down. The weight rod will be inserted in the pocket of fabric formed by these stitches — it will thus be 3 inches above the bottom of the shade. Note that one stitch along the fold line creates the rod pocket when the narrow facing strip resulting from the segment depth seed less than 5 inches (127 mm) is used.
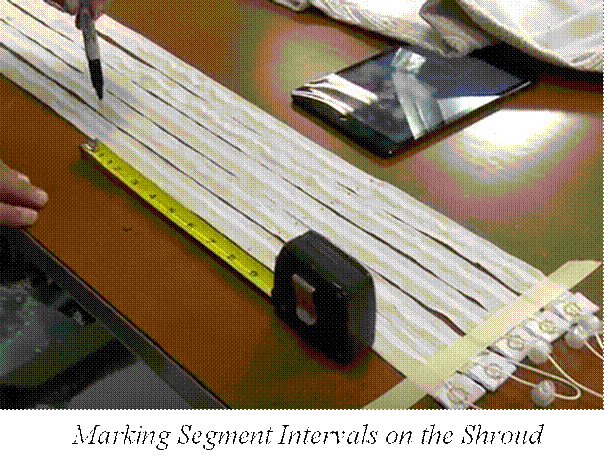
Hobbled: 6 — Mark Segments and Lift Lines
With the shade panel still face down, smooth the lining evenly over the decorative fabric and pin it in place every 12 inches (300 mm) or so. These pins prevent the lining from gathering unevenly as we work with the assembly. Then put down chalk or pencil lines on the lining that represent all the lift lines and all the ribs. The 5 lift lines are at 10-7/8 inch (276 mm) intervals across the width of the shade with 1 inch (26 mm) margins at each edge.
When the vertical lines are in place, proceed to the horizontal ones. Measure from the bottom of the shade up for rib placement. The first rib line is 9-3/8 inches (239 mm) above the bottom edge. The next 5 are 13 inches (323.85 mm) on center — the depth of those segments plus the hobble add-on in each case. And above the fifth rib line place a final line (which will indicate the bottom of the headboard) 10-1/8 inches (256 mm) up — the depth of the top segment and its hobble add-on. There will be roughly 3 inches (76 mm) of extra cloth beyond this final line that is partially used to finish and attach the shade. The rest is safety scrap.
Hobbled: 7 — Fashion Shroud Cords
This shade will use shroud cord to make 5 lifter lines. Divide the total length of recommended cord (38 feet here) by the 5 lengths required. There will be 5 lengths roughly 91 inches (2311 mm) long.
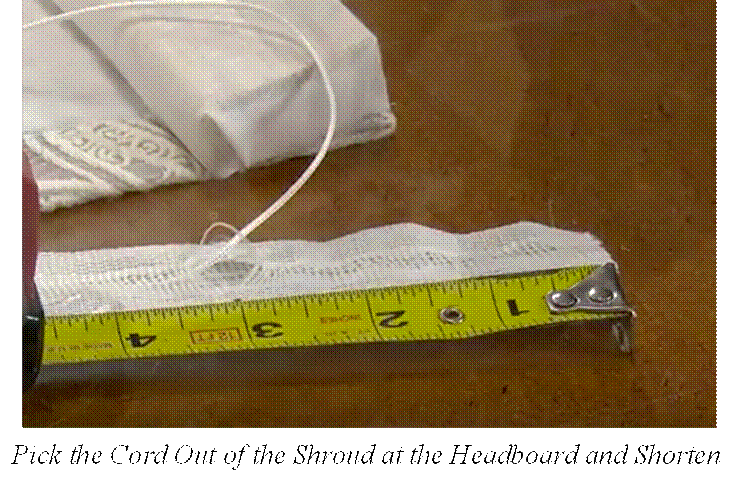
Prepare the bottom of each shroud cord as follows. Pull the cord from the shroud 3 inches (76.2 mm) from the bottom end. Cut the tape so that just 1.5 inches (38.1 mm) remains below the cord exit point. This gives us a clean edge to work with.
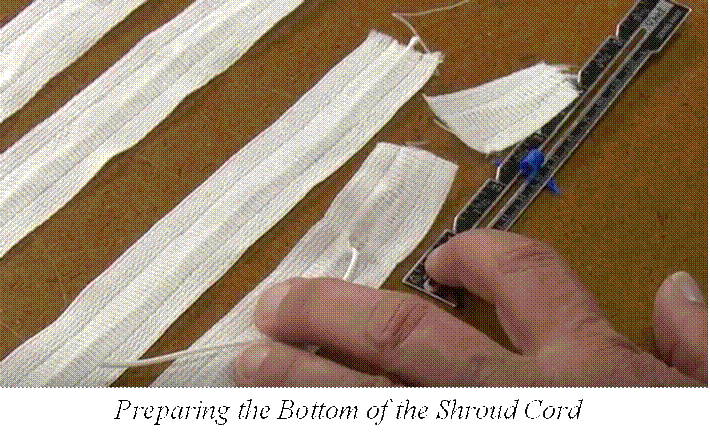
Now fold this tape below the cord up to create a 3/4 inch hem. Then reinforce this hem by cutting a 3 inch (76.2 mm) piece of grosgrain ribbon, folding each end to the center and sandwiching the hem on the shroud with it.
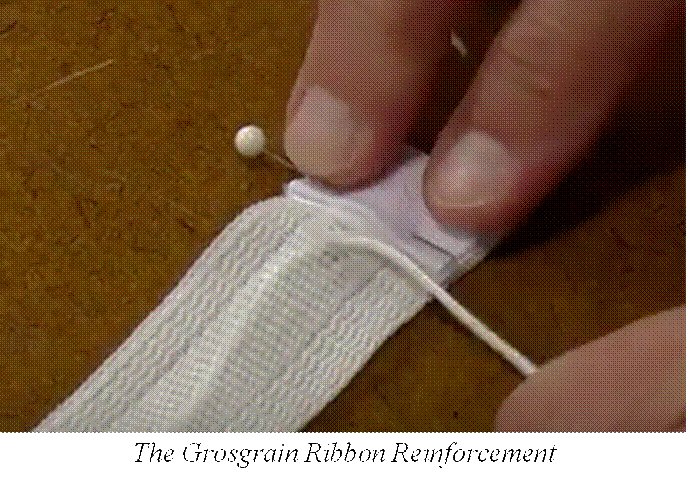
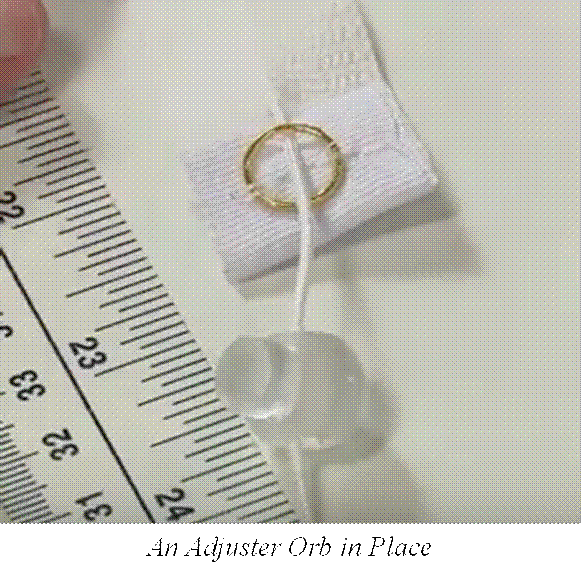
Place a small brass ring on this assembly and sew over it 3 or 4 times with the machine.

Run the cord first through the ring and then an adjuster orb. Repeat this process on all of the 5 lift lines.
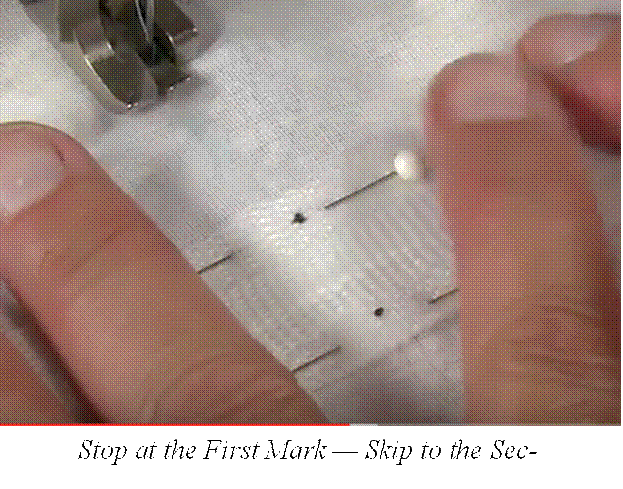
Hobbled: 8 — Mark Shroud Cords
Lay all 5 tapes out. The rings at the ends of the tape will eventually be placed on the first chalk line 9-3/8 inches (239 mm) above the bottom of the shade. Here we will measure up the tape 6-1/2 inches (239 mm) and place a mark. Repeat this process for each segment less the top one and the bottom one: the number of segments less 2 (5 in our case). In each case, this is the depth of those segments without hobble add-on. Then put a final mark 3-5/8 inches (91 mm) above the others to define the top segment. Again, these marks are to designate the depth of the segments alone without the add-on that creates the hobble.
Hobbled: 9 — Attach Shroud Cords
Starting at the rib line 9-3/8 inches above the bottom edge of the shade, pin the shroud cords in place over the 5 lift line chalk marks. The center of the brass ring should be on that first rib line. Then match the marks on the shroud cords with the rib lines on the lining. Pin it all together. The shrouds will be pinned at each rib line but do NOT attach them at the top of the shade where the headboard line is — they will later be attached directly to the headboard itself.
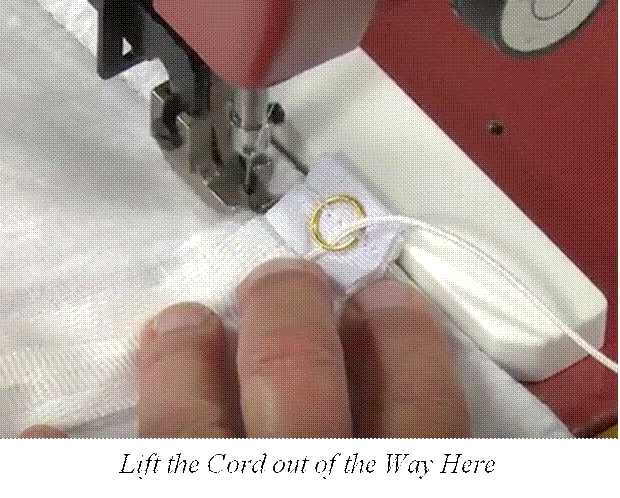
Then spread the shade on its width and run straight stitches from side to side on all 6 of the rib lines. The first stitch at the bottom of the shade should run right through the center of the rings. Be careful here (lift the cords out of the way) and with all the rest NOT to sew the cord lines themselves. This means that you will lift the presser foot and skip over the center portion of all the tapes on rib lines above the first one.
Hobbled: 10 — Make Casings for Each Rib
Create a casing for each rib. Place a rib centered under the seam line and insert a pin to hold it snugly in place.
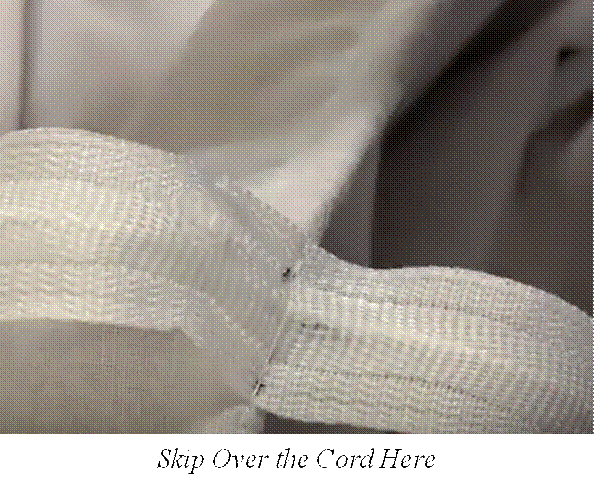
Remove the rib and measure the distance from the seam line to the pin. Fold the shade on each of the rib lines and run a row of straight stitches just that distance from the fold. Be careful to avoid stitching through the lift lines — move them out of the way at the bottom and skip over them elsewhere.
Hobbled: 11 — Cut and Insert Ribs
The ribs should be 1/2 inch (12.7 mm) less than the width of the shade or 45 inches (1143 mm) here. Sew the rib casings shut with needle and thread by hand.
Hobbled: 12 — Finish the Top of the Shade
The top hobble will not be sewn in place at this point. Fold it over the segment just below so that it matches all the folds below — the marks at the top of the shroud cord should match up with the line at the top of the shade when this fold is in place. Measure the height of the shade to this point. It should be 45.5 inches (1155.7 mm).
Add the thickness of the front edge of the headboard (3/4 inch here) to the finished height of the shade, put down another chalk line and cut on that line (do NOT cut the cords — push them out of the way).
Fold the decorative fabric with the lining underneath on the chalk line over onto the back of the shade. Place either the hook or the loop side of the Velcro tape under this hem and pin everything in place. Sew with straight stitches along both edges and the ends of the tape. Again, keep all the cords out from under the machine as these stitches are applied.
Hobbled: 13 — The Headboard
Prepare a headboard 45 inches long. Cover it with a scrap of material and staple it in place just as though it were gift wrapped (if a scrap is not available, any fabric can be used or the board can be left bare — it will not be visible). Staple the tape mate for the Velcro strip that was sewn to the top of the shade to the front edge of the headboard.
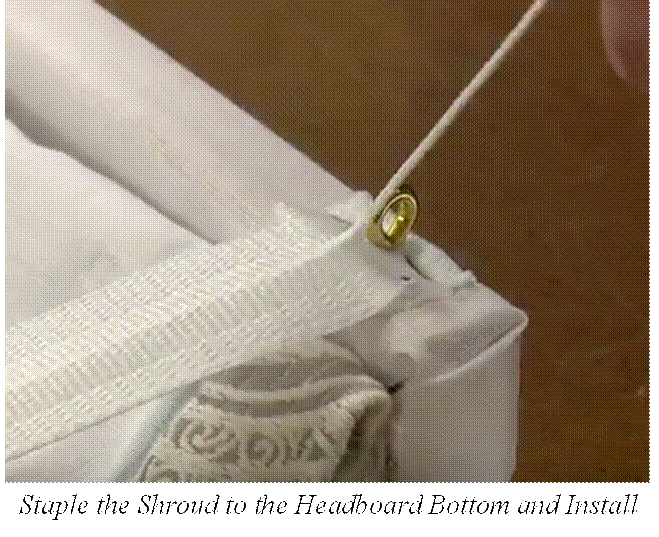
Pull the lift cords out from inside their shrouds at the point where they will be secured to the headboard. Leave the cord intact but cut the shroud so that there is just 3 inches (76.2 mm) of shroud beyond the cord exit point.
Fold the 3 inches over until there are 4 layers about 3/4 inch (19.05 mm) beyond the cord. Staple this so the black dots on the shroud are centered on the bottom edge of the headboard. Put a screw eye in the center of the stapled shroud. Repeat this process for all 5 lift lines at appropriate intervals across the width of the headboard.
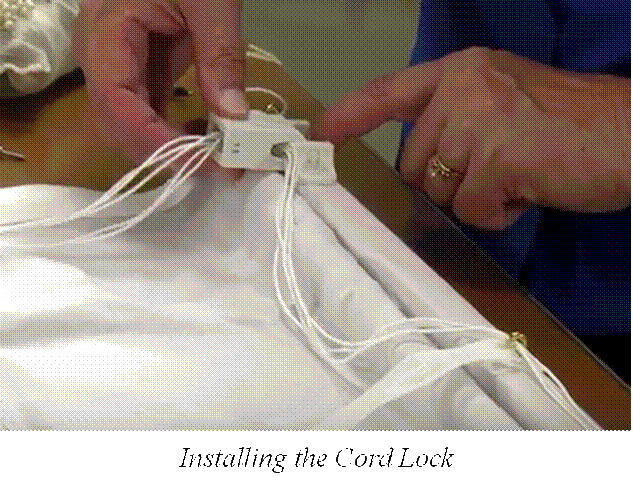
Thread all cords through the screw eyes at their head and all the eyes to the right (or the left if it is preferred that the lift lines be worked from that side). Insert the lines into a small cord lock and screw it in place just 1 inch or so (25.4 mm) inside the screw eye on the selected side. Dress the ends of the cords by using a condenser and a tassel if desired.
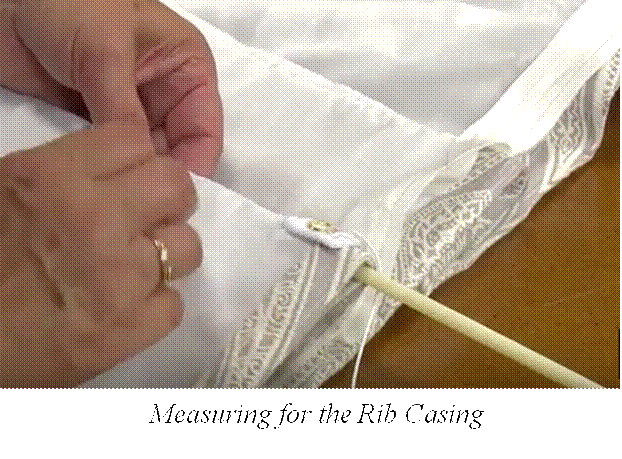
Hobbled: 12 — Insert a Weight Rod
Cut a brass weight bar with a hack saw so that
it is 1.5 inches (38.1 mm) shorter than the shade width. Insert it between the two
stitch lines in the facing strip at the bottom of the shade. Close the ends of the
pocket with needle and thread by hand.
Chapter 4 -- Building a Slatted Roman Shade
This shade will be lined. It will make use of simple cord “lift lines” with rings. There will be ribs on each segment in casings sewn right into the shade itself. The edges will be finished with a double folded hem. We will build a shade to fit inside the frame of a window. That frame measures 46 inches (1168 mm) in width and 45.5 inches (1156 mm) in height.
The first order of business in a project like this is to make good use of the fabric calculator. Hit the second tab below to pull up the calculator and enter width (45.5 inches — allow for 1/4 inch clearance on both sides) and height (45.5 inches) and fabric width (54 inches). We will use Sunbrella Reflex Flame Upholstery Fabric (pt # 145094-0002) so the horizontal pattern repeat is 5.6 inches and the vertical repeat is 10.15 inches.
• Note that the edge allowance defaults to 1.5 inches.
• The slatted style is selected. The segment depth seed defaults to 7 inches given the length and the style of this shade (the default seed is linked to these two inputs).
• And the pattern orientation defaults to “length” when there is a horizontal repeat (the length of the shade will run down the fabric roll’s length).
Hit “calculate”. The screen below scrolls into view. If this screen is scrolled up the entire shade rendition will be viewable.
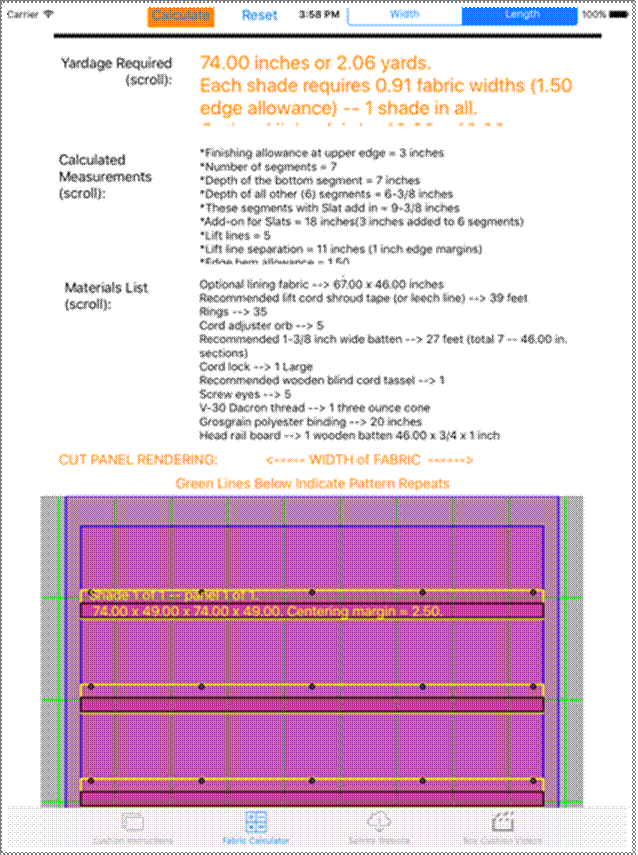
Several things to emphasize here. First, rings are rendered on all segments. Folds in a slatted shade are formed by collapsing individual segments. And these segment depths can be increased or decreased as desired by overriding the default “segment depth seed” value. It is termed a “seed” since it does not control but only guides the actual segment depths (which are actually 6.5 inches here for the 5 center segments, 5-5/8 for the top segment, and 7-7/8 for the bottom one — 165 mm). The top and the bottom segment depths are adjusted to keep the overlapping layers of the shade uniform or nearly so.
Second, the shade is centered over the horizontal pattern. The “centering margin” is 2.5 inches. If the fabric does not have a finished selvedge edge (some fabrics include extra fabric beyond the nominal published width), trim or mark it to establish that width before taking the centering measurement.
Third, the length and width dimensions in yellow on the rendering include edge allowance as well as head and foot allowance. These add-ons are indicated with a lighter shade of purple.
Fourth, ribs are shown on each segment and listed as recommended in the list of materials. Slatted shades require ribs roughly 1-3/8 inches (34.925 mm) wide. This width could easily be changed if desired, but the calculator’s yardage required would have to be increased to accommodate the deeper pockets.
Fifth, lining fabric is included in the list of materials but it is optional. We will be using a lining with this shade.
STEP BY STEP FOR SLATTED SHADES:
Slatted: 1 — Create the Shade Panels
Cut the single 73.5 by 48.5 inch panel (1866.9 by 1231.9 mm) that will make this shade. Also cut a single piece of lining 66.5 by 45.5 inches (1689.1 by 1155.7).
Slatted: 2 — Cut the Facing Strip
From this cut panel remove a strip of fabric along the bottom. Cut this “facing strip” that will be used to trim and finish the bottom edge of the shade. All shades with segment depth seeds greater than 5 like this one will have a facing strip 6.5 inches (165.1 mm) wide and, of course, 48.5 inches (1231.9 mm) long (the width of our cut panel). Shades with segment depth seeds less than or equal to 5 (127 mm) will have narrow facing strips just 2.5 inches wide.
This strip of fabric is light purple in the calculator rendition. Make sure that this cut is made perpendicular to the two edges and perfectly straight. Set this strip aside for now.
Slatted: 3 — Secure the Lining
With the decorative fabric face up, spread the lining (right side down) over it. Sew the lining in place first along one edge with the two layers and the bottom flush. Then smooth the fabric layers together over to the other edge until they are flush and sew. Be careful not to skew the lining as it is attached. Both stitches should be accurately placed 3/4 inch (19.05 mm) inside the edges.
Slatted: 4 — Finish the Edges
Turn the shade assembly right side out. Press a double fold of the decorative fabric (the lining will not be folded) along both edges of the shade panel. Make the first fold 3/4 inch (19.05 mm) deep and do the second right on top of the first. Rather than risking the visibility of a sew line to hold this hem in place, we like to simply press it with a properly adjusted iron. The stitching at each rib location is generally enough to keep this hem fold flat.
Slatted: 5 — Finish the Facing
With the fabric right side down, place the facing strip face down centered on the bottom of the shade panel. Baste and sew with a straight stitch across the width of the shade 1/2 inch (12.7 mm) above the aligned bottom edges. This stitch must be straight and 90 degrees to both edges.
Unfold this sewn facing and smooth the two attached panels flat. Fold and press the two edge allowance flaps at the ends of the facing strip over onto the top of the assembly so that they match the width of the shade. Now fold the facing strip up over onto the back side of the shade. Press the exposed seam edge on the bottom of the shade so that it is rolled slightly to the back. Turn the assembly so the shade panel is right side down. Fold the top edge of the facing strip under until the strip itself is just 4 inches (101.6 mm) wide. (This width will be just one inch when the narrow facing strips that result from segment depth seeds of 5 inches (127 mm) or less are applied.)
Press this fold in place with an iron and then run two straight stitches across the width of the shade at the top of the facing strip. One of these stitches should be just inside the fold of fabric and the other 1 inch (25.4 mm) down. The weight rod will be inserted in the pocket of fabric formed by these stitches — it will thus be 3 inches above the bottom of the shade. Note that one stitch along the fold line creates the rod pocket when the narrow facing strip resulting from the segment depth seed less than 5 inches (or 127 mm) is used.
Slatted: 6 — Mark Segment Tops
With the shade panel still face down, smooth the lining evenly over the decorative fabric and pin it in place every 12 inches (300 mm) or so. This is just to prevent the lining from gathering unevenly as we work with the assembly. Then turn the assembly over so the shade is face up. Put down chalk lines on the decorative fabric that represent the top of each segment including the add-on fabric outlined in yellow on the calculator rendition. Measure from the bottom of the shade up. The first horizontal line will be 7-7/8 inches (199 mm) above the bottom (there is no add-on here). The middle segments (a total of 5) are 9-1/2 inches (241 mm) apart. The top segment is 8-1/8 inches (207 mm). These heights are adjusted to make all the folds in the shade appear similar in depth on completion.
Slatted: 7 — Sew Slat Pockets
Turn the assembly over once again so the lining is up. Working from the bottom of the shade, fold it on the first chalk line so the lining sides are together. Keep the lining and the ornamental fabric smoothly together. Mark a chalk line and pin carefully 1-1/2 inches (38.1 mm) inside the fold. Run a row of straight stitches all the way across the shade on that line. This stitch will create a pocket for a slat. It is very important that the stitch line be straight and 90 degrees to both sides of the shade.
Repeat this process on each ornamental fabric side chalk line all the way to the top of the shade. Then lay the assembly right side up and press each pocket toward the bottom of the shade.
The shade should now match the final length measurement with 2 or three inches of extra fabric at the top.
Slatted: 8 — Sew Rings in Place
The 5 lift lines are at 10-7/8 inch (276 mm) intervals across the width of the shade with 1 inch (26 mm) margins at each edge. There will be a ring installed at the top of each rib pocket at each interval as indicated in the calculator rendition. Sew each one in place with a needle and thread. Use a thread similar in color to the shade fabric and keep the length of the stitch on the face of the shade to a minimum in order to reduce its exposure. Measure in from the edge 1 inch (26 mm) to place the first ring. Then space the rest at 10-7/8 inch (276 mm) intervals across the shade. The final ring in each case should be 1 inch (26 mm) from the opposite edge. Repeat this for all 6 ribs.
Slatted: 8 — Install Lift Lines
The calculator recommends 38 feet of leech line for lift lines. Divide this total by 5 — each length will be roughly 91 inches (2311 mm) long. Insert one end of each line through the bottom rings. Secure them by sliding plastic orbs over their ends. These orbs are spring loaded to lock onto the cord while providing some measure of adjustability. Then thread each cord up through the rings above.
Slatted: 8 — Headboard Installation
Prepare a headboard 46 inches long. Wrap it like a present with a scrap of material and staple everything in place (if a scrap is not available, any fabric can be used). Put screw eyes in the bottom of the headboard that match the placement of the rings on the ribs. Install a small cord lock just 1 inch or so (25.4 mm) inside one of the outside screw eyes. Staple Velcro tape (hook or loop) on the front of the headboard. Sew the mating Velcro tape to the top of the shade after squaring and trimming it to the 45.5 inch height desired. Mount the headboard inside the window frame. Thread all lift lines through appropriate screw eyes and on to the cord lock. Dress the ends of the cords by using a condenser and a tassel if desired.
Slatted: 9 — Insert a Weight Rod and Ribs
Cut a brass weight bar with a hack saw so that
it is 1.5 inches (38.1 mm) shorter than the shade width (44.5 inches here). Insert
it between the two stitch lines in the facing strip at the bottom of the shade.
Close the ends of the pocket with needle and thread by hand. Make 6 ribs 1/2 inch
(12.7 mm) shorter than the shade’s width (45.5 inches). Insert them in the pockets
and sew those pockets shut just as above.
Chapter 5 -- Building a Tucked Roman Shade
This shade will be lined. And the lining will be secured with an adhesive which will stiffen the structure to the extent that ribs will not be required. It will make use of simple cord “lift lines” with eyelets. The “pillowcase” facing fabric and lining assembly will be finished with a folded hem.
The first order of business in a project like this is to make good use of the fabric calculator. Hit the second tab below to pull up the calculator and enter width (45.5 inches) and height (45.5 inches) and fabric width (54 inches). We will use Sunbrella Reflex Flame Upholstery Fabric (pt # 145094-0002) so the horizontal pattern repeat is 5.6 inches and the vertical repeat is 10.15 inches.
• Note that the edge allowance defaults to 1.5 inches.
• The tucked style is selected. The segment depth seed defaults to 4 inches given the length and the style of this shade (the default seed is linked by default to these two inputs).
• And the pattern orientation defaults to length when there is a horizontal repeat (the length of the shade will run down the fabric roll’s length).
Hit “calculate”. The screen below scrolls into view. If this screen is scrolled up just a bit the entire shade rendition will be viewable.
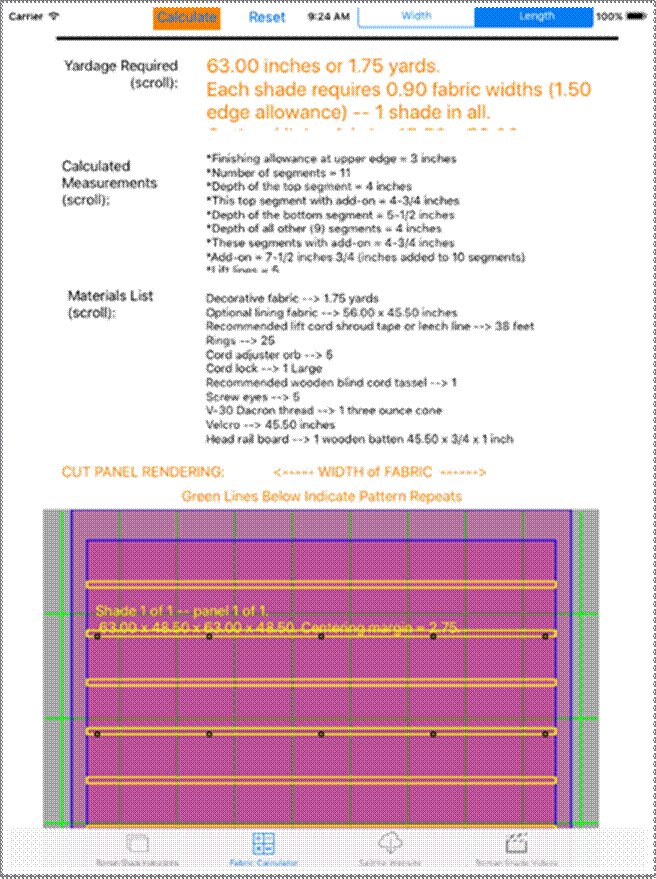
Several things should be noted. First, eyelets are indicated only on alternate segments. Folds in a tucked shade are formed by segment pairs rather than individual segments. The default segment depth seed is automatically reduced when tucked shades are selected to make this “segment pair fold” work.
Second, the shade is centered over the horizontal pattern. The “centering margin” is 2.75 inches (69.85 mm). If the fabric does not have a finished selvedge edge (some fabrics include extra fabric beyond the nominal published width), trim or mark it to establish that width before taking the centering measurement.
Third, the length and width dimensions in green on the rendering include edge allowance as well as head and foot allowance (3 and 7 inches as indicated at the top and bottom of the scrolling “Calculated Measurements” window). These add-ons are indicated with a lighter shade of purple in the rendering.
Fourth, ribs are not shown on the rendition. They could be used here but we assume that tucked shades will normally be selected when it is intended that the shade will fold very flat like an accordion. Ribs would tend to add bulk to such a fold. The yellow boxes on the rendition are the fabric “add-ons” to make the tucks — not ribs.
Fifth, lining fabric is included in the list of materials. It is optional but we will add a lining to our shade. We will be using an adhesive to attach the lining to the face fabric here. This will make the shade stiffer than might otherwise be desired but that stiffness contributes to the smooth and tailored look that is often sought after with this type of shade.
STEP BY STEP FOR TUCKED SHADES:
Tucked: 1 — Create the Shade Panels
Cut the single 58 by 48.5 inch (1473.2 by 1231.9 mm) panel that will make this shade. Also cut a lining panel 55 by 45.5 inches (1397 by 1155.7 mm).
Tucked: 2 — Cut the Facing Strip
From the face panel remove a strip of fabric along the bottom. This “facing strip” will be used to trim and finish the bottom edge of the shade. All shades with segment depth seeds less than 5 inches (127 mm) like this one will have a facing strip 2.5 inches (76..2 mm) wide and, of course, 48.5 inches (1231.9 mm) long (the width of our cut panel). Shades with seeds 5 or more will have 6.5 inch wide facing strips. This strip of fabric is light purple in the calculator rendition. Make sure that the facing cut is made perpendicular to the two edges and perfectly straight. Set this strip aside for now.
Tucked: 3 — Secure the Lining
Lay the face panel right side up on a table. Put the lining wrong side up (if there is a “wrong” side) over it and make one side and the top edges flush (as shown in the picture below). Use Seamstick or pin the two layers together at intervals of 6 to 12 inches (150 to 300 mm) or so all along the side making sure that the fabric layers are flat. Then roll the basted side over and stretch the liner out flat until it is flush with the second side of the shade. Seamstick or pin this second edge just like the first. Note that if the facing and the liner have not been cut straight and square, they may not match along the top of the shade — this is OK so long as it does not exceed an inch or so since the calculator allows an extra 2 inches (76.2 mm) at the top for shades like this one with segment seeds less than 5 inches. That extra is for just such eventualities.
Run a row of straight stitches (make the stitch length on the machine maximum) all along the flush edges. This stitch should be exactly 3/4 inch (19 mm) inside those edges. It is a good idea here to use something like the Deluxe Magnetic Guide on the machine to keep this stitch consistently positioned all along its length. If pins are used, you may want to remove them as they are encountered although they generally cause no trouble when sewn right over. Always backstitch three or four stitches at the beginning and end of all stitch lines to lock them in place.
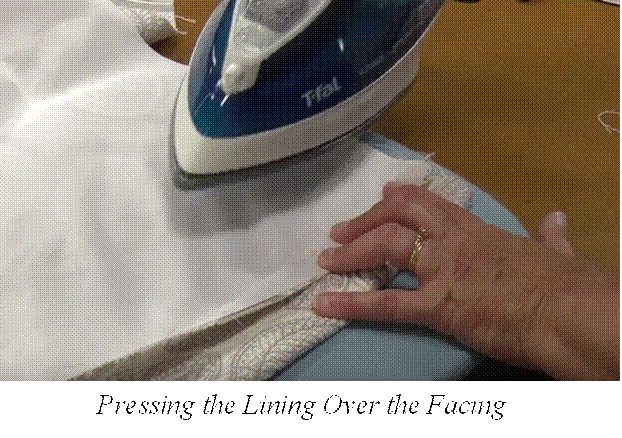
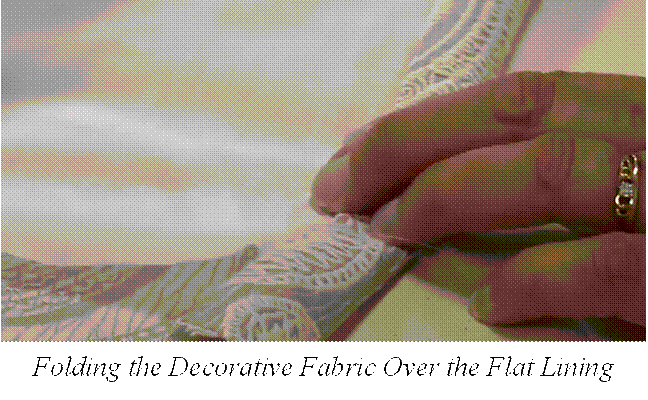
With everything still wrong side out and lining side up, use a “safely” hot iron to press flat the 3/4 inch (19.05 mm) width of lining against the decorative fabric on both sides. Do not crease the fold in the decorative fabric on the outer edge of the shade.
Tucked: 4 — Finish the Edges
Turn the shade assembly right side out and smooth the two panels together with the lining flat and centered on the decorative fabric. Use an iron-on paper backed adhesive like Heat’n Bond Ultra Hold to adhere the two layers of fabric together.
| An alternative adhesive is 3M’s Super 77 spray adhesive. Position the mating surfaces of fabric and fold back one half then the other to lightly spray both surfaces. |
Press a double layer of the decorative fabric (the lining will not be folded) along both edges of the shade panel. Make the single fold 3/4 inch (19.05 mm) deep. Press this flat all along both edges of the shade. Rather than risking the visibility of a sew line to hold this hem in place, we like to simply press it with a properly adjusted iron. The stitching at each segment will keep this hem fold flat.

Tucked: 5 — Finish the Facing
Place the facing strip face down centered on the bottom of the shade panel. The “front” side of the strip (if there is a front and back) should be against the front side of the shade. Baste and sew with a straight stitch across the width of the shade 1/2 inch (12.7 mm) above the aligned bottom edges. This stitch must be straight and 90 degrees to both edges. It will define the lower edge of the shade.
Fold and press the two edge allowance flaps at the ends of the facing strip over onto the strip so that they match the width of the shade. Now fold the facing strip with its two hemmed sides over onto the back side of the shade. Press the exposed seam edge on the bottom of the shade so that it is rolled slightly to the back.
Turn the assembly so the shade panel is right side down. Fold the top edge of the facing strip under until the strip itself is just 1 inch (25.4 mm) wide.
Press this fold in place with an iron and then run a straight stitch across the width of the shade at the top of the facing strip just inside the fold. The weight rod will be inserted in the pocket of fabric formed by these stitches
Tucked: 6 — Fold and Press Segments
The assembly will now be accordion folded and pressed with an iron. The folds will be centered between each pair of yellow lines. With the shade face down, measure up from the bottom the depth of that segment (4-1/4 inches or 106 mm) plus half of the yellow “add-on” or 3/8 inch (9.5 mm). Crease the shade up and over face to face on this line 4-5/8 inches (115.5 mm) above the bottom edge. Next measure up from the fold 4-7/8 inches (114.5 mm) and crease the shade up and over back to back. Continue upward at 4-7/8 inch (114.5 mm) intervals for all ten segment folds (one less than the number of segments). The creases should all line up perfectly on top of one another. Use an iron to clearly mark each crease and accurately move on to the next.
| The mm dimensions here are not just converted inches but rather the result of calculations using metric instead of imperial units. Rounding is responsi-ble for some minor discrepancy in the figures. We force imperial units to the nearest eighth inch while metrics are rounded to the nearest millimeter.. |
The segment folds will always line up over one another. If millimeters are the units of measure, the bottom edge segment will very nearly match the crease stack. If inches are the units of measure however, the bottom segment may be slightly increased or reduced to allow for rounding all the other segment depths to the nearest eighth inch.
Tucked: 7 — Sew Tucks
A stitch line between 1/4 and 3/8 inch (6.35 and 9.525 mm) inside the creased edges should be used to sharply define the shade segments folds. It is important to keep this stitch line straight and accurate and consistent in each case! Use a Magnetic Seam Guide if possible.
Tucked: 8 — Install Eyelets (#00 Grommets)
The 5 lift lines are at 10-7/8 inch (276 mm) intervals across the width of the shade with 1 inch (26 mm) margins at each edge. There will be an eyelet (#00 grommet) installed in every tuck at intervals as indicated in the calculator rendition. Use the plier tool and the hole cutter that comes with the #103150 kit from Sailrite. Measure in from the edge 1 inch (26 mm) to place the first ring. Then space the rest at 10-7/8 inch (276 mm) intervals across the shade. The final eyelet in each case should be 1 inch (26 mm) from the opposite edge. If the eyelet is wider than the stitched tuck, overlap the stitch line as necessary — the eyelet should be firmly placed in the doubled fabric.
Tucked: 9 — Install Lift Lines
The calculator recommends 38 feet of leech line for lift lines. Divide this total by 5 lift lines — each length will be roughly 91 inches (2311 mm) long. Insert one end of each line through the bottom eyelets and tie them in place. Then thread each cord up through the eyelets above.
Tucked: 10 — Headboard Installation
Prepare a headboard 46 inches long. Cover it with a scrap of material and staple it in place as described in Chapter 8 above (if a scrap is not available, any fabric can be used). Put screw eyes in the bottom of the headboard that match the placement of the eyelets on the ribs. Install a small cord lock just 1 inch or so (25.4 mm) inside one of the outside screw eyes. Staple Velcro tape (hook or loop) on the front of the headboard. Sew the mating Velcro tape to the top of the shade after squaring and trimming it to the 45.5 inch height desired. Mount the headboard inside the window frame. Thread all lift lines through appropriate screw eyes and on to the cord lock. Dress the ends of the cords by using a condenser and a tassel if desired.
Tucked: 11 — Insert a Weight Rod and Ribs
Cut a brass weight bar with a hack saw so that
it is 1.5 inches (38.1 mm) shorter than the shade width (44 inches here). Insert
it in the facing strip pocket at the bottom of the shade. Close the ends of the
pocket with needle and thread by hand.
Chapter 6 -- Measurements and Rules
If you have already built a roman shade using the procedures above, congratulations! But there is much more to learn. These final two chapters are intended to present a “general theory of roman shade fabrication” that should provide a solid foundation for any future project.
Measurements are dependent on whether the shade is to be mounted inside a window moulding or outside. The width of an outside mounted shade will not be limited by the window frame opening. It can be any width dependent only on aesthetic considerations. The headboard in an outside mount will normally be just thick enough (“thick” here refers to projection from the wall) to make the shade hang clear of whatever is below it and no thicker. This will assure that it will remain effective in blocking light at the sides of the shade. An outside mounted roman shade can be installed well above window frames, if desired, so that the shade, when drawn up, will reveal the entire window.
Shades mounted inside window frames will generally be just slightly narrower (between 1/4 and 1/2 inch — 6.35 to 12.7 mm — on each side) than the space inside the frame. The thickness of the headboard and the depth of the frame itself will determine how deep the shade rests within the frame. The headboard will usually be from 1/4 to 2/3 the width of the frame in thickness by 0.75 to 1 inch (19 to 25 mm) along what will become its forward surface (a one x one or a one x two often works well).
Lets boldly set forth rules for measuring, cutting, and assembling a roman shade. If these rules are followed, pleasing results will follow. That does not mean that these rules are the only ones that could be employed. Indeed, almost anything “works”, but the rules that we have developed over the course of much experimentation provide beautiful and functional roman shades every time.
This may seem a bit daunting, but don’t despair. We will follow with a discussion of the roman shade calculator that is accessed with the second tab in the margin at the bottom of this screen. The calculator makes the application of all these rules quite straight forward.
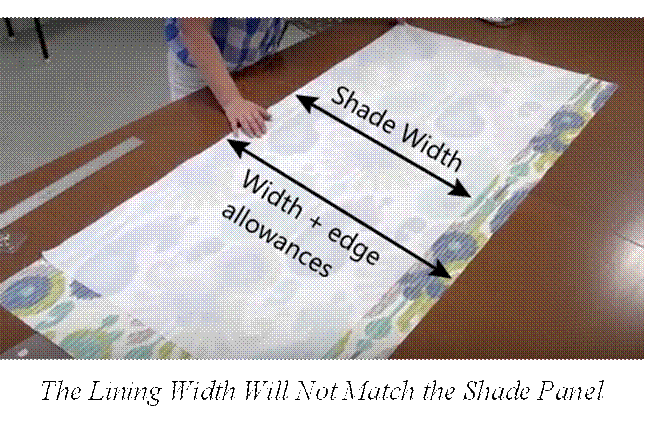
1. The facing fabric (the one everyone sees on the inside shade surface) should be cut to a width equal to the desired finished width plus 3 inches (76.2 mm). The extra allows for 1.5 inch (38.1 mm) on each side. This extra will be used for hems and any necessary finishing seams. If two or more panels are necessary along the shade’s width, there should be a 1 inch (24.5 mm) seam allowance (2 overlapping widths 1/2 inch wide) for each additional panel added to this basic width. If the fabric width is insufficient, we like to create an extra panel on each side of the central one to keep seams centered which would require an additional 2 inches (49 mm) of width beyond the actual shade width with its edge allowances.
2. The length of the facing fabric should be sufficient to create the desired finished length plus 10 inches (254 mm) in the case of shades with segment depth seeds 5 or greater and 6 inches (127 mm) when the segment seeds are less than 5. This extra allows for a finishing sleeve (wider when justified by segment depth) on the bottom of the shade and a proper finishing hem at the top. If two or more panels are necessary along the shade’s length (only likely if the shade length is run across the width of the fabric), there should be a 1 inch (24.5 mm) seam allowance (2 overlapping widths 1/2 inch wide) for each additional panel added to this basic length. (And here, again, we will suggest a central panel with extra at the top and the bottom just as above when the same problem confronted us because of fabric width constraints.)
3. If there is a lining, it should be cut the desired finished width (it will thus be 3 inches —. 76.2 mm) narrower than the cut facing fabric). This will insure that it remains hidden on the back side of the shade.
4. If there is a lining, its length will match the length of the primary fabric less the narrow strip of fabric cut away from that fabric at the bottom and used to finish that edge of the shade.
5. A rough approximation of the depth of the “segments” will be used to determine their actual placement in the shade. The segment depth defaults to a number based on the height of the shade. It is then modified to create an odd number of appropriately spaced intervals. The actual depth of each segment will be modified somewhat in the course of applying the rules that follow. In short, the value of the seed will have an impact upon pleat depth in any given shade length even though its impact will be adjusted. To determine the default seed value, we divide the length of the shade by 6.5 segments in hobbled and slatted shades where each segment folds on itself and 11.5 segments in the case of flat and tucked shades that make use of paired segments in each fold. The result is rounded to an integer value. The resulting seed value ranges from between 2 inches (49 mm) as an absolute minimum and 18 inches (441 mm). This default seed value can be modified. Use lower numbers to reduce the depth of segments (and to create more “child safe” shade systems). Larger seeds increase segment depth and reduce the volume of folds in the collapsed shade. The U.S. Consumer Product Safety Commission (CPSC) recommends that there be no exposed cords, but, if this is not possible, they recommend that the loops of cord that can be formed when roman shade segments are extended be as small as possible. Indeed, qualifying for ANSI safety compliance would require the minimum 2 inch valance depth. But the folds will be small and tight. We recommend the use of shroud tape to encapsulate the cords making this requirement unnecessary.
6. Divide the length of the finished shade (less 1.5 inches or 36.75 mm in the case of a flat shade) by the segment seed depth desired and round the result up or down to a whole number. If that number is odd, you are done. If it is not, then add 1 to it to make it odd. The result is the the number of segments for the shade in question.
7. Divide the finished length of the shade by the number of segments (the odd number derived in the step above). The result is the base depth of all the segments. The top and bottom segment depths will be modified somewhat in what follows. Label all but the top and bottom ones “main segments”.
8. The top segment depth will match the main segments in flat, and tucked shades. Flat shades will have an additional 1.5 inches (36.75 mm) added to the bottom one (the “curtain segment”. (The amount subtracted from overall length in step 6 above.) The curtain segment in both flat and tucked shades will also be increased or decreased by whatever is required to round main segment depth to the nearest eighth inch or mm.
9. Hobbled and slatted shades will have top segments reduced in height by .9 of the segment add-on. This same amount will be added to the curtain segment depth. This is to make the apparent height of these shade segments nearly match the main segments when finished. These shades, too, will have curtain segments increased or decreased by whatever is required to round main segment depth to the nearest eighth inch or mm..
To all of this must be added the possibility that the fabric may have patterns that repeat vertically, horizontally or both. Care must be taken to place these patterns. They will normally be centered on each shade horizontally. If vertical patterns exist, the intention of most designers will be to keep them consistent in neighboring shades.
Of course, pattern repeats cannot be accommodated
unless their values are known. With a little study, it is possible to determine
the beginning and ending points in a patterned fabric but, fortunately, this effort
is seldom necessary since the measurements are readily available from whatever fabric
outlet is used. Sailrite displays them under the “description” listing for each
fabric. If one or both repeats are missing, that means that there is no pattern
(at least no discernible pattern) in that direction.
Chapter 7 -- Using the Calculator
Whew! All this is simple enough, but there is a lot of it. The roman shade calculator (the second tab below) makes all of this easy and fast. The calculator started as a simple program to give yardage ordering information. But it has evolved into an extremely sophisticated tool which will not only calculate yardage but also show a rendering of the of the panels needed to complete a project and the segment sizes and ring placement for roman shades. If there are pattern repeats in the fabric (horizontal and/or vertical) the software will show how to center them and keep them consistent over two or more shades. The renditions are very accurate, but some assumptions for seams and hems and lining and segmentation are made — more about this in the following paragraphs.
Segment Depth
One of the most important functions of the calculator is its facility in experimenting with different valance seed depths. The valance segment depth as modified by rounding the number of segments depending on shade length will determine the actual depth of the top fold that creates the valance. Each fold below the first will create a fold that will hang down an additional 0.5 to 1 inch (12.7 to 25.4 mm) — depending upon how neatly the rings and ribs stack upon one another). And the bottom curtain segment will add roughly 1.5 more inches (36.75 mm) to the total when drawn all the way up.
Let’s use the simple inside mounted shade with which we started this book as an example. The inputs are as shown above (the iPhone screen will have the same input fields but they will be in a single, longer column). The quantity defaults to 1 prior to any entry. The segment depth seed defaults to 4 inches when the length value is entered. This particular fabric has a horizontal repeat of 3.74 inches (95 mm). Touch the “mm-inches” switch to convert everything to millimeters if preferred. The seed value becomes 101. When the calculate button is hit, the following screen scrolls up into view.
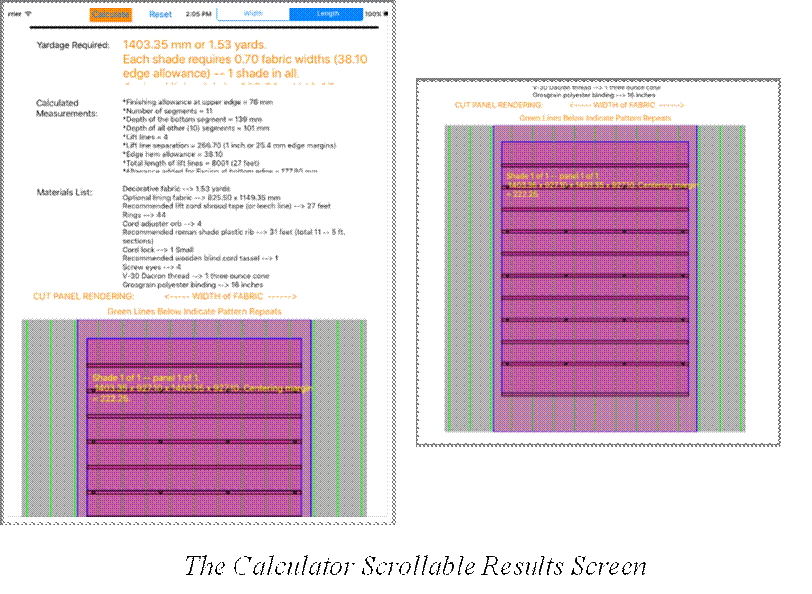
The “calculated measurements” list 11 segments (6 pairs and a bottom curtain). The segment depth seed results in a bottom segment of 5 inches with main segments at 4 inches. (Note that, when imperial units, inches, are used and decimals result, the measurements are rounded to the nearest eighth inch.) If the unit switch is changed to “mm” and calculate is hit, a bottom segment of 139 mm and main segments of 101 mm (just by chance the calculated seed value) result. Metric notation requires no rounding, but the rounded imperial measurements are within 1/16 inch for each segment and minor top and bottom segment depth adjustment is used to make the total shade length exactly the same whether metric or rounded imperial measurements are in use.
If the length of the shade were increased to 56 inches, the seed value would default to 5 inches (124 mm) the bottom segment would be 5 inches (162 mm) with the main segments 5 inches (126 mm) deep. (Again, note that inches will be rounded so these numbers do not match up as might be expected.)
The value of the segment depth seed defaults depending on the length and type of the shade. When each segment pair creates a fold, as it does with flat and tucked shades, the default seed will be adjusted to create 11 segments. Hobbled and slatted shades with single segment folds default to a seed yielding 7 segments. The default seed in either case can be increased to reduced. Decreasing the seed will increase the number of segments and increase the height of the folded shade bundle while increasing it will reduce the segments and the folded height.
When the seed is less than 5 inches (127 mm), the fabric added at the top of the shade is 3 inches (76.2 mm) but that added at the bottom is 3 inches (76.2 mm). The resulting shallow segments mean that less fabric is required to finish that edge. Seeds 5 inches and above result in 3 inches (76.2 mm) of extra cloth at the head and 7 inches (177.8) at the bottom. Note that the facing strip at the bottom of the tucked shade instructions above reflect this difference when compared with the hobbled instructions.
Calculated Measurements
The Calculated Measurements box scrolls if necessary to also show the number of lift lines recommended along with their placement intervals. The lift rings in the calculator renditions are spaced across the width of the shades.“Lift line separation” is rounded to the nearest 1/8 inch or to the nearest millimeter. The very minor effects of the rounding are accommodated by adjusting the nominal 1 inch margins at the finished shade edges.
This line in the Calculated Measurements box is followed by the edge allowance added along each shade edge, then the length of lift line that should be obtained, and finally the standard 7 inch (177.8 mm) bottom edge allowance is indicated (this cannot be modified in the calculator).
Materials List
The Materials List box also scrolls as necessary. Here are all the materials that we think most appropriate for the particular shade in question and nothing more — some are marked recommended and some are marked optional. A more complete list with alternatives and options beyond those in the calculator will be found in the following chapter.
Panel Rendering
Then panel rendering scrolls into view. This is the shade “blueprint” in grey and purple. It includes dimensions for all four sides of the face or “finish” fabric. The length dimension includes an extra 3 inches (76.2 mm) to finish the top and 7 inches (177.8 mm) to finish the bottom of the shade when the segment depth seed is 5 inches or greater. (It would be 3 inches and 3 inches with seeds under 5). If the default edge allowance of 1-1/2 inches is not changed, the width will be 3 inches (76.2 mm) more than the finished width of the shade to allow for hems. All of this extra “finishing fabric” is indicated with a lighter color on the rendering.
The fabric in the shade described above has a horizontal pattern repeat. The pattern’s beginning and ending points are indicated with a light green line on the rendition. Because of this horizontal pattern repeat, the shade has been shifted to the right in the rendering to center it over the repeats. The margin of 8.75 inches (222.25 mm) indicates the extent of the required shift. Do note that some fabrics are not trimmed at the mill. They will have excess fabric along both edges. Discount or trim that excess away on both sides (to match the published fabric width) before using the margin to center patterns.
When shades are so narrow that more than one panel can be cut from a fabric width with horizontal pattern repeats, there will be “horizontal pattern matching allowance” between the panels. And, if more than one row of panels is cut from a length of fabric with a vertical pattern repeat, there will be a “pattern matching allowanced” to separate the rows and maintain a consistent placement on that vertical grid. As an example, enter the following into the calculator: 15, 27, 1, 54, 7.813, 4.34, 1.5, Flat, 2, Length.
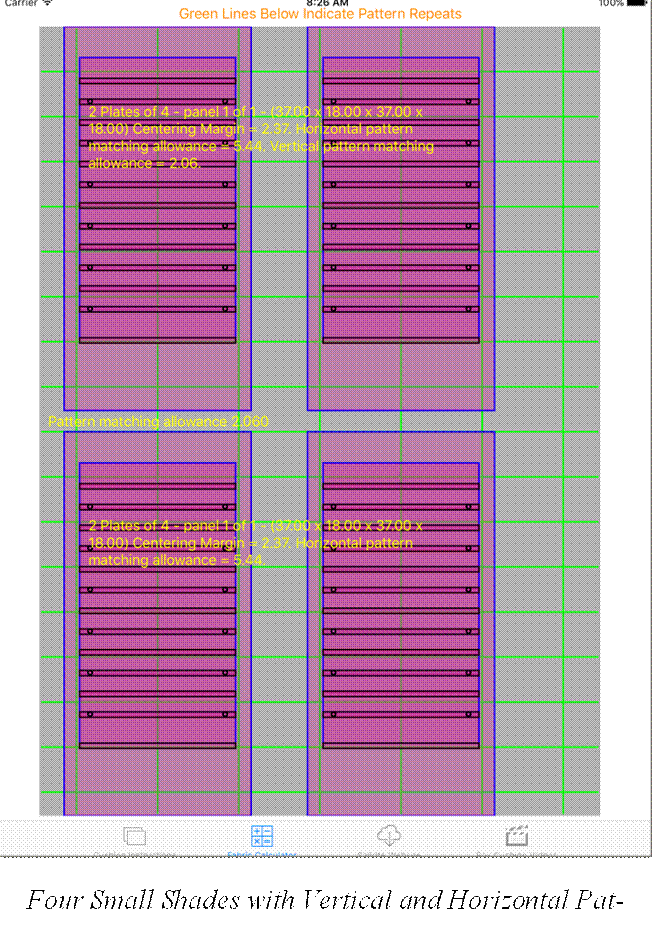
Shades Requiring More than One Fabric Width
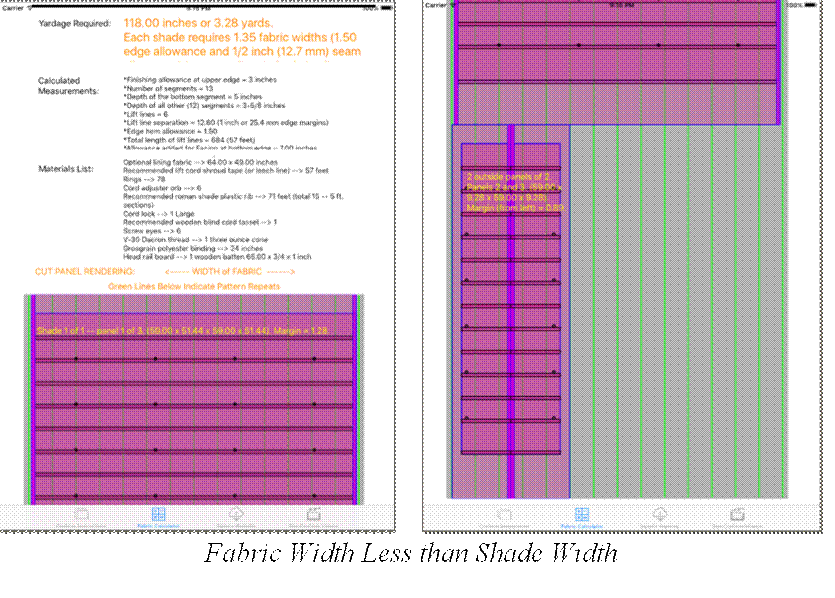
If the “Pattern Orientation” selector is changed from the default “Length” to “Width” and “Calculate” is hit again, the calculated measurements will remain the same but the shade will be rendered with the pattern running across rather than down. Since the shade is longer than the fabric width, 3 panels are called for. The intent is to keep the central part of the shade “whole” and move seams to the ends while at the same time making sure that patterns are matched. When multiple panels are required for a shade, a seam allowance of 1 inch (25.4 mm) will be provided. This seam allowance will be indicated with 2 purple 1/2 inch (12.7 mm) bands along mating panel edges on the rendition. Such allowances will generally be located on a pattern initiation line or midway between two such lines. To accommodate the adjacent seam allowances in the two panel additions (panels 2 and 3 — we call them “remainders”), the seam allowances are offset 1 inch (25.4 mm) from this point in the primary panel.
| Shades that require more than one width of fabric and made of fabric with a horizontal pattern repeat equal to half the fabric width or nearly that will make use of the extra fabric on the edge beyond the nominal width. Margins in this case will be shown as negative numbers. |
Consider the following shade: 65, 49, 1, 54, 3.74,0,1.5,Flat, 4, Length. Here the major, center, portion of the shade is a single panel. The extra width is accommodated by adding panels along each edge. These panel remainders keep the pattern centered and move seams out to the edges. Each remainder pair is centered in a pattern repeat. Their 1/2 inch (12.7 mm) seam allowances will match up properly with those on the primary panels which end 1 inch beyond the pattern center (just as was the case in the paragraph above) 1.28 inches from each fabric edge.
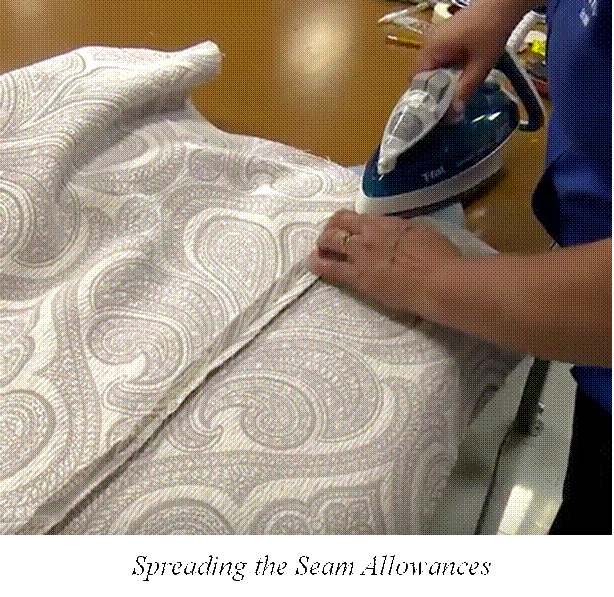
The remainder panels will be sewn one on each side of the primary panel. Lay the pair to be joined on one another “face to face” (not all fabrics have a front and a back, but, if yours does, then the front sides should be facing each other). Baste the assembly together with pins or with double sided “transfer tape” (seamstick) in the seam allowance to insure accuracy. Put a row of straight stitches 1/2 inch (12.2 mm) inside the matched edges. Put down a pencil line to insure a straight line of stitches or use the Deluxe Magnetic Guide or do both — accuracy here is very important. The calculator will have added just the right amount to the segments to make this seam possible and to insure that the pattern (if any) is continuous. Then spread the seam allowances back against their parent panels. Use an iron with a safe heat setting to smooth them in place.
Spread the panels to check that there are no bubbles or tight spots along the seam.
It should be noted here that the calculator is currently limited to working with at most 2 widths of fabric (3 panels) in the creation of any single shade. Wide shades (or long ones run across the fabric width) will always have a central panel and two bordering panels. If more than one shade is requested, all of the central panels will be rendered first followed by all of the remainders.
Using the Pattern Orientation Selector
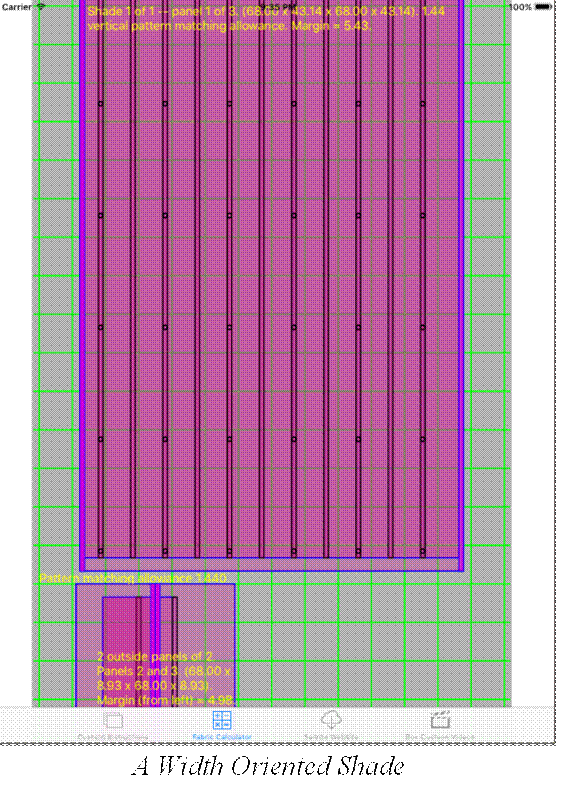
If the pattern would look better running the shade across the width of the fabric roll, change the orientation selector from “length” to “width”. Now the remainder panels are for the top and bottom of the shade rather than for the sides. And the vertical pattern matching allowance is 1.44 inches (see the gap between the primary panel and the remainders below). It will be necessary to initially center the shade manually on the vertical pattern of the fabric roll. This 1.44 inch gap will maintain that placement on the remainders. Extra fabric equal to one vertical pattern repeat should be ordered to make this centering possible.
The seam allowances on the remainders center on the horizontal pattern repeat just as they did above, but they could also center on the green demarcation lines themselves. (Change the length to 46 inches to demonstrate this.) As before, the 1 inch seam allowance at each edge is added on both sides of the primary panel which pushes its edge out beyond the pattern repeat line or its center point as appropriate.
Since yardage can begin at any point along the length of a fabric roll, a little effort may be required in order to establish the begin point of a vertical pattern. This effort will only be necessary if the pattern is to be located at a given point. If that is desired, order a horizontal pattern length of extra material (one length no matter the quantity of shades required) so the shade outline(s) can be adjusted up and down on the cut length.
Lining Panels
The calculator provides the rectangular measurements for optional liner fabric on the second line of the Materials List. The width will equal the width of the finished shade while the length will be 3 inches longer than the finished length so that it can be matched at the top of the shade with the facing. The liner will be narrower than the facing fabric by the width of the two edge allowances.
Notice that there is extra material at the bottom of the shade above. This material should extend beyond the lining material 7 inches (177.8 mm) which will be used to create a facing at the bottom of the shade.
Summary
Let this serve as a brief introduction to the shade calculator. In fact, there is much more to be said about it. But much of that has to do with specific styles (flat, hobbled, slatted, and tucked). Separate chapters will be devoted to each style and each one of these is where relevant features of the calculator will be discussed.
Needless to say, carefully check all measurements
prior to cutting or ordering fabric. Do let us know if you discover a bug in the
calculator. Email Eric Grant at Sailrite (ericg@sailrite.com).
Chapter 8 -- Materials and Tools
The shade calculator includes a list of materials. The items and their quantities are customized for the shade in question. Each list includes just the items that we normally use ourselves in the completion of those given shades. But alternative materials are possible. And specialized tools can be helpful. There follows a more inclusive list of possible materials and tools for a roman shade project. Not everything here will be required for every project. But nothing of consequence will be overlooked if each item below is considered prior to beginning work.
|
Materials List |
Sailrite Pt# |
|
Facing fabric (Brisa Braemore, Dena Home, P/K Lifestyles, P/Kaufmann, Softline, Sunbrella, Tommy Bahama, Waverly, and many, many more!) |
Varied |
|
Softline drapery lining fabric |
#103970 |
|
Softline Suite blackout fabric |
#103997 - 104003 |
|
Monofilament #18 Thread |
#100095 |
|
Ribs |
#104987 |
|
Iron-on rib tape or Silicon Adhesive or a Hot Glue Gun |
#104858 - 108016 |
|
Weight bar (width of shade) |
#104989 |
|
Seamstick 1/4 inch Basting Tape |
#104167 |
|
3M Super 77 Spray Adhesive |
#636 |
|
Velcro Hook and Loop 5/8” or 1” by the width of the shade |
#467100, #471100, #463100, #465100 |
|
Roman shade rings ((segments - 1)/2 * lift lines) |
#104469 |
|
Screw eyes or fairleads (1 per lift line) |
|
|
Cord lock |
#104468, #104857 |
|
Cord (Leechline 5/64” Dacron) |
#21207 |
|
Lift cord condenser |
#104470 |
|
Screws for headboard installation, cord lock, and fairleads |
Varied |
|
Headboard (often pine 1x2 or 2x2) |
|
|
Tools |
Sailrite Pt # |
|
Sewing Machine (The LS-1 Ultrafeed is a Good Choice) |
#300501 |
|
Edge Hotknife Package |
#103800 |
|
Deluxe 5-1/2 inch Magnetic Sewing Guide |
#103597 |
|
Deluxe Seam Ripper |
#18104 |
|
Multi use push pins |
#102985 |
|
Comfort Grip rotary cutter |
#102990 |
|
Cutting mat (18 x 24 inch) |
#102990 |
|
Pencil, scissors, tape measure, straight edge, hand sewing needle, drill with bits and screwdriver, hacksaw, upholstery stapler, steam iron |
|
Facing Fabric
There is no “best” fabric for shades. Any fabric at all can be used. But there are nevertheless some characteristics that are worth looking for in the fabric you choose. Of course it must have a color and pattern that you like. In addition, it will “drape” better if it is rather soft. And durability in sunlight is quite desirable. And a fabric with a “W” cleaning code (water based cleaners can be used) will be easier to maintain.
This said, the fabric used to build the “basic” shade in the opening illustrations is Sunbrella outdoor furniture fabric that is not very soft at all. And, if the fabric you like is not rated well for ultraviolet exposure, lining can be added to protect it. And very few fabrics are rated “X” (cleaned only by vacuum or brushing) — most are capable of being spot cleaned with one or more solvents.
So color and pattern are clearly the most important factors for fabric selection. Other limitations can probably be worked around.
All fabric cutting can be done with scissors or with a "hotknife". The latter is appropriate for synthetic fabric. It can be a soldering iron or gun with a narrow blade or it can be a specially designed professional tool (like the Sailrite Edge listed in the tools table above). The advantage in cutting a synthetic fabric with a such a tool is that the edge will be cut and sealed at the same time. Cotton, and other “natural” fabrics require cutting with a scissors. The resulting edge will not be sealed. But this is not a serious problem with shades where nearly all the raw fabric edges are finished. Any raveling should go unnoticed.
Be careful to cut all lines as straight as possible. We will actually be using the cut edges to guide us in our finish work.
One more caution. Synthetic fabrics do not shrink or stretch enough to warrant special treatment, but the same often cannot be said of natural fabrics. If in doubt, it is a good idea to wash and dry or steam iron cloth made of natural fibers before fabrication.
Lining Fabric
Adding a lining to roman shades is optional. It is recommended if the selected fabric is not rated for outdoor UV exposure. It can also be useful to increase the insulating characteristics of the shade (although this benefit is often oversold in ads for finished shades). Finally, it can help block out light. It is also possible to insert an “interlining” between the shade face fabric and a lining. This is sometimes done to add bulk to draperies, but we do not believe that is necessary or desirable in roman shades that should collapse neatly. As a result, the instructions that follow will describe construction with lining and without, but no mention of a third layer of interlining will be made.
If room darkening is desired, use one of the Softline Suite blackout drapery color choices. Otherwise, for protection from UV, the best choice is Softline drapery lining material also available in several colors.
Thread
The choice of thread used is not critical. Polyester thread does have excellent UV resistance, but color matching is often more important in shades than the durability of stitching. That is why we list the clear monofilament #18 thread above even though it is nylon and thus more susceptible to UV damage. In many cases there will be very little exposed thread in a roman shade. We do our best to reduce that exposure in the instructions following. Some even go so far as to eliminate sewing entirely — using iron on adhesive instead. But, at Sailrite, we are not yet willing to give up the certainty of stitching.
Ribs and Weight Bars
Plastic ribs are wonderful. They are inexpensive, light weight and flexible while still stiff enough to insure consistent folds. And iron on tape makes it easy to adhere them in place. But there are alternatives. Wood dowels 3/16 inch (4.76 mm) in diameter also work well. The “basic” shade that we described early in this manual has 1/4 inch by 1/4 inch wooden “battens” that are glued in place with clear silicone. Other fabric adhesives could have been used with the same results.
Similarly, the relatively heavy metal rods that Sailrite offers work well in the bottom sleeve of roman shades but a thin wooden batten or dowel will work just as well in most cases.
Seamstick and Spray Adhesive
The intention here is to make shade assembly as error free as possible. These adhesives can be used to temporarily hold any assemblies or folds in place until a more permanent fastening is applied (usually stitches). It should be pointed out that spray adhesives tend to stiffen the assemblies which they create and this may or may not be desirable given the project at hand.
The remainder of the materials list should require no comment. But let us note that the entire tools list is mostly optional. The fact is that perfectly satisfactory shades can be constructed with tools commonly available in most households.