A Box Cushion Detail
Building cushions is fun and rewarding! At Sailrite we have always added “And its easy”! This new box cushion calculator makes it even easier. What follows is our attempt to make planning your next box cushion fast and error free.
A Box Cushion Detail
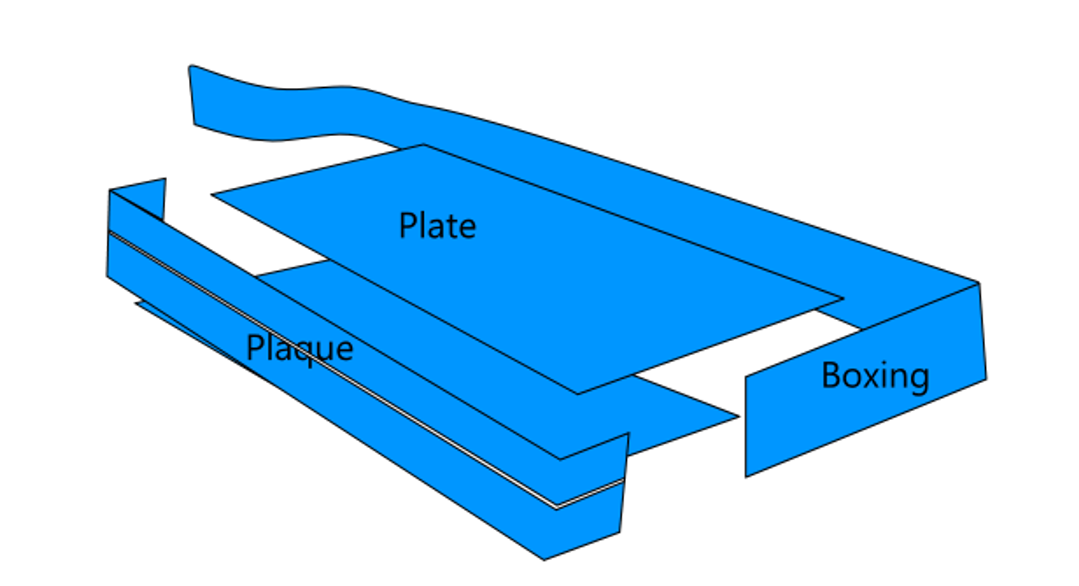
Let’s begin with some definitions. Plates are the top and bottom panels of a cushion. These plates sandwich a filler that can be foam or fiber or a combination of the two. “Box cushions” by definition also have boxing, a narrow band of fabric all round the plates. And there is often one side of the cushion boxing with a slit (often closed with a zipper) that enables the insertion and removal of any filler. At Sailrite we call this section of boxing a plaque. (Note that this use of the word “plaque” is not to be found in any dictionary — it is a term created by Sailrite to serve where no other was currently available. The word “placket” is commonly used to refer to a flap of fabric that covers a closure device over a slit opening — so there is some justice in our usage.) These cushion elements are sewn together inside out so all seam allowance and seam edging will be on the inside. The seams can be dressed with piping (often called "welting") if desired. Piping can be “home made” by folding a narrow strip of fabric over a cord or it can be purchased as a prefabricated vinyl strip. It is also possible to use “French Mattress Seams” to finish edges. We will be considering all of this in detail in what follows.
Of course cushions are of many shapes and sizes. But all these shapes, even circular ones and irregular ones, can be conceived in terms of their "bounding quadrilaterals". Quadrilaterals are four sided two dimensional shapes that are fully defined by their four sides and a single diagonal. It is these objects that we will be defining and manipulating to assess fabric requirements. If curves or cutouts are involved to create the cushion, these can be added after cutting the basic four sided panels.
Cushion filler is available in several varieties. Foam is the most common although fiber fillers are sometimes used. Both types of filler are available in several forms. You will choose one or another depending upon your intended application. Click HERE for help in choosing a particular filler. Here we will assume that all decisions regarding filler have been made. Our focus is on the fabric shell that will encase the filler.
The calculator is the best way to determine exactly how much yardage will be required for any cushion cover job. The box cushion calculator started as a simple program to give yardage ordering information. But it has evolved into a rather sophisticated tool which will not only calculate yardage but also show a rendering of the of the panels needed to complete a project. The panel renditions can be rotated, dragged (singly and as "cushion sets"), flipped horizontally, flopped vertically, sliced, copied, and deleted as desired. This functionality introduces some complexity which justifies the instructions that follow. In addition, some necessary assumptions for seams and hems and boxing and plaques should be made explicit — more about all of this in the following paragraphs.
The initial calculator page elicits fabric information -- the vertical and horizontal pattern repeats (if any) and the width of the fabric. We assume that all pattern repeats are the "block" type (sometimes called "brick" or "full drop") which is characterized by pattern rectangles that repeat down the fabric in parallel columns and across the fabric in parallel rows. Pattern repeats and fabric width can be measured on the fabric if it is available. But this information is always provided on the Sailrite Web site -- after finding the appropriate fabric, click on "Description" and scroll down to "Specifications". If fabric repeats are not listed, there are none and the default "0" can be accepted.
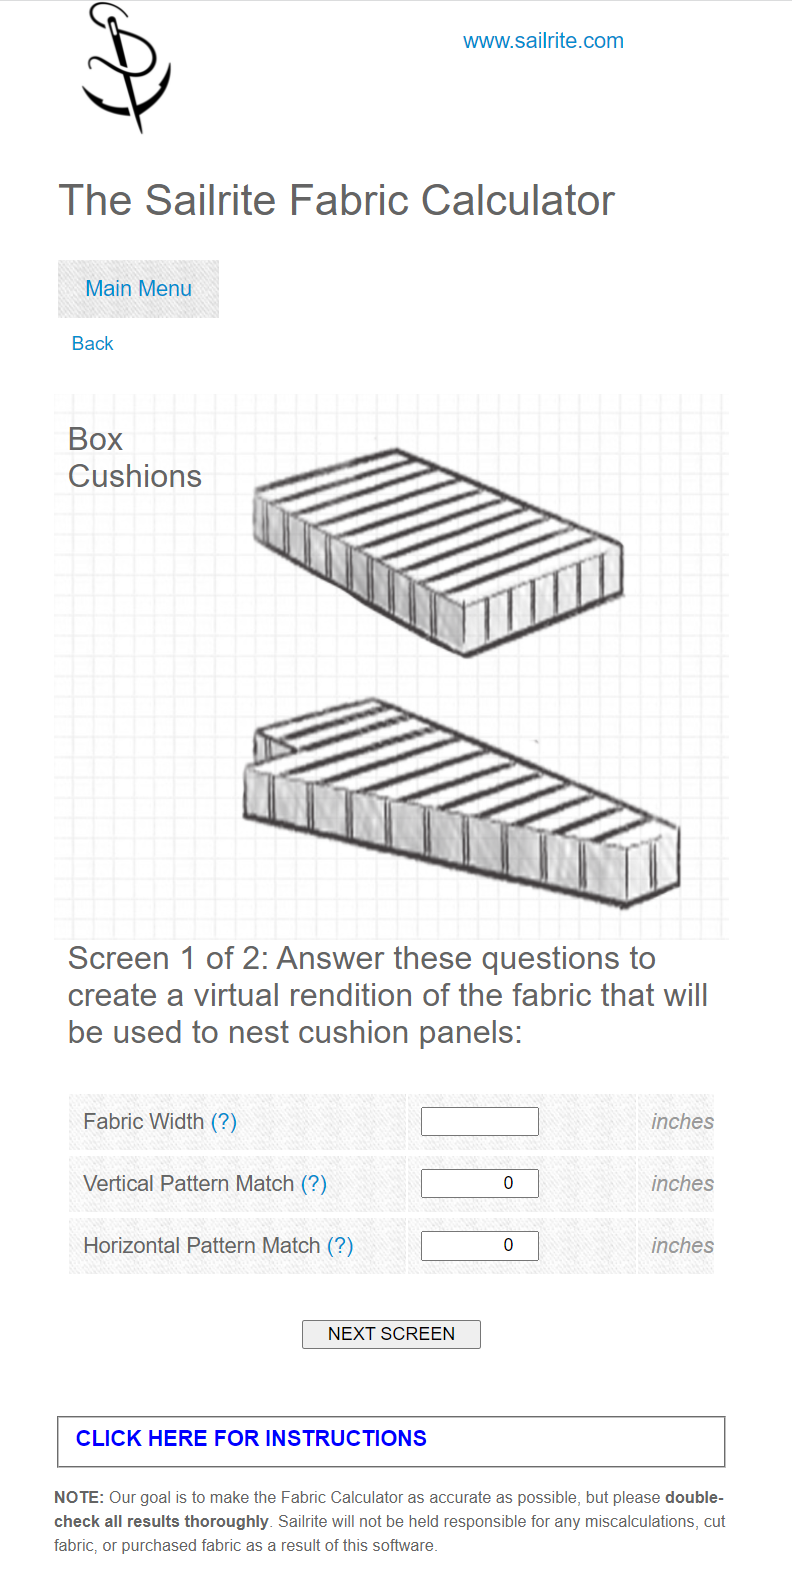
The Initial Box Cushion Calculator Screen
If 54, 14, and 9.33 are entered (the appropriate figures for Sunbrella® 145656-0001 Resonate Dune 54" Upholstery Fabric), and "Next Screen" is clicked, a second screen will appear where cushion dimensions can be entered. Scroll down to reveal the scale rendition of five yards of the desired fabric. Red lines on the rendition indicate where pattern repeats begin and end.
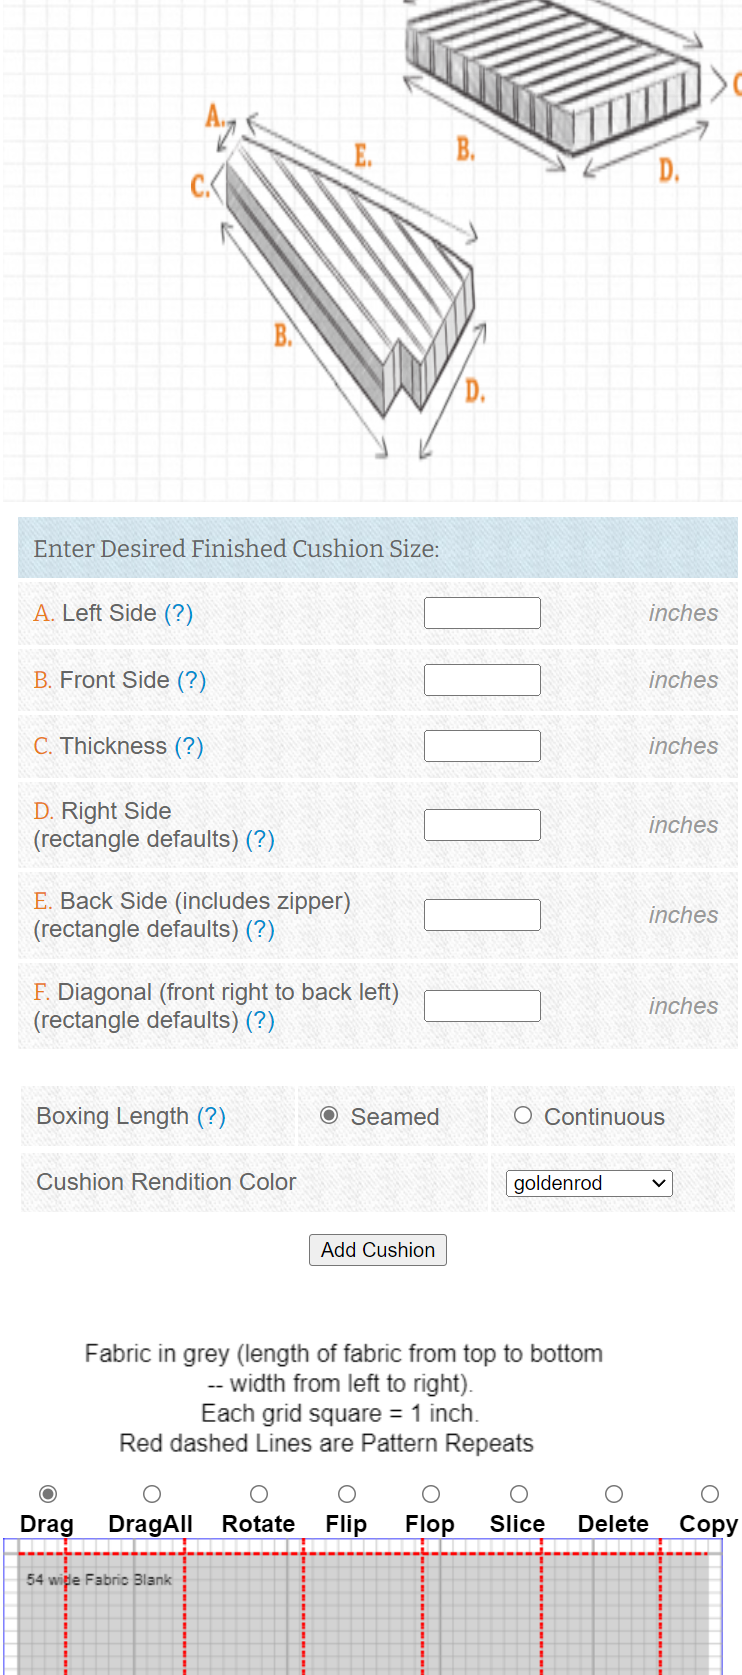
The Second Box Cushion Calculator Screen
This rendition is the proverbial "blank slate". We can create any four sided cushion pattern and drag it anywhere on the surface represented. Simple rectangular patterns are defined by entering "left side", "front side", and "thickness". Try it out! Enter 24, 36, and 3 in the first 3 fields and hit the "Add Cushion" button.
Default values will have been calculated for the three remaining fields on the assumption that a rectangle is intended. If the "right side" and the "back side" numbers or the "left side" and "right side" numbers are overridden, the default diagonal will either create a keystone pattern with the unequal sides centered, or, if all the entered dimensions are unequal, a diagonal will default to create an irregular cushion with its lower left corner a right angle (this is useful for creating forepeak cushions on boats).
Each time the "Add Cushion" button is pressed, all the panels required for that cushion will be created and displayed as patterns with a selected color in the rendition. These panel patterns are crudly "nested" by the software -- all boxing strips will be vertical either to the right of the plates or below them depending on the size of the cushion. They can be dragged from there to any location on the rendition either one panel at a time (if the "Drag" radio button is selected) or all the panels of a cushion at the same time (if the "DragAll" radio button is selected). Each panel can also be rotated, flipped, or flopped to minimize the yardage required. Each time a panel or set of panels is modified, the total yardage required will be recalculated and displayed on the first line of the list of materials that is displayed just above the rendition. Click on the blue colored text in the list of materials to hyperlink to the Sailrite website where the items can be ordered -- place them in a shopping cart and then return to the calculator tab where additional blue text can be clicked and thus added to the existing cart. All will be preserved as you move from the calculator to the website and back until the cart is filled with all needed supplies which can then be ordered with just a click or two.
When additional cushions are added (either with similar dimensions or new ones), the necessary panels will be displayed just below previous panels (with a one inch separation from the lowest edge of all previous panels). They will also be roughly nested with boxing to the right or below.
Let's talk in more detail about the radio buttons at the top of the rendition. The "Drag" button will be checked once a pattern is added and by default after using any other button. Clicking ("touching" on moble devices) on a stack of patterns will drag the most recent one added to the stack. And, as noted above, the "DragAll" button moves all the panels of a single cushion at a time. If the "Rotate" radio button is selected, any pattern clicked will be rotated roughly 1/4 turn so that the side that was "bottom" becomes parallel to the left edge of the foam blank. In similar fahion, the "Flip" button will invert clicked patterns vertically. The "Flop" button causes an inversion horizontally. These latter two choices have no apparent impact on rectangles. The "Slice" button will cut away part of a pattern that is off the grey area either to the right or below and create a new pattern for the cut area in the upper left corner of the rendition. This can be an important feature since it is often possible to split a panel and nest it more efficiently. Partial panels can readily be sewn together -- a half inch seam allowance is added to each slit edge to provide for this. Any pattern clicked on after the "Delete" button is checked will disappear. The "Copy" button reproduces all the panels of a given cushion in their current relative locations and offsets them slightly to the right and down -- their color will be white.
The "Slice" button will cut away part of any pattern that is off the grey area to the right and create a new pattern for the cut area above the saved portion. This is an important feature since it is often possible to split a pattern and nest it more efficiently. It also makes it possible to create horizontal boxing lengths greater than the width of the fabric. Partial panels can readily be sewn together and we will see below how patterns can be smoothly passed from one of these panels to another. The App adds 1/2 inch seam allowance to each sliced edge.
A Flipped Cushion with Roughly 12 inches Sliced from the Bottom -- the slice is not flipped
It should be noted that slice can only be used to separate two corners worth of pattern from the other two corners. That is, the software does not support five sided patterns or small slices from a single corner. An error message will be displayed if a slice attempt is made that does not conform to the system requirements.
These radio buttons, located as they are at the top of the rendition, will be awkward to use if the rendition becomes lengthy. And, since the buttons automatically return to "Drag" upon execution, they require frequent use. To overcome this problem, a right click (or long touch or two fingers depending on the device) brings up a context box with all the radio buttons so the appropriate action can be selected without leaving the current rendition location. (This "context menu" function does not currently work with Apple mobile devices -- it is thus necessary to access the radio buttons by scrolling to the top of the rendition with each use.) Once the action is selected, clicking on the appropriate pattern will execute it.
All newly created patterns and all rotated patterns are oriented with their left sides parallel to the left edge of the foam. This introduces a measure of initial order. "Flipping" and then "flopping" one of these patterns will usually make nesting more efficient for angular shapes. But when such a pattern is "flipped" the left hand side will not be parallel to the foam edge. This is not a problem, except that slicing such a shape on the bottom or "y" edge of the foam will result in a newly created sliced off part of the original pattern that will not be flipped so that it can be lined up with the left side parallel to the foam edge. It can quickly be flipped if that is useful and, of course, the remaining portion of the pattern which will remain flipped can itself be flipped again to an "unflipped" state if desired.
While on the subject of "flipping" and "flopping", it should be noted that, when using fabric that has a "right" and "wrong" side, cushions that are not symmetrical ("irregular" cushions) must be patterned so that one plate of each pair is "flipped" or "flopped". The software will advise users of this.
Although slicing is possible and perfectly manageable with small panels, large panels can become confusing, especially if there are several of them. In such a case, I recommend doubling the width of the fabric (there is usually enough of a selvage edge to provide seam allownce when they are seamed together -- check out THIS VIDEO for pattern matching instructions). I like to use a French Seam to finish the seam that joins the two lengths of full width fabric. This seam will really dress up the cushion. Click HERE for a video tutorial on this type of seam. Measure the finished width of the combined panels -- fabric width is always "nominal" so your matched panels may not be exactly double that nominal width.
Remember to double the yardage ordered if you double the width of the fabric! Also order an appropriate length of grosgrain ribbon to back up the seam. Click HERE for choices.
If more fabric is required to fit a cushion, the app will add to the rendition length automatically. But you can also add yardage to the rendition yourself by clicking on the "Add 5 yards" button at the bottom of the rendition. 5 yards of additional fabric will appear below the current yardage in the rendition. All the cushion patterns created thus far will be retained and they can be dragged onto the new fabric as needed. New patterns can be added as well.
Having nested the required shapes appropriately, all modern browsers (Safari, Firefox, Chrome, and Microsoft Edge) offer a "print" option which can be used to generate either a PDF file or, if a printer is available, a paper printout of the work done which can be used later to cut the fabric when it arrives, having ordered it from Sailrite. Those using phones or tablets can take "screen shots" of the rendition to preserve their work.
Our customers' biggest concern is often "What measurements do I need and how do I use them to create a proper fit." Let me respond to that question first. The key dimensions for any cushion are determined by where it will be used -- how wide and long and deep is the place to be occupied by the cushion. Given these measurements, we use a simple rule of thumb to cut the foam. It will be cut 1/4 inch (.64 cm) big on each side: 1/2 inch extra width and 1/2 inch extra length. Obviously this rule of thumb dimension might benefit from enlargement in the case of softer foam or in case of relatively large cushions. And if you are making doll house furniture cushions it is certainly too much. But for normal cushion sizes of foam with relatively normal density and firmness, the rule of thumb works! In some of the Apple cushion apps I develop algorithms allowing for variations in foam and size -- although the resulting cushions are fine, they are just not notably better than those resulting from use of the rule of thumb so long as the cushions are of "normal" size and thickness.
If you are making a cover for an old piece of foam, measure that foam and subtract 1/4 inch on each of the four sides. These measurements will define the finished size of the cushion.
Now what about the size of the cushion cover, the plates on top and bottom and the facing along the sides? How should they be sized and how should we allow for seam allowance? The Sailrite team use the foam as a master pattern. And that can be useful, it provides a kind of "connect the dot" method that simplifies things. And, of course, the Box Cushion App provides complete dimensions that connect dots behind the scenes. Here I want to "explain" these dimensions.
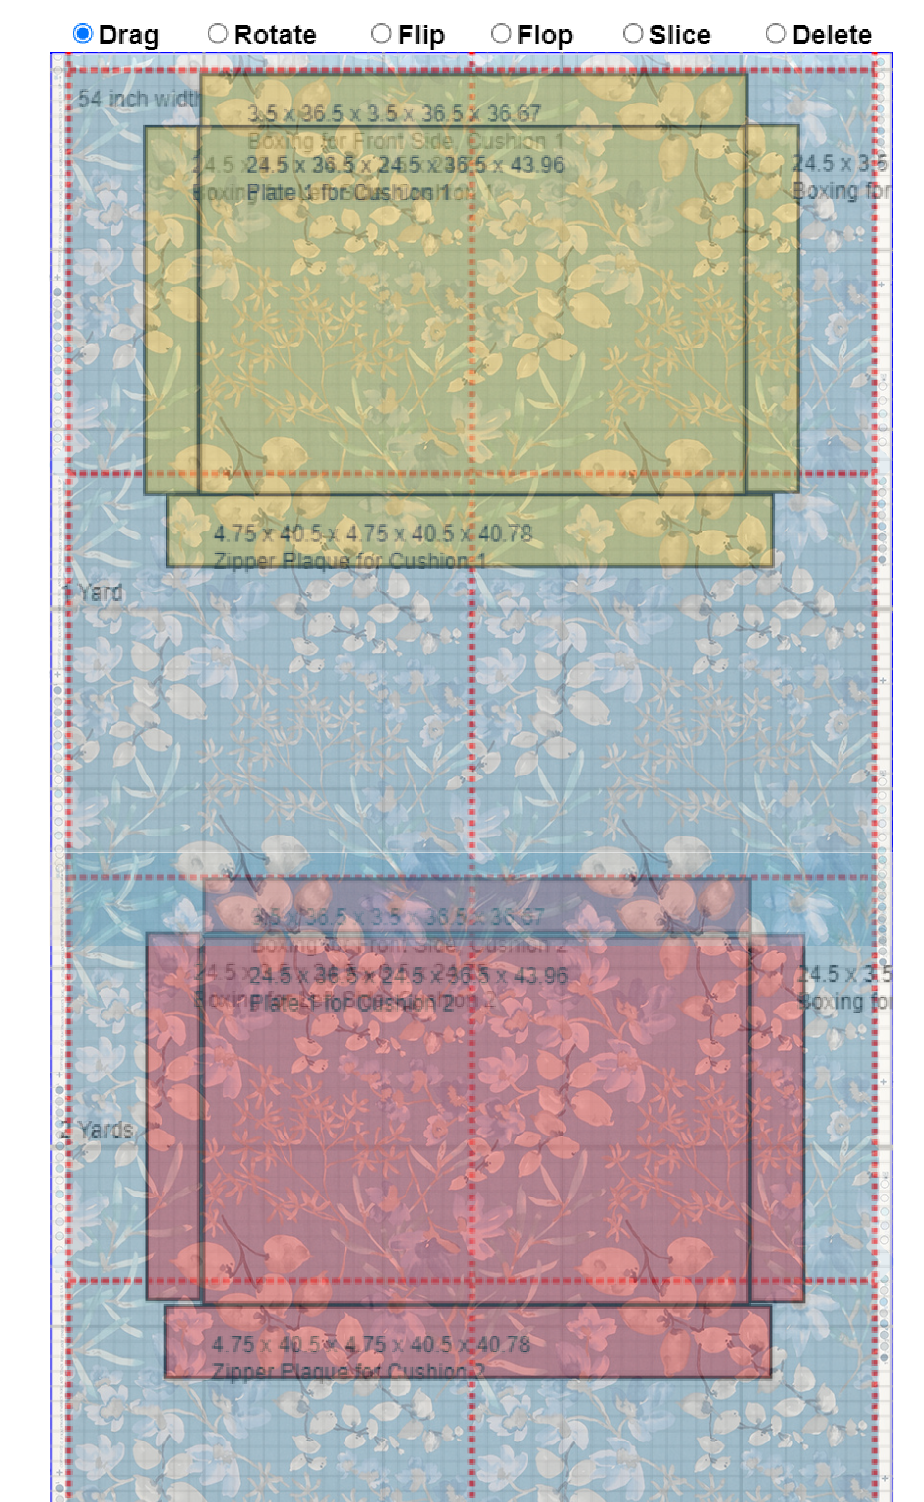
If you enter dimensions of 24, 36, and 3 in the A, B, and C fields of the second page of the calculator (after having entered 54, 14, and 9.3 in the three fields of the first page), the following will result.
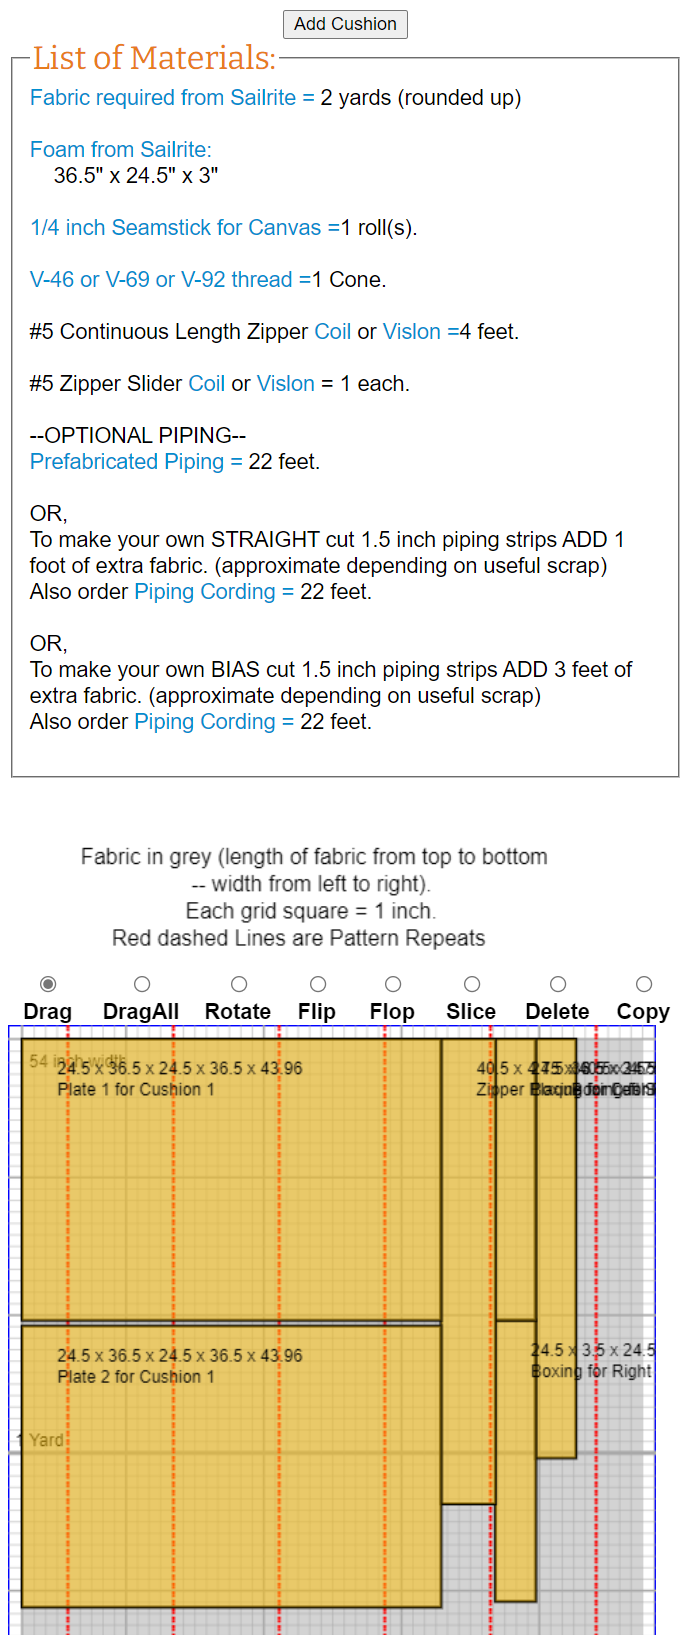
A 24 by 36 Cushion Detail
Note that under "List of Materials" the foam is 1/2 inch larger on both sides than the finished size of the cushion. And, if you move the stack of panels in the rendition so that their labels can be read, the plates are similarly sized. And the boxing is also 1/2 inch thicker than our 3 inch desired finished thickness. The plaque is 1-3/4 inch thicker than this thicknes. This width will be split and a zipper will be installed. The finished plaque will be exactly the width of the boxing. Each boxing panel is the same length as the plate against which it will be matched (we left the default "Seamed Boxing" radio button checked -- continuous boxing will extend the length of three sides with some extra for finishing work). The plaque panel if 4 inches longer than the back side of the plates to allow for slight needle pucker shrinkage and for zipper slider pockets at each end.
You should note that all seamed edges (the edges of the plates and those of the boxing and the plaque) are extended 1/4 inch beyond the expected finished size. All seam allowances are 1/2 inch. which means that the finished size of each plate, boxing, and plaque panel will be 1/4 inch shy of the expected finished size on each edge. This insures that the cushion cover will tightly fit over the 1/4 inch too large on each edge foam.
The reason that this works is twofold. First, the foam (unless it is very firm) will compress. Second, there is a "rounding reduction" that is subtracted from plate length and width and from boxing width top and bottom. Rounding reduction occurs because cushion edges are not 90 degree angles. They are more or less rounded depending upon the firmness and upon the thickness of the filling. The calculator uses a reduction of .25 inch (6.35 mm) that has served us well for normal box cushion sizes and foam firmness.
The rounding reduction is very important. Cushion covers will be smaller than the foam they enclose. Indeed they will be smaller (1/2 inch -- 12.7mm -- from edge to edge) than our finished length and width and thickness. We add 1/4 inch to each finished cushion length and width edge and to both sides of the boxing (1/2 inch overall in each). Then we use 1/2 inch to create seams. As a result the finished cushion length and width will be 1/4 inch less than our "finished measurements". And the boxing will also finish 1/4 less than the foam thickness. Into this slightly small shell we insert foam that is 1/4 inch oversize in length and width. The result will be a tightly stuffed cushion with slightly rounded edges that measures the finished width.
Obviously these "rules of thumb" would not work with small thin cushions or with large fluffy ones (such cushions are usually clad in "pillow case" covers). But the rules do work for the two or three or four or five inch thick cushions of normal cushion size (from chair to sofa size) that have a box shape. If the cushion is thin or if the foam is very firm (like closed cell foam), feel free to add 1/8 inch to the lengths and widths of all panels.
The pattern matching made posible by the calculator is perhaps its most unusual and useful feature. Pattern matching means that the pattern will be pleasingly displayed and similarly distributed from one cushion to another. This will often require space between panels in the direction that the pattern runs (horizontally and vertically) — that space is required to move the new panel over to the proper beginning point on the pattern repeat.
Pattern repeats cannot be accommodated unless their values are known. The horizontal and vertical repeat fields are necessary to provide for pattern matching. With a little study, it is possible to determine the beginning and ending points in a patterned fabric but, fortunately, these measurements are readily available from whatever fabric outlet is used. Sailrite displays them under the “description” listing for each fabric. If one or both repeats are missing, that means that there is no pattern (at least no discernible pattern) in that direction.
Vertical repeats run along the length of the cloth roll and horizontal ones across its width. The pattern repeat input fields both default to “0”. When values are entered in one or the other of the repeat input fields the cushion images will display red dashed lines depicting the direction and location of the repeated pattern. If both repeat fields are filled, a cross-hatched pattern will display.
Note that these dashed red lines are only displayed when the pattern repeat (in either direction) is greater than one inch (25.4 mm). Smaller repeats are considered inconsequential and, were they not ignored, there would be a noticeable delay in program execution resulting from so many calculation iterations.
When the cushion fabric is patterned, boxing and plaque can be rotated and dragged to improve appearance and maintain consistency. Solid color fabrics make boxing and plaque placement that better utilizes scrap fabric possible.
Plates should all be similarly arranged on the horizontal and vertical pattern lines if consistency is desired. If the fabric is striped, having only red lines going up and down the length of the fabric, there is a simple rule to follow: make all boxing and plaque run from side to side across the fabric (slicing may be required) and line these panels up with the appropriate two plate edges where the stripe is perpendicular. Offset the two boxing strips that will parallel the stripe by 1 inch -- one to the left and one to the right. When these offset ends are sewn to the front boxing, the stripped pattern will be continued evenly round the front corners. The plaque will be extended round the back corners to hide the stripe missmatch there. Below is a simple 24 by 36 by 3 inch cushion overlayed with the Preston Stone pattern. I have offset the short horizontal boxing strips, the one for the left side to the right of the boxing strip for the front side by 1 inch and the other to the left of that front boxing strip also by 1 inch. Preston Stone is 46 inches wide with a 7.5 inch horizontal pattern. There is no vertical pattern (enter 0 in that field).
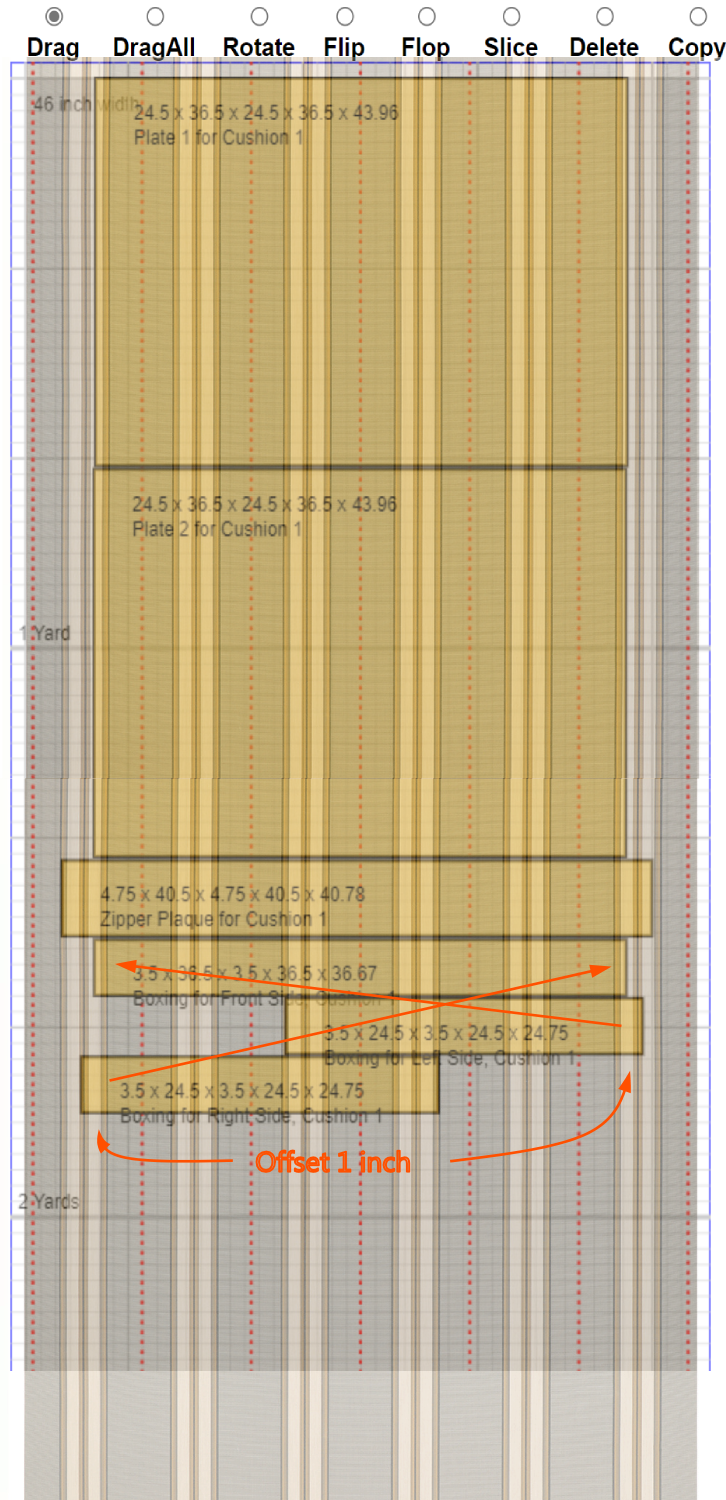
A 24 by 36 by 3 Cushion with the Preston Stone Pattern Overlayed
When the left boxing is sewn to the front with a 1/2 inch seam allowance, the horizontal pattern will be continued smoothly through the seam. The same will be true when the right boxing is sewn to the other side of the front boxing. We have demonstrated an important principle here -- horizontal pattern repeats can be joined smoothly if rightward sides extend 1 inch over the same pattern section occupied by the leftward side. And leftward sides can be similarly joined to righward sides with a similar extention.
Consider, for example, the same Cushion with continuous boxing and Preston Stone fabric. In the following rendition we have rotated both the plaque and the boxing. The plaque really should be sliced here -- it will be 1/2 inch short. But I have thus far split only the boxing to illustrate how it can be seamed together while maintaining the horizontal pattern. Each split section is first centered one on top of the next in any order (the order will matter if the cushion is irregular). Then move lower sections 1 inch to the right of the one above. The third section in our example will be 2 inches to the right. Cut the sections and sew the lower cushions to the left end of the ones above with our regular 1/2 inch seam allowance.
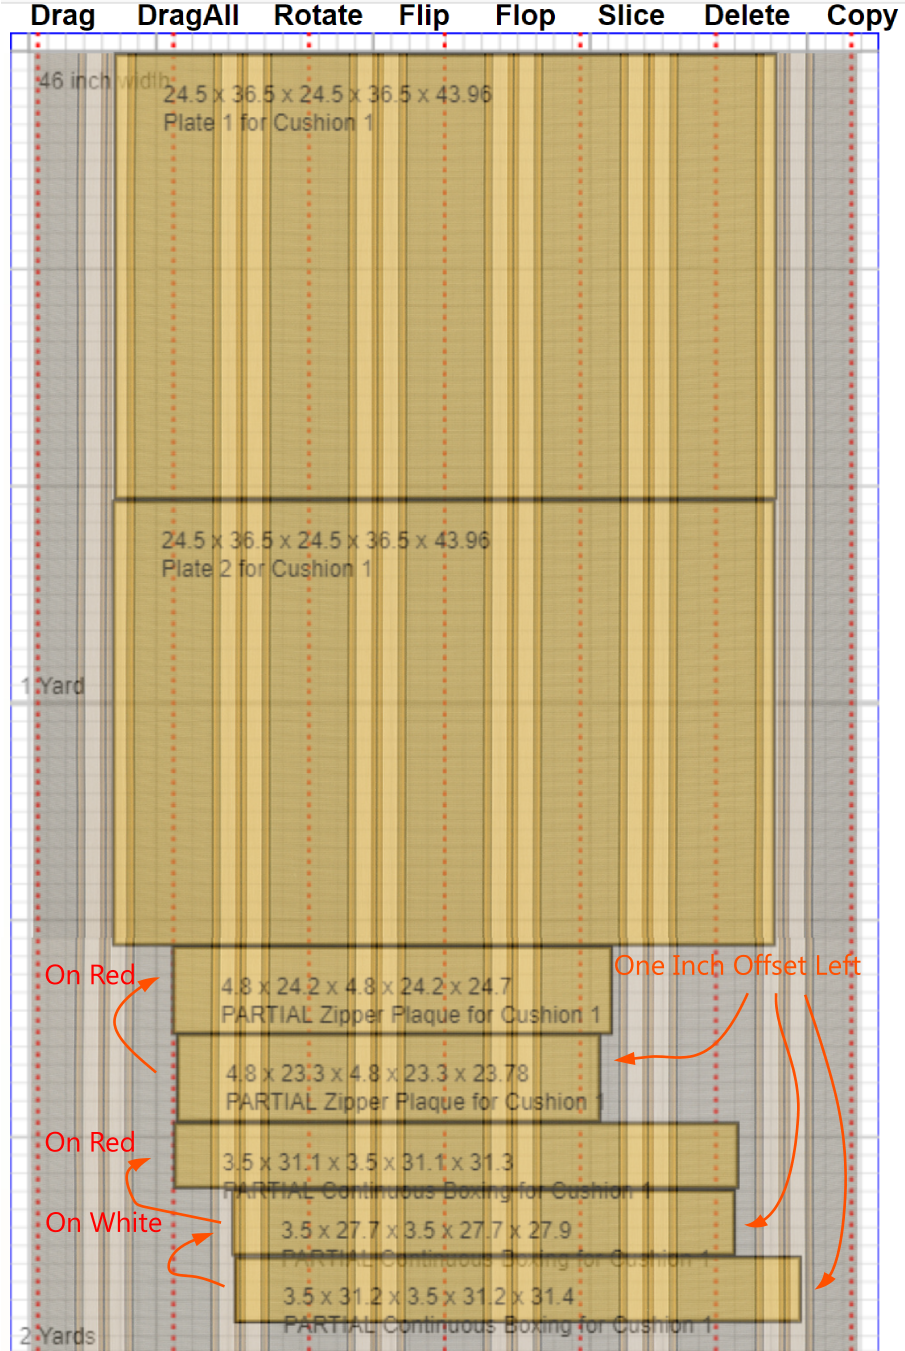
A 24 by 36 Cushion with Continuous Boxing and Preston Stone Overlayed
In the same way, vertical pattern repeats can be joined smoothly if upper sides extend 1 inch over the same pattern section occupied by the lower side. And lower sides can be similarly joined to upper sides with a similar extention. And this statement enables us to proceed to more complex patterns.
Floral patterns require the most care. For example, consider the fabric "Bolero Marina" with vertical pattern repeat of 27 inches and the same pattern repeat vertically. Large pattern repeats always require more fabric and planning care. I want to create 4 cushions. Both will have underliner bottoms (with a pattern this large we cannot match pattern on both sides of the narrow boxing and plaque). The boxing and plaque will run from bottom and over the top matching the pattern. The match will be less than perfect in the case of the first 2 cushions but there will be little scrap fabric. The second 2 cushions will feature almost perfect pattern match but there will be a good deal of scrap.
Let's first create the 4 cushions. Enter 54, 27, and 27 in screen one and then 24, 36, and 3 in the second. Use the default orange color for the firstand red for the second. , green for the third and blue for the last. Drag "plate 2" from each color set down to the bottom of the rendition since these will be cut from underlayment material -- they are not of concern right now. Then drag all of the remaining green and blue panel "sets" down to get them out of the way for now. We will make the orange and red cushion panels our 2 "less than perfect" examples. Use the "zoom" capability of your browser (unless your using a mobile device) to show the entire length of the rendition on the screen so each cushion set can be dragged in one motion. Then zoom back to 100% for what follows.
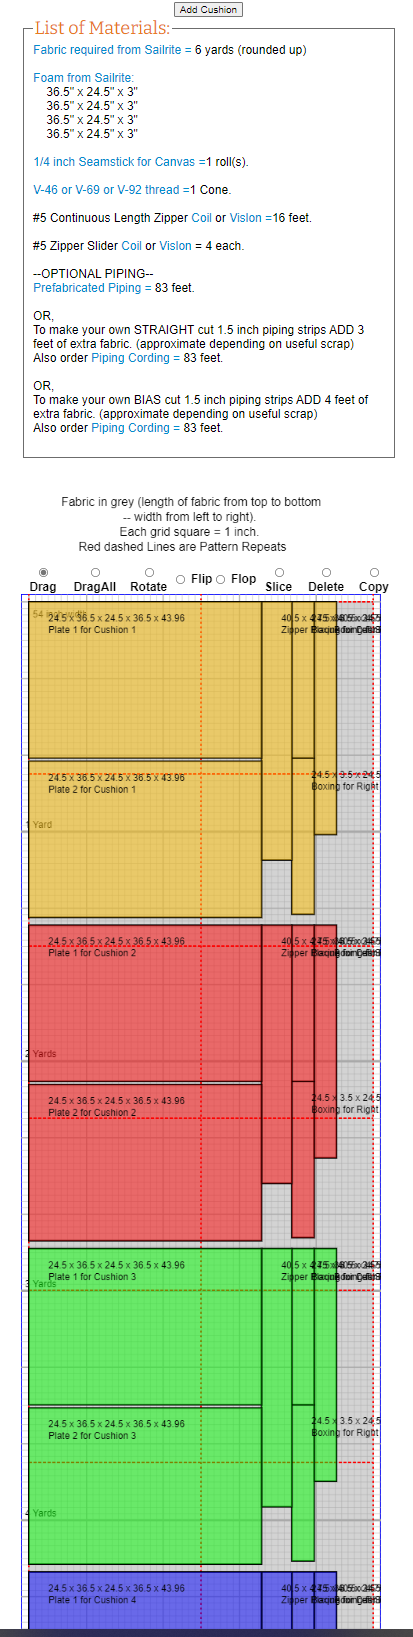
Four 24 by 36 Cushions with the Default Nesting
Rotate the orange and red front boxing strips and their plaques once so they run from side to side across the fabric. Drag the orange front boxing to the top red pattern dash line and drag orange plate 1 just under it -- center both. Then drag the orange plaque to the bottom of the orange plate and center it as well. Finally drag the left and right boxing strips to the appropriate plate side. Follow the same instructions with the red front boxing and plate and left and right boxing strips but move them down to the next pattern repeat dash line. If the pattern were superimposed the following should result. Just under 2.5 yards of fabric is required for the construction of these two cushions.
Two 24 by 36 Cushions Nested Crudely to Save Fabric with Bolero Pattern Superimposed (bottom plates are below -- not shown)
This practice is quite common but, in our opinion, not attractive.
On sewing, the pattern will not match perfectly along the seam joining plate and boxing and plaque because of the 1 inch required for the seam (1/2 inch on the plate and another 1/2 inch on the narrow strips). But it will be very close and this is often enough.
Note that if the boxing and plaque are not cut away from the plates, the resulting shape would be very close to that of a "quick and easy" box cushion -- two adjustments, the plaque would have to be trimmed by two inches on each end and boxing width would have to be reduced by a 3/4 inch seam allownace (the seam does not exist). Such a cushion would have no seams on the top edges and, as a result, the pattern would be perfectly matched.
In the same way, if the plaque were shortened by four inches and if its width were increased by a zipper width and if it were split in half, the panels could be arranged to form the shape similar to that required for a "30 minute" cushion. If it were then cut out as one piece and sewn, there would be no edge seams at all and the pattern matching would run continuously round the cushion.
But many prefer the tailored look of box cushions with seams. And, of course, seamed edges can be finished with piping (welting). Finally, if the shape of the cushion is not rectangular, the quick and easy or 30 minute approach will not work at all. So how do we match pattern in cushions with cut away boxing and plaque?
The Finished Cushion Done Right -- Patterns Match Over the Seams!!!!

All four 24 by 36 Cushions Nested
If more precision is desired in box cushions with separate boxing and plaque, lets turn to the second two cushion panels in our rendition (colored green and blue). In order to avoid the mismatch caused by the 1 inch seam allowance we position these panels each 1 inch lower, higher, left, and right than their respective position in the two cushions above all the while maintaining relative position to the plate. It will be necessary to skip down to new pattern repeats to accomplish this.
First duplicate just what we did with the orange and red panels. But then slide each panel up, down, left, or right until it overlaps the green plate one inch on all sides. The zipper plaque overlaps the boxing such that seam allowance would be cut away. So drag the plaque strips down to the appropriate position on the next pattern repeat below. Then drag the green plate 1 down until it fits in the same relative position over a pattern below (this will require skipping down past the pattern partially filled by the zipper plaque). When cutting the short overlapping boxing corners, cut as though creating miter joints.
And do the same thing with the blue cushion patterns. Next drag the blue plate 1 down to the relative position on the pattern below.
When this work is accomplished, a little more than 6 yards instead of the 2.5 above are required, but all the boxing and plaque patterns will run continuously up the side of the cushions and over the top. The rendition to the right results.
Cutting all the panels must be done carefully. We recommend that chalk marks be placed at each pattern repeat. Then inches can be counted from those marks and from the fabric edges (if necessary, cut the fabric or mark it to the width of the scale rendition) to keep all pattern placement accurate
When these panels are carefully cut and assembled, the pattern will continue perfectly over the plate edges.
The rendition clearly indicates that the four "plate 2" patterns require a bit more than two yards of cushion underliner and the Bolero fabric should be cut to just over 9 yards for all four cushions. The list of material shows 13 yards required because we left the plate 2 patterns (which will require underlayment material) at the bottom of the rendition.
The calculator will render almost any "box" shape. But some cushions push the "box" envelope! They may have curved, slanted, or cut out sides. When the need arises, simply increase measurements as necessary to create a four sided shape within which the cushion in question will fit. Render this shape with the calculator to determine yardage and all the other materials required. Print the rendition if possible and pencil in curves, slants, and cutouts.
Then sculpt the foam to the required shape. Remember to make it 1/4 inch larger on all sides. The resulting shape can be used to help accurately cut the actual plates and and plaque and boxing. Eric's sidebar from the advanced video is below.
Many more examples could be offered, but personal experimentation is likely to be the best learning technique. There are instances where unusual shapes will create spaces or overlaps in the rendition. And there will be opportunities to make use of scrap material. Fortunately, the renditions make it easy to adjust for these opportunities manually. Do let us know if you discover a bug. Email Eric Grant at Sailrite (ericg@sailrite.com) or Jim Grant directly (islanderinfinity@hotmail.com).
Cushions May Have Unusual Shapes -- the Calculator Can Be Used to Plan for This
I promised in the first paragraph to take up piping and French seams. These are decorative techniques that can add attractive detail to the cushions we make. Sailrite has many videos on these techniques -- so many that things can get confusing. I want to provide a guide to all that work here rather than actually repeating it.
First let me explain that the word "piping" is generally used to describe decorative cord no matter where it is used while "welting" is actually more appropriate here as it refers directly to cord on the edges of a box cushion. We use the more general term because it can be applied to all the projects Sailrite addresses.
And I should also add a note about French matress seams. If fiber filled, they require that 1-3/4 inches be added to cushion size measurements instead of the 1/2 inch provided by the fabric calculator. An additional 1-1/4 inch of fabric must be added to the 1/2 inch on each plate and boxing and plaque length and width -- for a total of 1-3/4 inch added length and width on plates and plaque and boxing. If fiber filled, add 1-1/4 inch to all these pattern dimensions generated by the calculator. Oh, except that a zipper is usually not needed here so the plaque width can be reduced by 1-1/2 inches. The video HERE. should help make this clear.
If foam will be the filler for French matress seams, 1-1/2 inches should be added to cushion size measurements instead of the 1/2 inch provided by the fabric calculator. An additional 1 inch of fabric must be added to the 1/2 inch on each plate and boxing and plaque length and width -- for a total of 1-1/2 inch added length and width on plates and plaque and boxing. If foam filled add 1 inch to all these pattern dimensions generated by the calculator. Yes, a zipper is usually not needed here so the plaque width can be reduced by 1-1/2 inches. Again, the video HERE. should help make this clear.
To make these additions required for French matress seams more evident and to prepare a more relevant list of materials, just open a new box cushion calculator and enter width and length and thickness figures 1-1/4 inches (fiber) or 1 inch (foam) larger than the actual cushion measurements. Note that the foam sizes in the list of materials will be oversized by your additions -- reduce their measurements manually. Also reduce the plaque width by 1-1/2 inches if a zipper will not be used per the video instructions.
If French matress seams are not desired, you will have noted that the List of Materials includes prefabricated piping as well as material quantities required for straight piping or for bias cut piping. They are all optional and, if desired, only one need be selected.
For French seams on the edges of box cushions click HERE.