The Initial Foam Nesting App Page
The Initial Foam Nesting App Page
Foam is expensive. It is best not to buy more than needed. But at the same time it is important to buy enough. The Foam Nesting App is intended to make buying foam wisely as easy as possible. It displays foam sheets in small scale renditions and permits the placement and manipulation of minature "cushion patterns" over these shapes to ensure maximum material utilization without shortfall.
Use mouse clicks to drag objects and initiate actions. Touch events are also supported so phones and tablets can be employed.
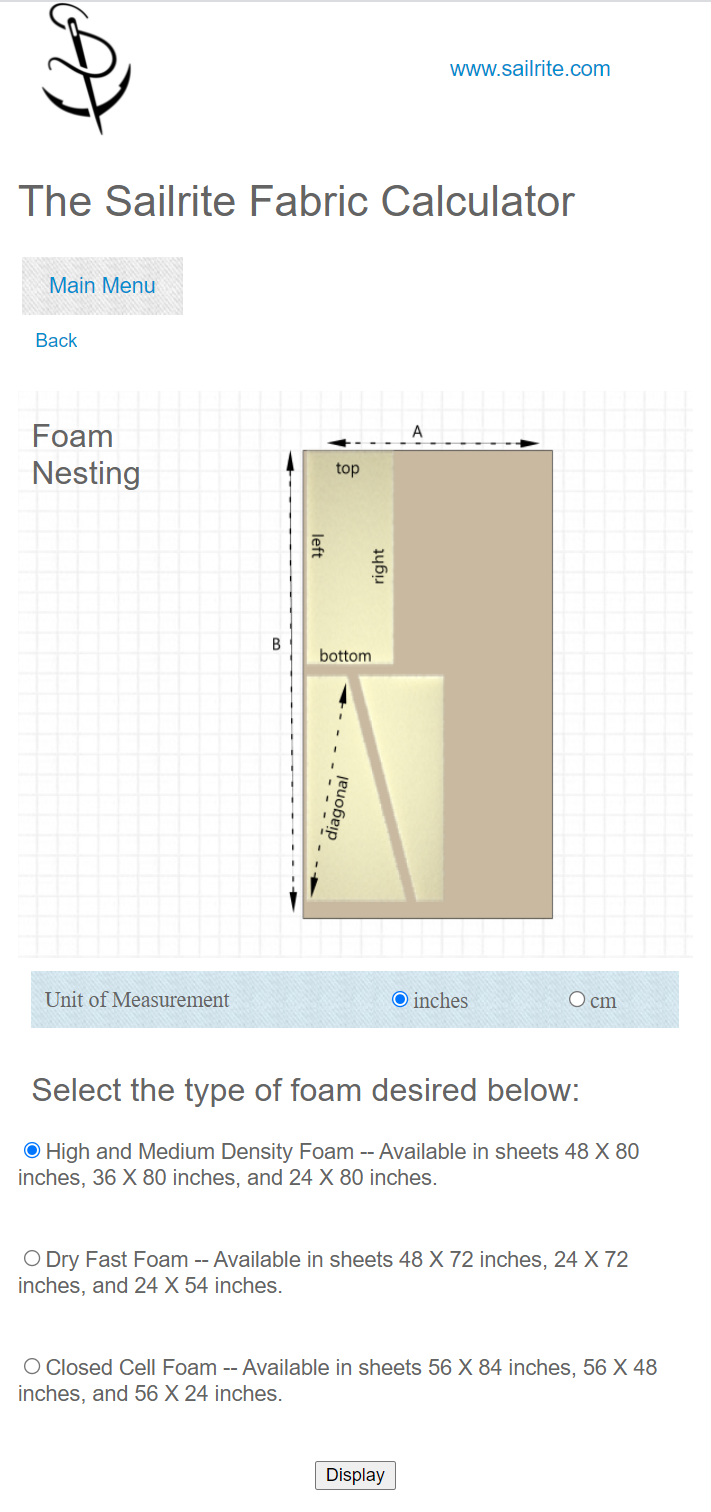
Of course cushions are of many shapes and sizes. But all these shapes, even circular ones and irregular ones, can be conceived in terms of their "bounding quadrilaterals". Quadrilaterals are four sided two dimensional shapes that are fully defined by their four sides and a single diagonal. It is these objects that we will be defining and manipulating to assess foam requirements.
Foam is available in several varieties. You will choose one or another depending upon your intended application. Click HERE for help in choosing a particular foam. The initial page of the App requests that you specify the foam desired. Depending on that choice, the resulting rendition will display an appropriately sized maximum sheet with alternative smaller sizes indicated as overlays. These overlays are all pushed down and to the right into the lower right hand corner of the maximum sheet. This placement makes it possible to "slice" patterns on the right or the bottom and manipulate them entirely within the bounds of the smaller overlays. That should make it easy to determine if the smaller sizes are sufficient for a given project.
The rendition for the medium and high density foam choice is shown in the accompanying figure. It is reached by scrolling down on the second page of the app (after "NEXT" is clicked). The grey rectangle represents the "full" size foam sheet. The green and red rectangles on the rendition represent the size of smaller alternative foam sheets that can be ordered from Sailrite. Since foam production results in sheets of only "nominal" precision, there is a yellow line inside each foam size representing the guaranteed minimum size of each sheet. Oredered foam may be larger than the yellow rectangles, but they will not be smaller in either width or length. The grid lines over the rendtion are spaced on one inch (or one centimeter) increments. There is a slightly darker line every twelve inches (or 10 centimeters).
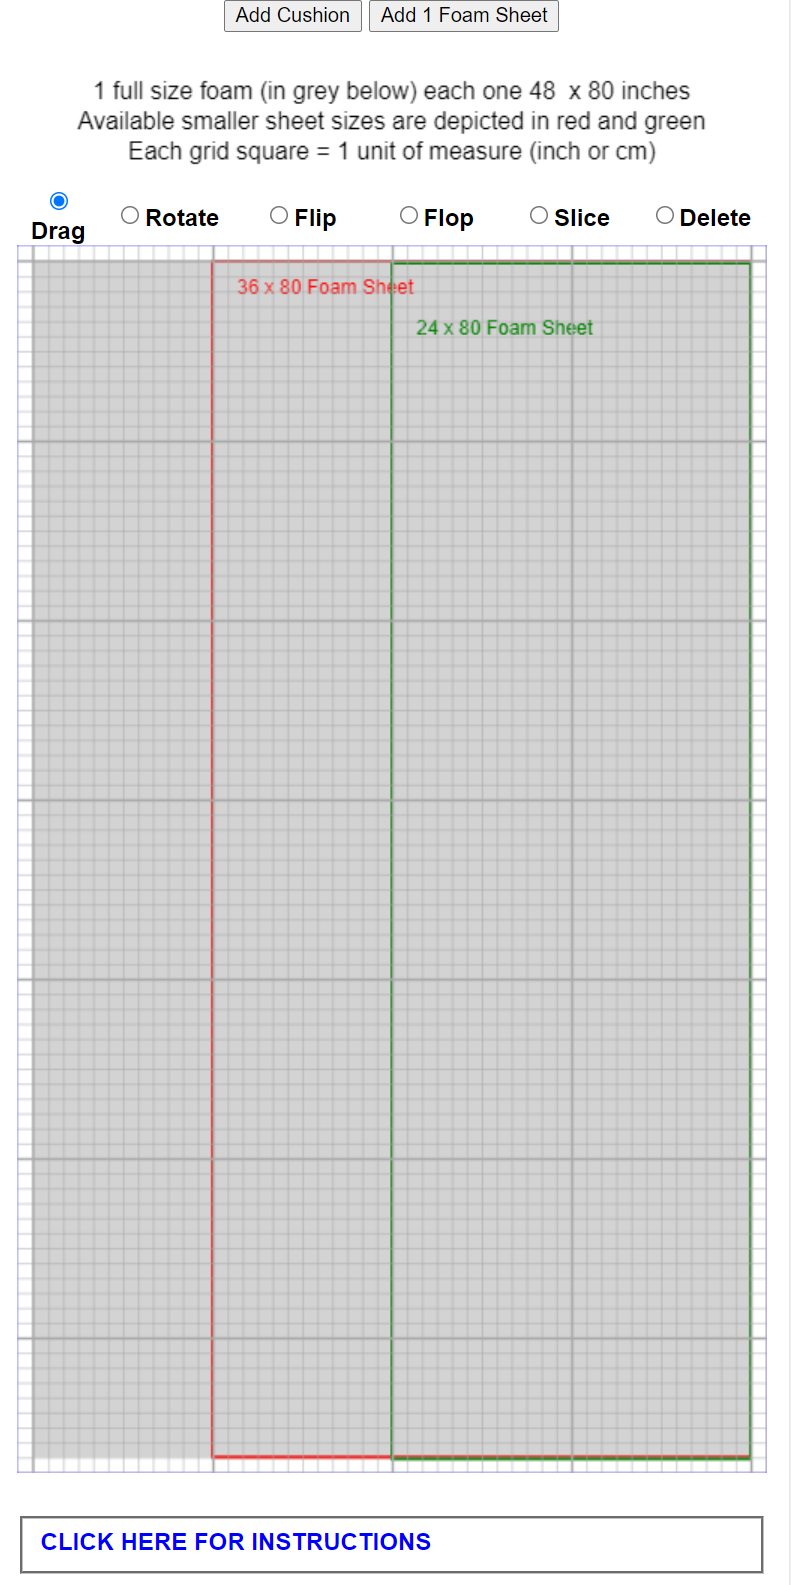
The Initial Foam Rendition (the Add Cushion Page Scrolled Down)
This rendition is the proverbial "blank slate". We can create any four sided cushion pattern and drag it anywhere on the surface represented. The patterns are defined by entering "left", "top", "right", "bottom", and "diagonal" dimensions in the appropriate input fields above the rendition and hitting "Add Cushion". That page is shown in the figure below. The diagonal dimension is measured from the lower left corner to the upper right.
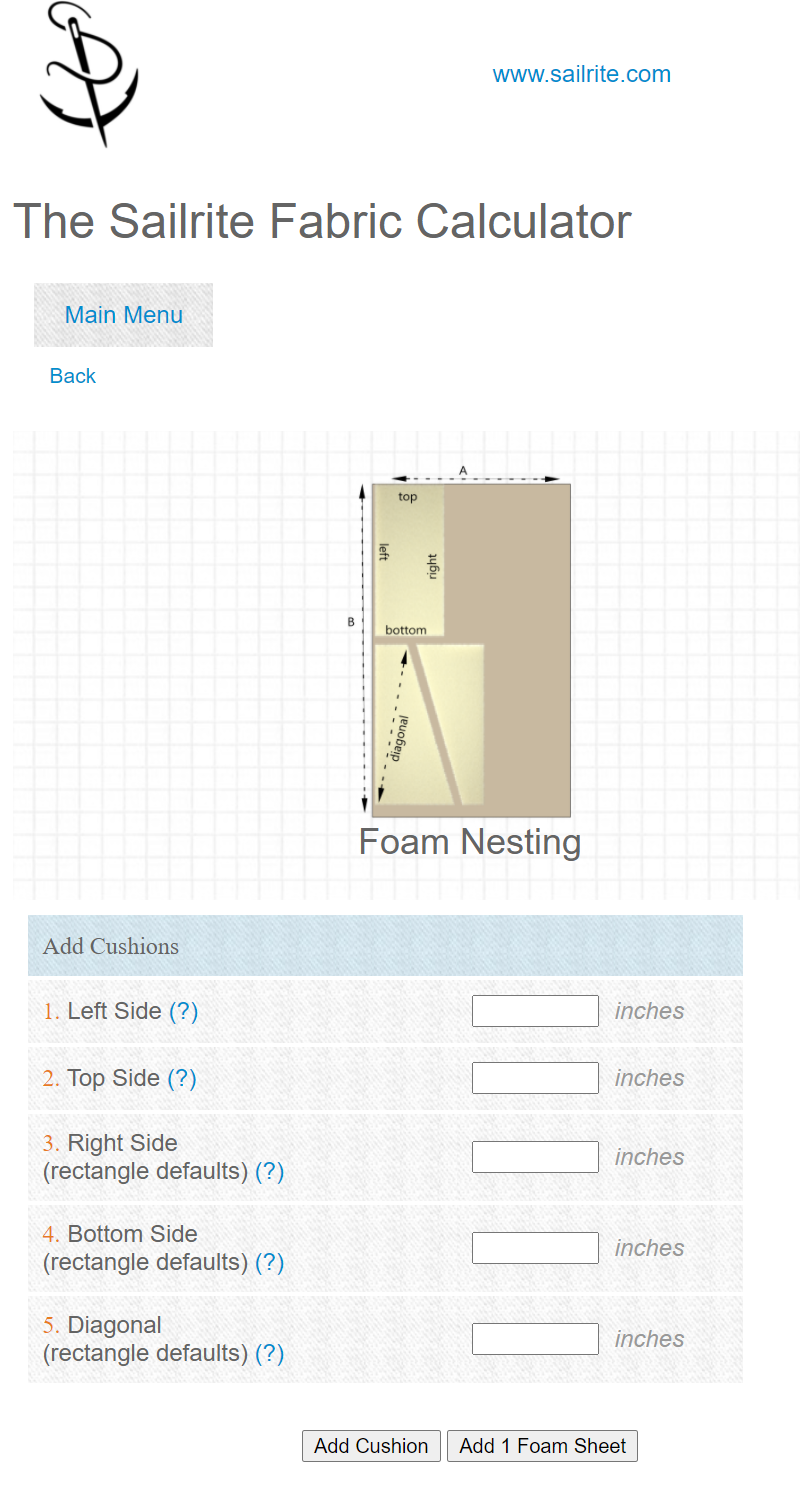
The Add Cushion Page Scrolled to the Top
But many cushions are simple rectangles where the right, bottom, and diagonal can be easily calculated. The software calculates these rectangle dimensions to create default entries. And, if any two sides opposite are the same, the app will calculate a default diagonal that makes the pattern symetrical. These defaults can be modified as needed. As many of a given cushion pattern as appropriate can be added by hitting the "Add Cushion" button. These patterns are stacked in the upper left corner of the rendition. They can be dragged from there to any location on the rendition.
Note the radio buttons at the top of the rendition. The "Drag" button will be checked once a pattern is added and by default after using any other button. Clicking on a stack of patterns will drag the most recent one added to the stack. If the "Rotate" radio button is checked, any pattern clicked after will be rotated roughly 1/4 turn so that the side that was "bottom" becomes parallel to the left edge of the foam blank. In similar fahion, the "Flip" button will invert clicked patterns vertically. The "Flop" button causes an inversion horizontally. These latter two choices have no apparent impact on rectangles. Any pattern clicked on after the "Delete" button is checked will disappear.
The "Slice" button will cut away part of any pattern that is off the grey area either to the right or below and create a new pattern for the cut area in the upper left corner of the rendition. This is an important feature since it is often possible to split a pattern and nest it more efficiently. Partial foam panels can readily be glued together -- if the proper adhesive is used, the seam will not be detectable in the final product. Click HERE for a brief video on the subject.
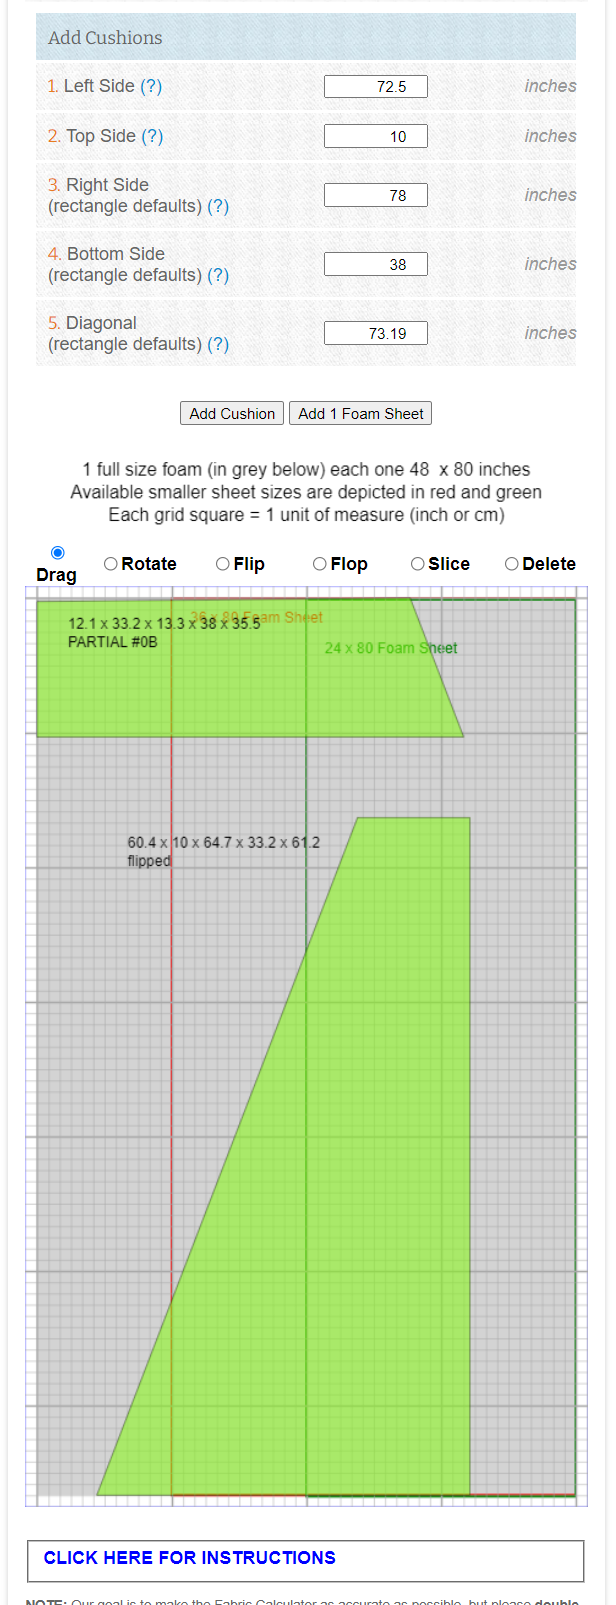
A Flipped Cushion with Roughly 12 inches Sliced from the Bottom
It should be noted that slice can only be used to separate two corners worth of pattern from the other two corners. That is, the software does not support five sided patterns or small slices from a single corner. An error message will be displayed if a slice attempt is made that does not conform to the system requirements.
These radio buttons, located as they are at the top of the rendition, will be awkward to use if the rendition becomes lengthy. And, since the buttons automatically return to "Drag" upon execution, they require frequent use. To overcome this problem, a right click (or long touch or two fingers depending on the device) brings up a context box with all the radio buttons so the appropriate action can be selected without leaving the current rendition location. (This "context menu" function does not currently work with Apple mobile devices -- it is thus necessary to access the radio buttons by scrolling to the top of the rendition with each use.) Once the action is selected, clicking on the appropriate pattern will execute it.
All newly created patterns and all rotated patterns are oriented with their left sides parallel to the left edge of the foam. This introduces a measure of initial order. "Flipping" and then "flopping" one of these patterns will usually make nesting more efficient for angular shapes. But when such a pattern is "flipped" the left hand side will not be parallel to the foam edge. This is not a problem, except that slicing such a shape on the bottom or "y" edge of the foam will result in a newly created sliced off part of the original pattern that will not be flipped so that it can be lined up with the left side parallel to the foam edge. It can quickly be flipped if that is useful and, of course, the remaining portion of the pattern which will remain flipped can itself be flipped again to an "unflipped" state if desired.
If it becomes clear that more foam is required (either as full or partial sheets). Simply click on the "Add 1 Foam Sheet" button. A second (or third or more) sheet will appear below the current one. All the cushion patterns created thus far will be retained and they can be dragged onto the new foam as needed. New patterns can be added as well.
Having nested the required shapes appropriately, all modern browsers (Safari, Firefox, Chrome, and Microsoft Edge) offer a "print" option which can be used to generate either a PDF file or, if a printer is available, a paper printout of the work done which can be used later to cut the foam when it arrives, having ordered it from Sailrite. Those using phones or tablets can take "screen shots" of the foam rendition to preserve their work.