This shade will be lined. It will make use of shroud cord “lift lines” and the shroud will be used to create the hobbles. There will be ribs on each segment in casings sewn right into the shade itself. The edges will be finished with a double folded hem. We will build a shade to fit inside the frame of a window. That frame measures 46 inches (1168.4 mm) in width and 45.5 inches (1155.7 mm) in height.
The first order of business in a project like this is to make good use of the fabric calculator. Hit the second tab to pull up the calculator and enter width (45.5 inches — allow for 1/4 inch clearance on both sides) and height (45.5 inches) and fabric width (54 inches). We will use P/Kaufmann Adelaide Platinum indoor fabric (pt# 106598). The horizontal pattern repeat is 27 inches and the vertical repeat is 27 inches.
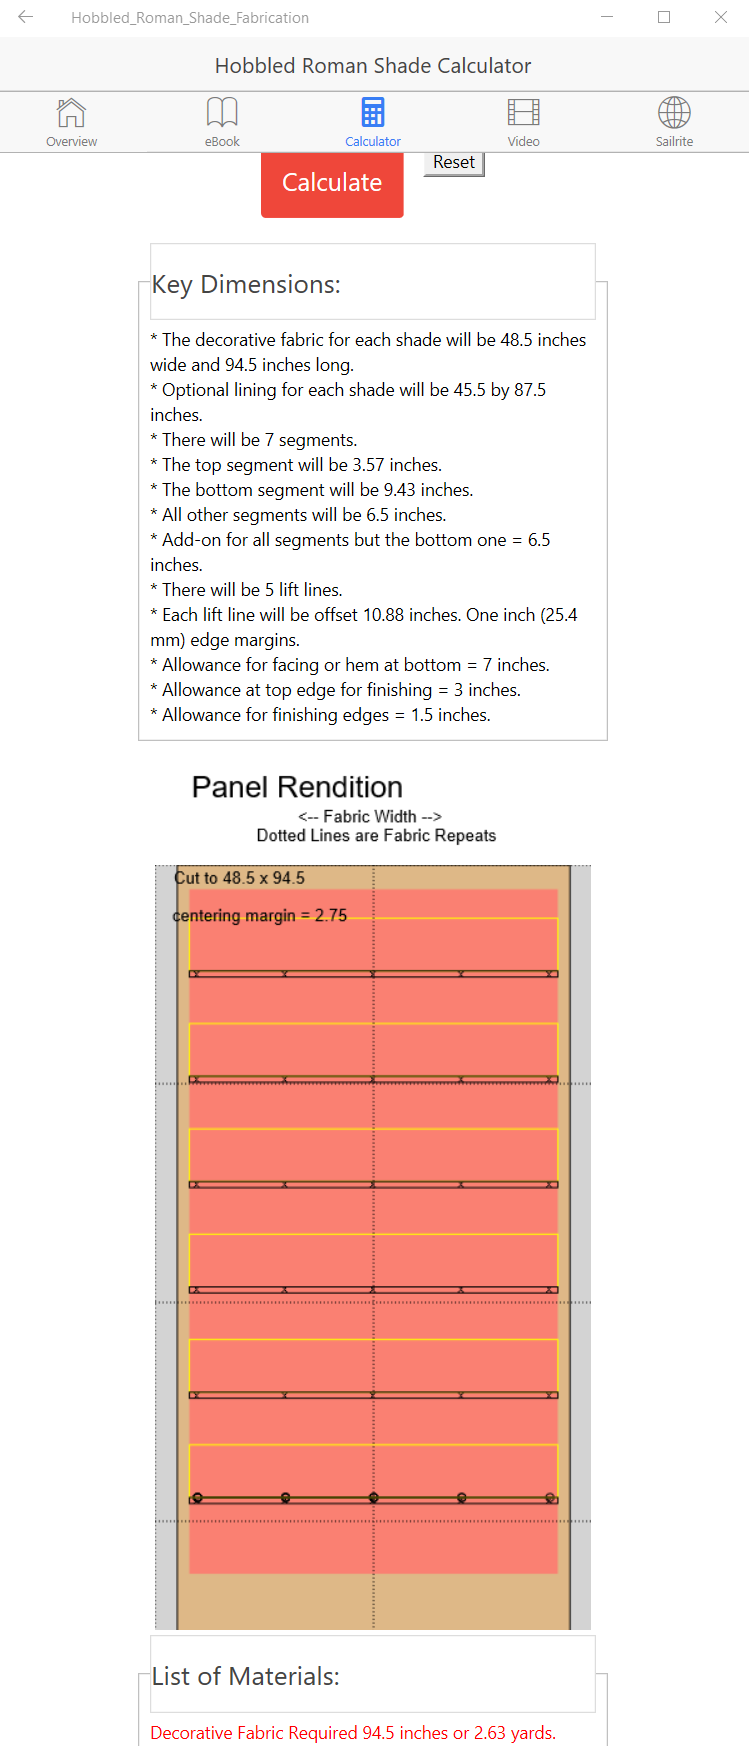
Hit “calculate”. The screen below scrolls into view.
Several things should be noted. First, only 5 rings are included in the material list. The five rings will be used on the bottom rib. Because we are using shroud cord lift lines (lift lines encased in a fabric tube or "shroud"), the shroud itself can be secured where rings would otherwise be secured. The shroud, properly reinforced, will take the place of rings above the first rib. And, by shortening the shroud to just the segment depth we can hobble the shade forcing the add-on to create an attractive fold below each rib.
Second, the shade is centered over the horizontal pattern. The “centering margin” is 2.75 inches. If the fabric does not have a finished selvedge edge (some fabrics include extra fabric beyond the nominal published width), trim or mark it to establish that width before taking the centering measurement.
Third, the length and width dimensions on the rendering include edge allowance as well as head and foot allowance. These add-ons are indicated with a light shade of brown.
Forth, ribs are shown on each segment and listed as recommended in the list of materials. In fact ribs can be eliminated if a softer look is desired. Rib usage is a personal decision. Our choice is to employ them.
Fifth, lining fabric is included in the list of materials but it is optional. We will be using a lining with this shade. We will use the "pillow case" method to secure the lining to the decorative fabric.
Cut the single 94.50 by 48.5 inch panel (2399.7 by 1231.9 mm) that will make this shade. Also cut a single piece of lining 87.5 by 45.5 inches (2221.9 by 1155.7 mm).
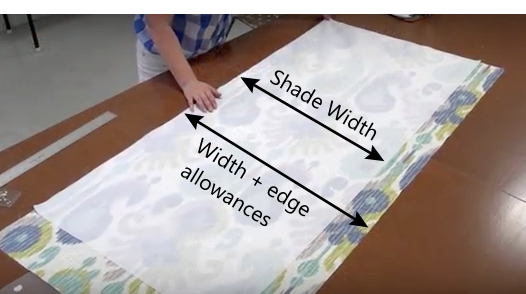
From this cut panel remove a strip of fabric along the bottom. Cut this “facing strip” that will be used to trim and finish the bottom edge of the shade. All shades with segment depth seeds greater than 5 like this one will have a facing strip 6.5 inches (165.1 mm) wide and, of course, 48.5 inches (1231.9 mm) long (the width of our cut panel).
This strip of fabric is light brown at the bottom of the calculator rendition. Make sure that this cut is made perpendicular to the two edges and perfectly straight. Set this strip aside for now.
The Lining Width Will Not Match the Decorative Fabric Width
With the decorative fabric face up, spread the lining (right side down) over it. Sew the lining in place first along one edge with the two layers and the bottom flush. Then smooth the fabric layers together over to the other edge until they are flush and sew. Be careful not to skew the lining as it is attached. Both stitches should be accurately placed 3/4 inch (19.05 mm) inside the edges.
With the decorative fabric still down, fold each seam allowance back against the decorative fabric (so the lining is flat) and iron just that seam allowance. Then pick threads, if any from both sides of the fabric (if threads or other debris are left on the inside of the shade before it is turned right side out they will be forever seen in the light).

The Edge Fold
Turn the shade assembly right side out. Press a double fold of the decorative fabric (the lining will not be folded) along both edges of the shade panel. Make the fold 3/4 inch (19.05 mm) deep over the flattened liner. Rather than risking the visibility of a sew line to hold this hem in place, we like to simply press it with a properly adjusted iron. The stitching at each rib location is generally enough to keep this hem fold flat.
With the fabric right side up, place the facing strip face down centered on the bottom of the shade panel. Baste and sew with a straight stitch across the width of the shade 1/2 inch (12.7 mm) above the aligned bottom edges. This stitch must be straight and 90 degrees to both edges.
Fold and press the two edge allowance flaps at the ends of the facing strip over onto the top of the assembly so that they match the width of the shade. Now fold the facing strip onto the back side of the shade. Press the exposed seam edge on the bottom of the shade so that it is rolled slightly to the back. Turn the assembly so the shade panel is right side down. Fold the top edge of the facing strip under until the strip itself is just 4 inches (101.6 mm) wide.
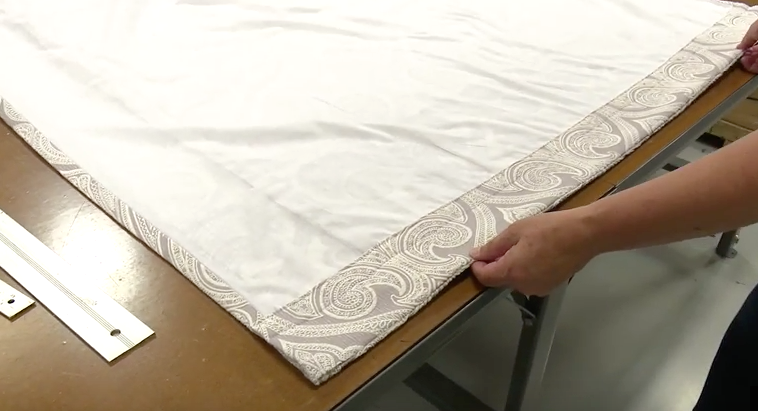
The Finished Facing Strip on the Bottom Backside of the Shade
Press this fold in place with an iron and then run two straight stitches across the width of the shade at the top of the facing strip. One of these stitches should be just inside the fold of fabric and the other 1 inch (25.4 mm) down. The weight rod will be inserted in the pocket of fabric formed by these stitches — it will thus be 3 inches above the bottom of the shade.
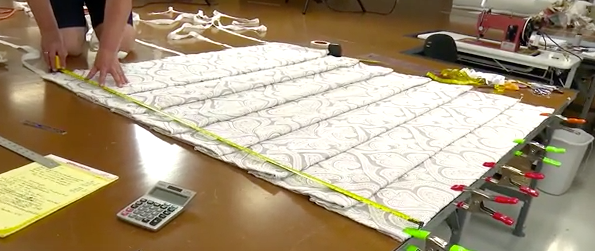
With the shade panel still face down, smooth the lining evenly over the decorative fabric and pin it in place every 12 inches (300 mm) or so. These pins prevent the lining from gathering unevenly as we work with the assembly. Then put down chalk or pencil lines on the lining that represent all the lift lines and all the ribs. The 5 lift lines are at 10-7/8 inch (276 mm) intervals across the width of the shade with 1 inch (26 mm) margins at each edge.
When the vertical lines are in place, proceed to the horizontal ones. Measure from the bottom of the shade up for rib placement. The first rib line is 9-3/8 inches (239 mm) above the bottom edge. The next 5 are 13 inches (323.85 mm) on center — the depth of those segments plus the hobble add-on in each case. And above the fifth rib line place a final line (which will indicate the bottom of the headboard) 10-1/8 inches (256 mm) up — the depth of the top segment and its hobble add-on. There will be roughly 3 inches (76 mm) of extra cloth beyond this final line that is partially used to finish and attach the shade. The rest is safety scrap
This shade will use shroud cord to make 5 lift lines. Divide the total length of recommended cord (38 feet here) by the 5 lengths required. There will be 5 lengths roughly 91 inches (2311 mm) long.
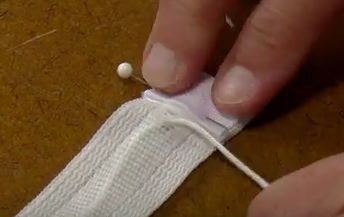
The Grosgrain Ribbon Reinforcement on the Shroud
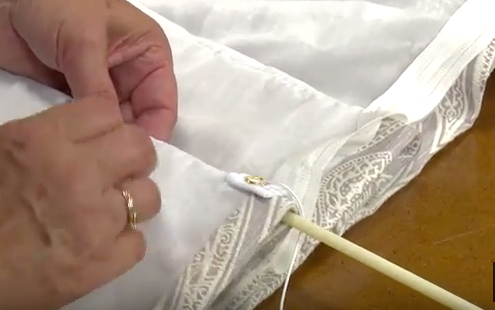
Prepare the bottom of each shroud cord as follows. Pull the cord from the shroud 3 inches (76.2 mm) from the bottom end. Cut the tape so that just 1.5 inches (38.1 mm) remains below the cord exit point. This gives us a clean edge to work with.
Now fold this tape below the cord up to create a 3/4 inch hem. Then reinforce this hem by cutting a 3 inch (76.2 mm) piece of grosgrain ribbon, folding each end to the center and sandwiching the hem on the shroud with it.
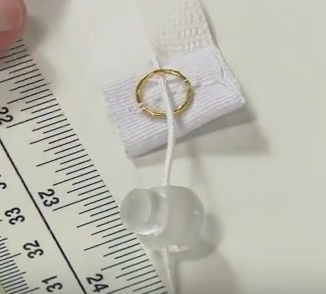
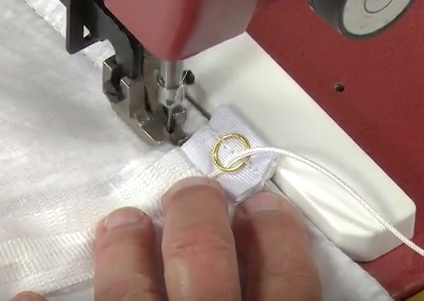
A Bottom Ring with Adjustor Orb
Place a small brass ring on this assembly and sew over it 3 or 4 times with the machine. Run the cord first through the ring and then an adjuster orb. Repeat this process on all of the 5 lift lines.
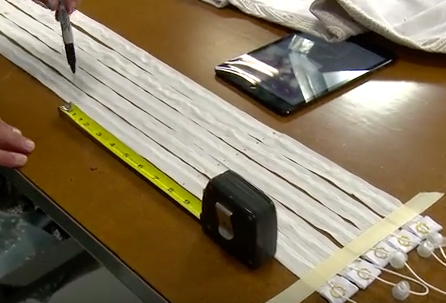
Marking Segment Intervals on the Shroud
Lay all 5 tapes out. The rings at the ends of the tape will eventually be placed on the first chalk line 9.43 inches (239 mm) above the bottom of the shade. Here we will measure up the tape 6.5 inches (239 mm) and place a mark. Repeat this process for each segment less the top one and the bottom one: the number of segments less 2 (5 in our case). In each case, this is the depth of those segments without hobble add-on. Then put a final mark 3.57 inches (91 mm) above the others to define the top segment. Again, these marks are to designate the depth of the segments alone without the add-on that creates the hobble.
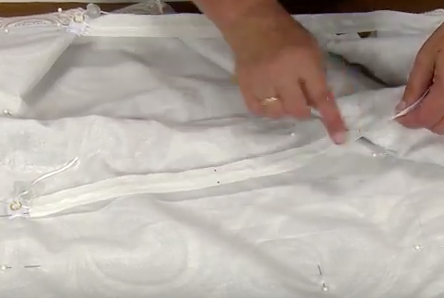
The Cord Mark will be Below the Rib Height
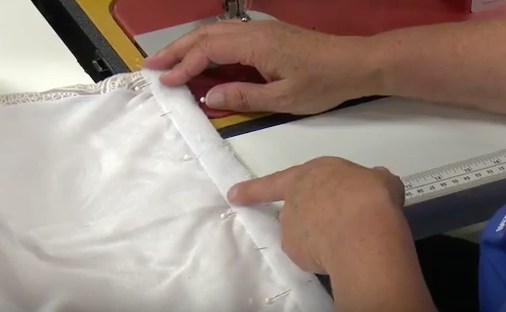
Starting at the rib line 9.43 inches above the bottom edge of the shade, pin the shroud cords in place over the 5 lift line chalk marks. The center of the brass ring should be on that first rib line. Then match the marks on the shroud cords with the rib lines on the lining. Pin it all together. The shrouds will be pinned at each rib line but do NOT attach them at the top of the shade where the headboard line is — they will later be attached directly to the headboard itself.
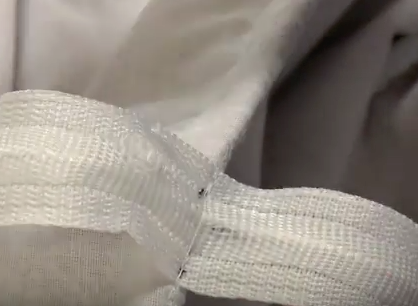
Skip the Shroud Centers from Black Dot to Black Dot -- Reinforce with Grosgrain (Not Shown)
Then spread the shade on its width and run straight stitches from side to side on all 6 of the rib lines. The first stitch at the bottom of the shade should run right through the center of the rings. Be careful here (lift the cords out of the way) and with all the rest NOT to sew the cord lines themselves. This means that you will lift the presser foot and skip over the center portion of all the shrouds on rib lines above the first one. It is a good idea to reinforce the stitches attaching the shroud edges by laying an inch or so of grosgrain ribbon over them as they are sewn.
Measuring for Rib Casings
Lift the Shroud Cord Out of the Way at the Bottom -- Skip Over It Elsewhere
Create a casing for each rib. Place a rib centered under the seam line and insert a pin to hold it snugly in place.
Remove the rib and measure the distance from the seam line to the pin. Fold the shade on each of the rib lines and run a row of straight stitches just that distance from the fold. Be careful to avoid stitching the lift lines or their shrouds — move them out of the way at the bottom and skip over them elsewhere.
The ribs should be 1/2 inch (12.7 mm) less than the width of the shade or 45 inches (1143 mm) here. Once the ribs are inserted, sew the rib casings shut with needle and thread by hand.
Final Length Measurement
The top hobble will not be sewn in place at this point. Fold it over the segment just below so that it matches all the folds below — the marks at the top of the shroud cord should match up with the line at the top of the shade when this fold is in place. Measure the height of the shade to this point. It should be 45.5 inches (1155.7 mm).
Add the thickness of the front edge of the headboard (3/4 inch here) to the finished height of the shade, put down another chalk line and cut on that line (do NOT cut the cords — push them out of the way).
Velcro Tape Pinned in Place at the Top of the Shade
Fold the decorative fabric with the lining underneath on the chalk line over onto the back of the shade. Place either the hook or the loop side of the Velcro tape under this hem and pin everything in place. Sew with straight stitches along both edges and the ends of the tape. Again, keep all the cords out from under the machine as these stitches are applied.
Prepare a headboard 45 inches long. Cover it with a scrap of material and staple it in place just as though it were gift wrapped (if scrap is not available, any fabric can be used or the board can be left bare — it will not be visible). Staple the tape mate for the Velcro strip that was sewn to the top of the shade to the front edge of the headboard.

Stape the Shroud to the Headboard Bottom and Install Screw Eyes
Pull the lift cords out from inside their shrouds at the point where they will be secured to the headboard. Leave the cord intact but cut the shroud so that there is just 3 inches (76.2 mm) of shroud beyond the cord exit point.
Fold the 3 inches over until there are 4 layers about 3/4 inch (19.05 mm) beyond the cord. Staple this so the black dots on the shroud are centered on the bottom edge of the headboard. Put a screw eye in the center of the stapled shroud. Repeat this process for all 5 lift lines at appropriate intervals across the width of the headboard.
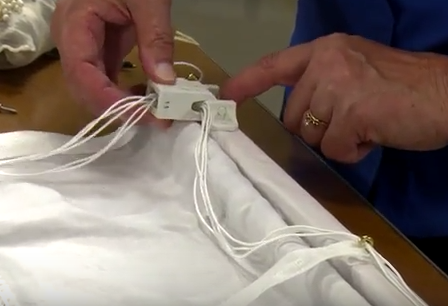
Installing the Cord Lock
Thread all cords through the screw eyes at their head and all the eyes to the right (or the left if it is preferred that the lift lines be worked from that side). Insert the lines into a small cord lock and screw it in place just 1 inch or so (25.4 mm) inside the screw eye on the selected side. Dress the ends of the cords by using a condenser and a tassel if desired.
Cut a brass weight bar with a hack saw so that it is 1.5 inches (38.1 mm) shorter than the shade width. Insert it between the two stitch lines in the facing strip at the bottom of the shade. Close the ends of the pocket with needle and thread by hand.
Detach the Velcro from the headboard. The shade will remain attached to the headboard by the lift lines, but it will now be easier to use screws to secure the headboard in place. Once this is accomplished, reattach the Velcro. The hobbled shade is now complete.